
PhotoGenetics 2.0 |
01/08/2002 - READER NOTICE: This software has been discontinued by the manufacturer.
Product Overview
What It Is
QBeo's PhotoGenetics 2.0 is a unique variation among the many sophisticated
(and not so sophisticated) image editing programs currently on the market. A
recent upgrade to the original PhotoGenetics software (previously reviewed
by Imaging Resource), PhotoGenetics 2.0 performs a variety of image editing
operations in a greatly simplified manner -- sort of an "Image
Editing for Dummies" application. Borrowing terms from the genetics field,
PhotoGenetics uses "Genotypes" to represent filter effects, and employs
an "Evolution" function to make progressive improvements to photographs.
This very basic "image fixing" program is not intended to compete
with Adobe Photoshop or other high-end imaging programs, at a minimal price
of only $29.95 for the online download and $39.95 for a CD-ROM version (with
some expanded features), we see PhotoGenetics 2.0 as a very inexpensive "upgrade"
to your digital camera.
What It Does
Based on QBeo's proprietary ImageOp technology, the PhotoGenetics Evolution
function displays side-by-side previews of suggested improvements to an image,
and then allows users to choose their preferred level of adjustment -- from
"no change" to "change completely" -- based on the software's
suggestions. These changes include basic image editing adjustments such as color
temperature, contrast, saturation, and brightness. The beauty of the program
is that it guides you through each step of the Evolution process without ever
revealing the specific adjustments the software is making. You don't have to
know, or worry, about complicated technical terms like gradients, curves, gamma,
or color balance, to get great results. PhotoGenetics also provides easy-to-use
batch processing and printing capabilities, plus rudimentary printer calibration.
The real power of PhotoGenetics for digital camera owners lies in its batch
processing capability: It's easy to develop a few standard "Genotypes"
matched to various standard shooting conditions (outdoor sun, outdoor cloudy,
indoor without flash, etc.) and then automatically apply them to all your shots.
With just a few mouse clicks, you can auto-correct dozens of images at a time.
PhotoGenetics is so effective at correcting the minor (or even major) color
and tonal problems we see in virtually all the digicams we test, that we've
come to refer to it as "The $30 camera upgrade." If you use a digital
camera with any frequency, PhotoGenetics is likely to be the best $30 you could
spend.
Who It's For
PhotoGenetics was created for casual photographers who want to "fix"
their images without having to learn a complicated imaging program. It's perfect
for those users who don't know anything about graphic design or digital imaging,
and frankly, don't want to know. Developed by QBeo Inc. (formerly Q-Research),
PhotoGenetics is designed to help people "enjoy and share their memories
through pictures." Even experienced users will find PhotoGenetics useful
though, given how quickly it can correct large numbers of images. Even if you're
highly experienced in Photoshop(tm) or other high-end image editing programs,
a quick pass through PhotoGenetics first could save you many minutes of work
on every image.
System Requirements
Windows:
- Windows 95/98/NT 4.0/2000
- Intel Pentium processor
- 133 MHz or better
- 16MB or more RAM
- 65-thousand colors (16-bit) or better display
Macintosh:
- Mac OS 7.1 or higher
- PowerPC (includes iMacs)
- 133 MHz or better
- 16MB or more RAM
- 65-thousand colors (16-bit) or better display
Getting Started
Installation of our evaluation copy of PhotoGenetics 2.0 was quick and hassle-free. We chose the "Easy Install," which loaded the standard application setup on our iMac with no trouble (installation was just as smooth on a Windows 98 system we tested). We only had to supply the registration code to complete the setup. Our evaluation copy didn't come with an instruction manual, but the QBeo website offers a full tutorial that covers all the bases. Plus, this software is so straightforward that we doubt you'll even need a manual, once you know the basic layout of the program.
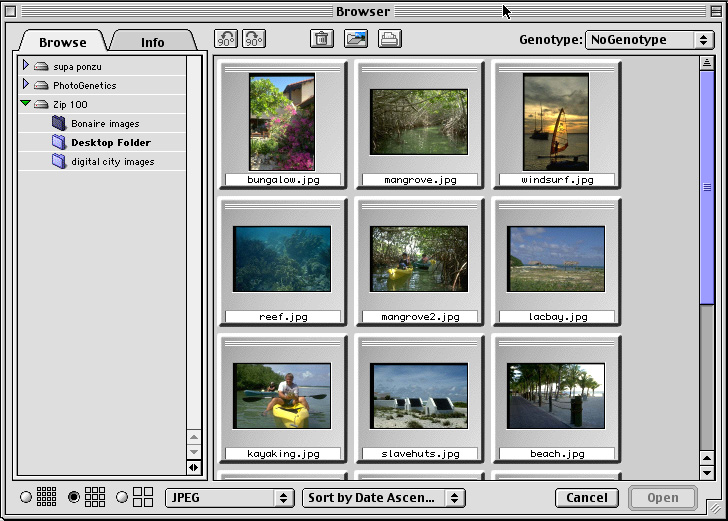
PhotoGenetics 2.0 features a built-in Image Browser that displays a file directory tree on the left side, and an index view of the images in the selected folder on the right. You can go through the File menu in the tool bar and select Open Image Browser, or click on the Open File button on the far left side of the icon toolbar to display the browser window. As you can see in the first illustration, setup is similar to Windows Explorer, so Windows users should feel right at home. (Even the Macintosh version is set up the same way, though the directory tree uses arrows instead of plus and minus signs to open and close folders.) The browser can access images on any drive or disk, as well as pull images from TWAIN devices such as digital cameras.
Across the bottom of the browser window are three layout options for the index thumbnail display, with two, three, or four images displayed in a row. You can choose which file types to show -- TIFF, JPEG, Photoshop, PICT or All Images -- and sort them by Date or Name, and in Ascending or Descending order. (In Windows, these options are at the top of the Browser interface, but it uses the same icons as the Mac version).

You can view the file information for any image by clicking on the preview icon once to highlight the image, and then click on the "Info" tab next to "Browse" at the top of the Browser window. This displays the file size, type, and color information of the individual picture, as well as the date and time the image was last altered. More advanced features of the browser window include the ability to rotate the preview 90 degrees left or right, delete images, select and process Images, make multiple prints, and assign Genotypes. (We'll discuss Genotypes in more detail later.) Holding down the Shift key allows you to select or highlight multiple images in the folder, and clicking on the "Open" button closes the browser window and opens the selected image or images for manipulation or "Evolution."
Software Features
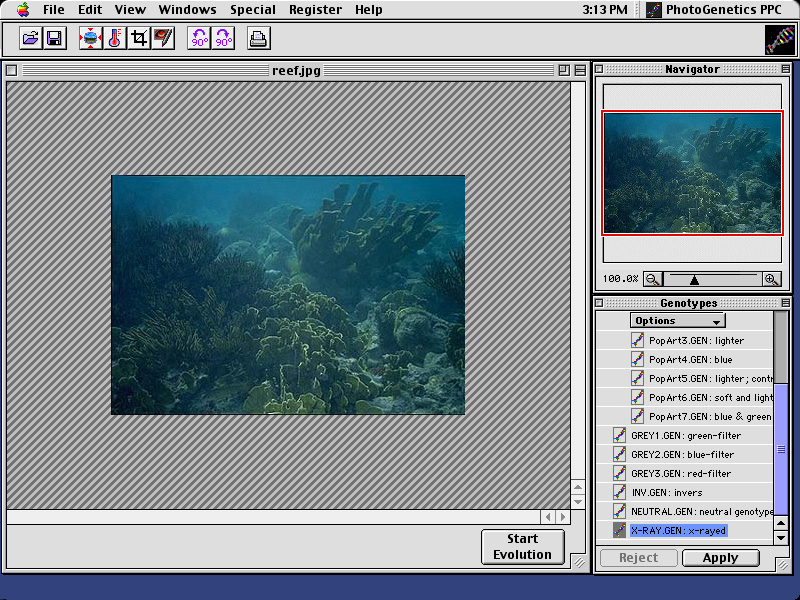
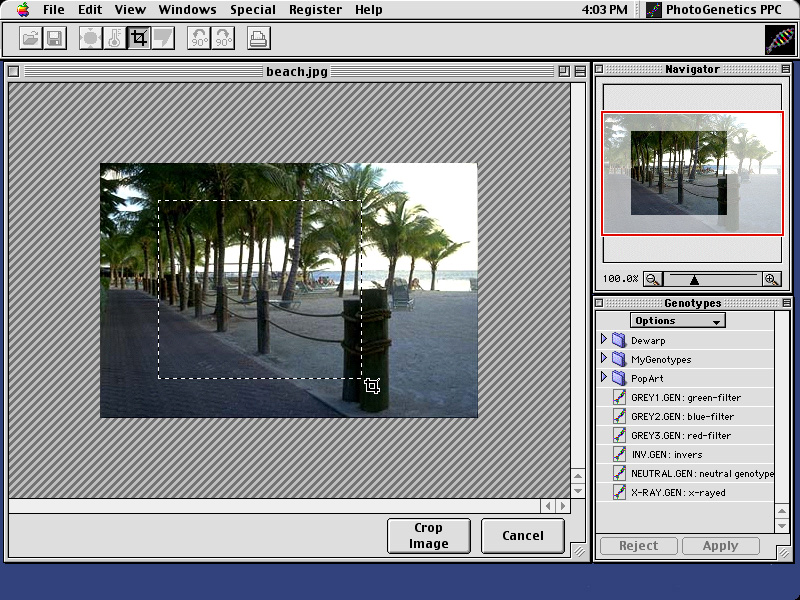
When a selected image is opened, it's displayed in an adjustment window, with two separate tool windows nearby (Navigator and Genotypes). The Navigator window allows you to zoom in and out of an image by clicking on the plus or minus signs at the bottom of the window, or by using the slider bar in between to adjust the amount of enlargement or reduction. A red frame indicates what area of the image is currently being displayed in the main window -- whether it's full frame or a smaller selection.
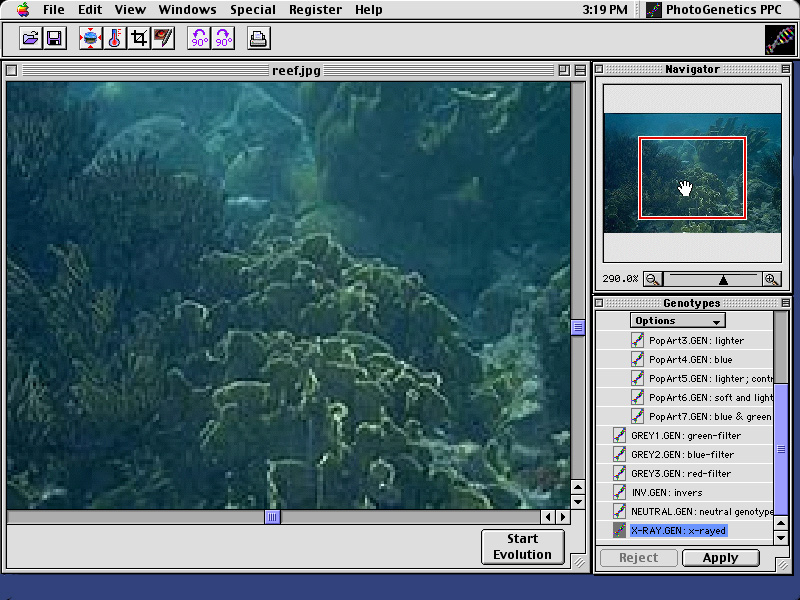
Once you enlarge a portion of the image, you can click inside the red frame with a "move" (hand) tool, and drag the frame to any section of the image you want displayed in the main window.
Image Evolution
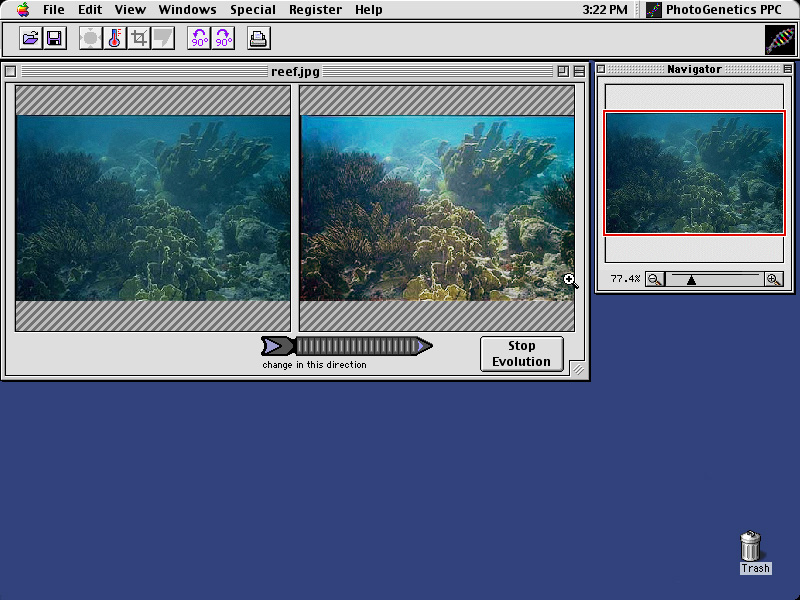
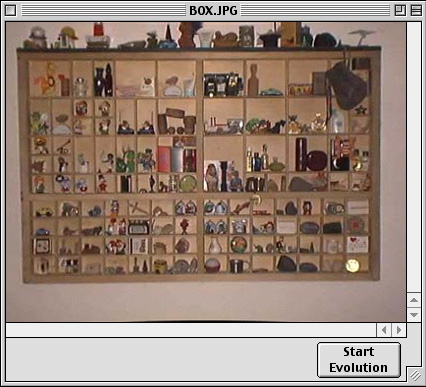
PhotoGenetics' primary enhancement function, called image "Evolution," is based on QBeo's ImageOp technology. To begin the Evolution process, simply click on the Start Evolution button at the bottom of the main image window. The screen displays the current, unedited version of the image on the left, and a modified version on the right. This modified version reflects what PhotoGenetics 2.0 determines to be the best first adjustment of the image. A clickable arrow bar, called an "evaluator," appears below the image, allowing you to control the degree of adjustment. As you slide the cursor over the arrow bar, a message at the bottom reads, "don't change," "change just a little bit," "change a little," "change a lot," and "change completely." (This is a more direct naming format than the original software, which read "Not Better or Worse," "a little better," and "a lot better.")
Once you've chosen the adjustment level you feel comfortable with, simply click on the corresponding section of the arrow to initiate the change. The righthand image will merge into the original on the left, to reflect the resulting adjustment. Immediately, a new adjustment image appears in the right screen. If you don't like Evolution's suggested adjustment, you simply click on the red "don't change" area of the arrow bar, and the software trashes the suggestion (that doesn't mean you won't see it again in a later Evolution of the same image).
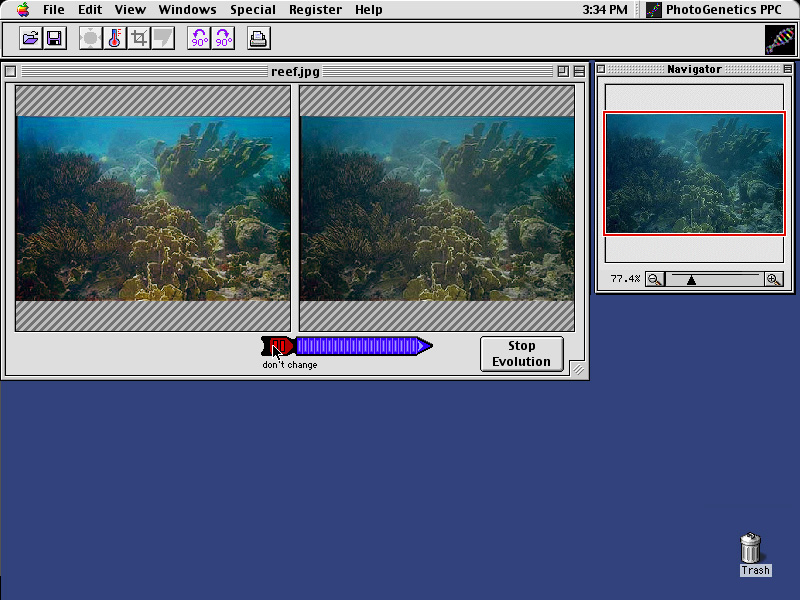
The Evolution process continues to cycle through a series of image adjustments, encompassing basic editing commands such as color levels, lightness, darkness, saturation, and contrast. True to its design, the software never tells you "what" it is doing, it just shows you another variation of the image. So if you have enough image editing experience to know you want to increase the contrast, you're out of luck until the program randomly selects that stage of the Evolution, and even then, it may be difficult to recognize. It does, however, always give you an option of making the image lighter or darker when you apply any Evolution adjustment. You'll see it when you click and hold down the mouse on the part of the arrow bar you've selected. For example, it may say "change a little," with the additional option of selecting "and brighter (or darker)." When you've finished making the adjustments, just click on the Stop Evolution button to end the adjustment process.
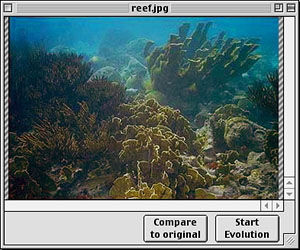
At the bottom of the "evolved" image you'll see two choices: "Compare to original" brings up the original image and lets you view it side-by-side with the adjusted image. "Start Evolution" begins the process all over again, but starts with the evolved image, rather than the original. If you decide to keep the adjustments that the Evolution process made, we suggest that you select "Save As . . ." under the File menu. If you select "Save," it will overwrite your original image; if you choose Save As, and change the file name slightly (like adding a number after the name), then you can always go back to your original image if you want to.
Genotypes
Genotypes work much like filters in other imaging applications,
by applying a specific effect to the entire image. For example, the X-Ray
genotype applies a negative effect, and the Pop Art Genotypes offer a variety
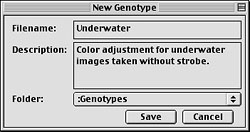
of extreme or creative color adjustments. You can also save a particular set
of your own image adjustments as a Genotype, so they can be applied to other
images later on, either as a batch process or individually. After you've completed
the Evolution process above, and you decide that you can apply the same adjustments
to similar images, you simply select "Save Genotype" under the File
menu. It will automatically save the image to the "My Genotypes"
folder in the Genotypes window (located under the Navigator box on the right
side of your screen). Genotypes are the real magic of PhotoGenetics, because
they let you easily save even very complex image adjustments for later recall
with just a mouse click or two.
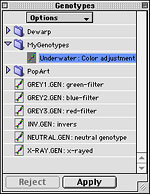
The Genotypes window is where you'll find all of the available Genotypes and
Genotypes folders listed. If you click on the Options tab in the Genotypes
window, you'll see several file management options, such as Reset Genotypes,
New Folder, Rename Folder, and Delete Folder, if you've highlighted one of
the folders in the box, and Reset Genotypes, New Folder, Rename Genotype,
and Delete Genotype, if you've highlighted a single Genotype.
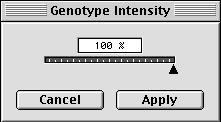
Under the Special pull-down menu at the top of the page, PhotoGenetics allows you to tweak the intensity of a Genotype effect by selecting the "Set Genotype Intensity" option. This option works on images that you've put through the Evolution process, as well as those to which you've applied preset Genotypes.
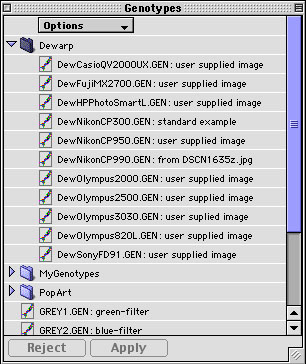
In addition to the creative and color adjustments, PhotoGenetics provides a series of Dewarping Genotypes that are designed to correct lens distortions inherent with different brands of digital cameras. Inside the Dewarp folder in the Genotypes Options preview is a list of digital cameras, each of which has specific distortion corrections already programmed into the software. If your digital camera model does not appear in the list, check the QBeo website for a downloadable plug-in http://www.qbeo.com. Below is an example of a barrel distortion correction provided by the software manufacturer.


Basic Image Editing Functions
In the main image window, there are several basic image editing tools that are available outside of the Evolution or Genotype processes. The icon toolbar across the top of the screen offers a handful of adjustment shortcuts, including a Dewarp adjustment, Crop tool, Adjust color temperature, and Remove red eyes. The same adjustments are also available in the pull-down Edit menu, along with Start Evolution and Set Image Size options.
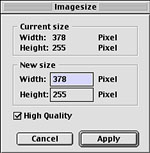
The Set Image Size dialog box allows you to adjust pixel resolution by typing the desired resolution in the "New Size" fields. You can make the image smaller for e-mailing or uploading to a Web site, or you can increase the image size for printing. (You only have to type in one field -- horizontal or vertical -- and the software will automatically adjust the other side.) A High Quality check box in the lower left corner of the box activates an extrapolation algorithm that is designed to improve the quality of all printed images. QBeo claims that enlarging an image may result in better prints, because of the "very refined extrapolation algorithms" that are used to make up for low-resolution digicam files. We were wary of this claim, but found that with very small increases in image size, say 20 percent, there appeared to be some image sharpening and no noticeable degradation of the image. However, if we tried to make a very low-resolution file (640 x 480 pixels) large enough for a good size print (1,600 x 1,200 pixels), the resulting image was noticeably pixelated.
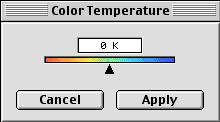
The Adjust Color Temperature option is accessed through the Special pull down menu in the tool bar. The adjustment box includes a rainbow-color slider and a box that reads out the image temperature in degrees Kelvin (-3,000 to +5,000). By moving the slider to the left, you can give the image warm (red) tones, and by moving it to the right, you can adjust the overall color temperature of the image to be a cooler (blue) tone. The adjustments between the two extremes are fine enough that you can make very subtle color corrections.
![]()
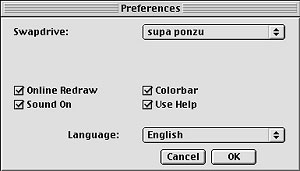
We also found a "Colorbar" check box under the Preferences setting of the File pull-down menu. Once enabled, the color bar (located in the top right corner of the toolbar display) reports the red, green, and blue levels as the mouse slides over the image. We found it a useful tool when comparing images in an Evolution process, as you could quickly look at the levels of the two images. However, given the software's very simple approach to image editing, we doubt that many users would be interested in reading the RGB levels.
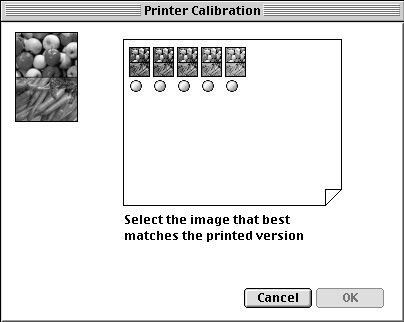
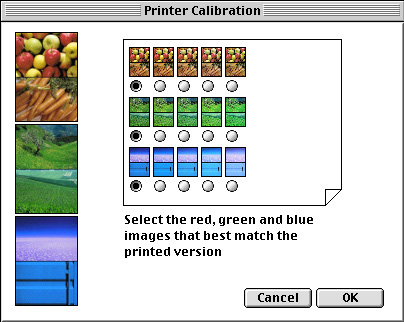
The Printer Calibration tool (under the Edit menu) isn't a true color management system, but it does allow you to adjust print output to your liking. The process starts with a grayscale adjustment, as your printer will print a black-and-white copy of the image in the calibration setup. What you do is compare the printout to the image on the screen, and select the option that most closely matches the print. The same process is used for the color calibration. With this type of color matching, you can establish a calibration setup for each printer you're using by saving the individual calibrations as "Printer Genotypes" (selectable in the Print dialog box).
Batch Conversion and Printing
Among the most valuable features we found in PhotoGenetics are its batch conversion and batch printing features. (In our view, this is really the heart of the program's appeal for digicam owners.) While they're not clearly marked in the software interface, the online manual walks you through both processes, and we found them very simple to figure out (once we knew where to look). Batch processing multiple images is carried out through the Image Browser window. It's a very simple procedure and fully automatic once you get it started.
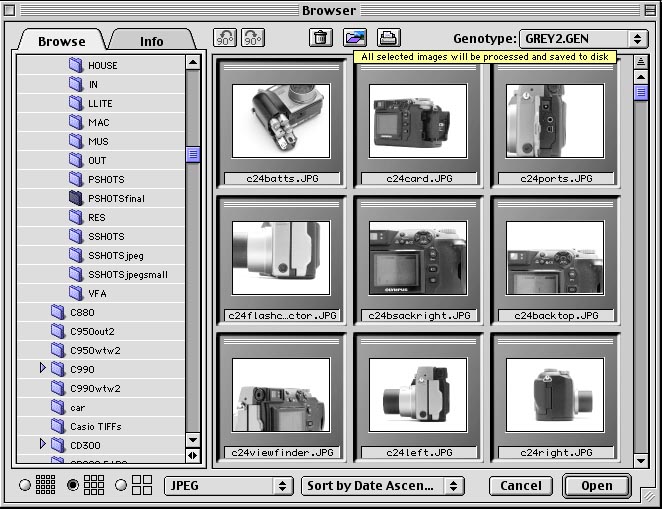
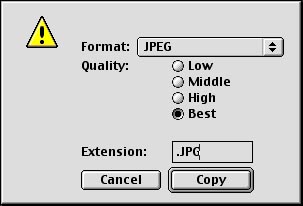
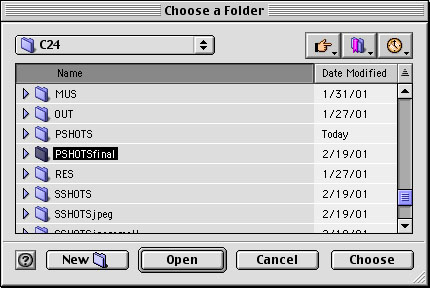
Start by highlighting each image in the browser you want processed. In the upper right corner of the browser window there is a pull-down menu of all the Genotypes stored in your Genotype folder. Choose the Genotype you want to use (it can be one you created) and click on the batch conversion icon at the top of the image browser. (It looks like a picture going into a folder and reads "all images will be processed and saved to disk" when you hold the cursor over top of it.) Selecting this icon will bring up a dialog box which asks you to choose a file format, quality setting (for JPEG images), and a file extension to add to the names of all the processed files. (Note: You have to choose a recognizable file extension such as ".jpg" or ".tiff" to open the file later in PhotoGenetics or other graphics software.) Press the Copy button and you'll be asked to choose a destination folder. Once you've created or selected a folder, press the Choose button, and the automatic conversion begins. PhotoGenetics zips through the process pretty quickly and stores all of the converted files into your destination folder.
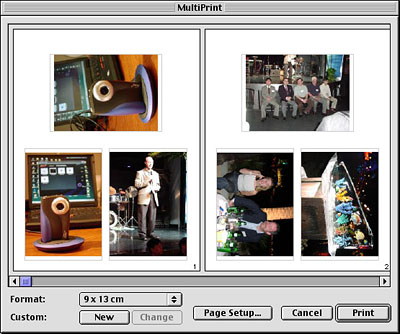
To the right of the batch conversion icon is a Print button. Clicking on it brings up a "MultiPrint" dialog box, which allows you to select the print size, in either inches or centimeters, from a list of standard formats, or to make your own custom size. There's also a Page Setup icon for the printer, and Cancel or Print buttons. Of course, if you use the batch printing function, you must print all of the images at the same size, but this could be a very helpful option for people who want to output standard size prints from their digital cameras on a photo-quality inkjet printer, without having to stand around and wait for each image to finish printing before starting the next.
Performance
PhotoGenetics 2.0 has incorporated several improvements over the original software package, which we reviewed last year (see our PhotoGenetics 1.0 review). For example, the Evolutions interface has changed slightly in that suggestions are no longer made in "batches" of five. Suggested improvements are continuous, as long as you choose to cycle through them, and they are applied immediately to the original image file, rather than being saved up and applied at the end of each batch. The selections on the arrow bar have also changed from the very nondescript choices of "Not Better or Worse," "a little better," and "a lot better," to the more sensible options: "don't change," "change just a little bit," "change a little," "change a lot," and "change completely."
We found that in most cases, the best Evolution adjustments were made in the first few selections offered by the program. (This is confirmed by QBeo's statement that it should only take a few minutes to make a perfect picture.) As soon as you see a version of the photograph you like, you should select it at whatever level you feel comfortable. You may want to go through four or five additional evolutions to see what the program has to offer, but you'll soon find that the software seems to be making suggestions just to give you options, and not necessarily to improve the image. For example, it may cycle through a set of images with a blue cast, then a red, and then green. Or it may give you very light selections with blown-out highlights. Just stick with your instincts and nail the image when you're happy with the results.
Our initial impression of the PhotoGenetics software was that it had very limited features, but it was very good at its intended purpose -- to correct color and tone in photographs without requiring the user to know anything about image manipulation. It's not really suited to editing scanned images, since you can't correct for dust or scratches, or sharpen the image, but its ideal for the digicam owner who wants to get the most out of his or her camera. In fact, one of the advantages of PhotoGenetics is its single-minded application, and its design for the non-expert user. While the new version does not incorporate any major changes or additions to its feature set, the Evolution process appears to be faster and more responsive, and the user interface is improved. It does what it does a little faster and better.
All that said, we feel the real value of the PhotoGenetics software is its ability to batch process. We've observed that almost all digicams have some characteristic color flaws that show up in all their pictures. Likewise, some cameras have a very hard time with incandescent or outdoor lighting, but do so consistently. If users spend the time to develop three or four Genotypes for their cameras, they'll be able to very quickly tweak all their photos and obtain dramatically better results than the camera could generate by itself. (It really is a $30 camera upgrade.) About the only adjustment we found missing was one for noise, which can be a handy tool for cleaning up low light or digitally enlarged images. Still, the red-eye remover and color adjustments take care of some of the most common imaging problems.
Conclusion
PhotoGenetics' simple, straightforward approach to image editing and enhancement should win any consumer who wants the ability to clean up and print their digital images without any hassles or technicalities. The software is easy to use, and you don't have to know anything about digital imaging to make adjustments. PhotoGenetics 2.0 retails for $29.95 as a download and for $39.95 as a CD-ROM. The QBeo Website offers a 30-day trial version, as well as an online demonstration and tutorial. Whether you're a beginner or advanced digital camera user, you owe it to yourself to download and try out this program!
For more information (including an on-line demo of the product),
Visit QBeo's PhotoGenetics Page.