| A word about our scanner testing philosophy: Some publications have taken the position of scanning everything using the scanner's default settings, believing this to be most fair, neutral methodology. The problem with this approach is it may show unacceptable results for an otherwise perfectly usable scanner. (Most users are willing to engage in some tweaking of the scanning parameters to get the best result.) For our part, we believe the most accurate representation of real-world performance is to allow for a reasonable level of twiddling of the scan parameters. In the interest of objectivity though, we also show scans performed with default settings, to provide a completely neutral reference point. Also note that all images here have been JPEG compressed for compatibility with 'web browsers. This will degrade image quality somewhat, but we used a very conservative compression setting ("8" in Photoshop) to minimize this. |
|
|
"Musicians
II" image: (294k) The main image here was scanned at
1278 x 8838 pixels, and minor tonal adjustments were made, using the "curves-levels"
controls. (Cleaning up the shadow tones a little, correcting for the white
point, and brightening the midtones slightly.) Here
(257k) is a version scanned with the Coolscan IV ED's default settings,
which shows somewhat heavy midtones and flatter colors. Even the unaltered
image shows very good color accuracy, tonal range, and saturation though.
(NOTE that this is NOT the identical "Musicians" image
as used in our digital cameras test! It's very similar, but the models
are different, and the digital-camera version is a couple of reproduction
generations removed from this particular version.) |
||
|
|
"Musicians II" detail clip:
(352k) The Coolscan IV ED's 2900 dpi maximum resolution is a bit above the
resolution of the earlier LS-2000 model, but a good bit below the 4000 dpi
of the Super Coolscan 4000 ED. When we reviewed the LS-2000, we'd said that
more than it's 2700 dpi would be wasted on 35mm film, since we felt more
resolution would just increase image noise. We confess that we've changed
our minds on that score, after working with the LS-4000. There's clearly
detail available in most 35mm film that's revealed by a 4000 dpi scanner,
but not seen by a 2700 dpi one. That said though, the Coolscan IV ED is
much sharper than the original LS-2000, and to our eye really gets quite
close to the performance of the Super Coolscan 4000 ED.
Our musicians slide is getting a little grundgy from several years use
now, so you can see some very fine-grained dirt on the image here. Compare
this image (327k), scanned with the Digital ICE
defect-removal feature engaged. The dirt and a few minor scratches completely
disappear, with remarkably little cost in sharpness. This is an excellent
illustration of Digital ICE in a more practical example than with our
heavily-damaged negative film used in the main review. This level of grundge
is pretty typical of what you'd find when dealing with older film in a
production environment. If this were a job for pay, Digital ICE would
have saved us a good 30 minutes or more of careful spotting in Photoshop.
|
||
|
|
Kodak Royal
Gold 25 "House" detail clip: (391k) This is a detail
clip from the same negative used to produce the original "house"
poster for our digital camera tests. (Now superceded by one shot on 4x5
transparency film.) It was shot on Kodak Royal Gold 25 film (sadly, no longer
manufactured), which is extremely fine-grained, but which has very different
color characteristics from most normal color negative films. Most scanners
we've worked with have difficulty with RG 25's color balance, and the Coolscan
IV ED somewhat fell prey to this. The default
scan (257k) wasn't nearly as bad as most scanners seem to do with
this subject though, with color about where it should be, and the tone only
a bit flat. A few tweaks in the Curves control panel extended the tonal
range and cleaned up the shadows a bit, producing this
scan (391k). As you can see though, the emulsion/chemical/dirt flecks
that are present on this film showed up quite strongly. When we engaged
the "Digital ICE" defect-removal software though, they completely
disappeared, as shown in this image (257k),
with very little disturbance to the underlying image. (We can see a slight
softening, as reported by other users, but it's quite minor. The most evident
artifact though, occurs in the slats of the white vent in the gable of the
roof: The dark flecks present on the ICE-processed version aren't present
in the original.) Applying moderate unsharp masking in Photoshop (125%,
0.3 pixel radius) brought out extraordinary detail, as shown
here (405k). We're actually not sure of the purpose of the "fine"
setting for the Digital ICE option on the Coolscan IV ED, but whenever we
engaged it, it didn't really seem to improve anything in the image, instead
just making the image much softer overall, as seen here
(276k). |
||
|
|
"Train" Shot (Extreme
shadow detail): (650k) This slide is an extraordinarily
tough test of scanner dynamic range: The slide contains areas of moderately
bright highlight, but the shadows are exceptionally dense. The Coolscan
IV ED did a very workmanlike job with it though, bringing out quite a bit
of detail in the deep shadows, with impressively low noise for a 12-bit
scanner. In fact, while it didn't find quite as much detail (by a narrow
margin), its noise level was very much on a par with that of the Super Coolscan
4000 ED. The autoexposure setting produced this
image (650k), which was very dark. A good bit of fiddling with the
Curves controls produced this result, which we were pretty happy with. There's
a noticeable reddish cast that was difficult to eliminate with the scanner
software alone. (We frequently find that extreme tonal adjustments like
this result in hard-to-control color casts while working from the scanner
software, simply because even very tiny adjustments in the individual color
channels produce radical changes in the output.) A few quick tweaks in Photoshop
produced this image (625k). As noted,
detail is excellent and image noise is very low. Surprisingly, on
the Coolscan IV ED, we found little need to play with the analog gain controls
to achieve the results we did. The default gain setting seemed to be close
to the maximum the scanner could handle without blowing out the strong highlights,
so we left this adjustment alone. |
||
|
|
Q60 Color
Target: (52k) Kodak's "Q60" color target (formally
adopted by the ISO as part of the IT8 color standard) is a good test of
color accuracy and tonal rendition. the main image
(70k) here was scanned with the scanner's "curves" controls adjusted
to produce a neutral grey in the slide's background, more or less matching
the monitor to what we saw in the slide, although going a bit more toward
neutral "by the numbers". The default scan, shown here
(121k), while it does an excellent job of capturing the full tonal range
of the subject, with superior color saturation to boot, is a little dark
and rather warm. The pure white swatch on the grayscale at the bottom of
the target is very light relative to the rest of the image. This tends to
"fool" scanners' autoexposure settings, producing artificially
dark scans, as did the Coolscan IV ED. Some folks on the internet have settled
on using a crop of the woman's face in the upper right-hand corner of this
slide as a reference for detail and resolution. To help with people making
comparisons with scanners we haven't reviewed yet, we offer this
crop (115k) of that area, captured by the Coolscan IV ED at its
maximum 2900 dpi resolution. |
||
|
|
"Davebox"
test target: (190k) This is our official "weirdness of color
negative film" test target. As noted above in the discussion of the
Royal Gold "House" shot though, the Coolscan IV ED does a pretty
decent job of handling oddly color-balanced negative film. Even a scan with
the Coolscan IV's default settings turned out fairly good, as seen here
(186k). The color was a bit washed out and a bit reddish in the shadows,
but a few simple tweaks on the "curves" controls gave us the very
bright, saturated scan we used for our main shot
(190k). |
||
|
|
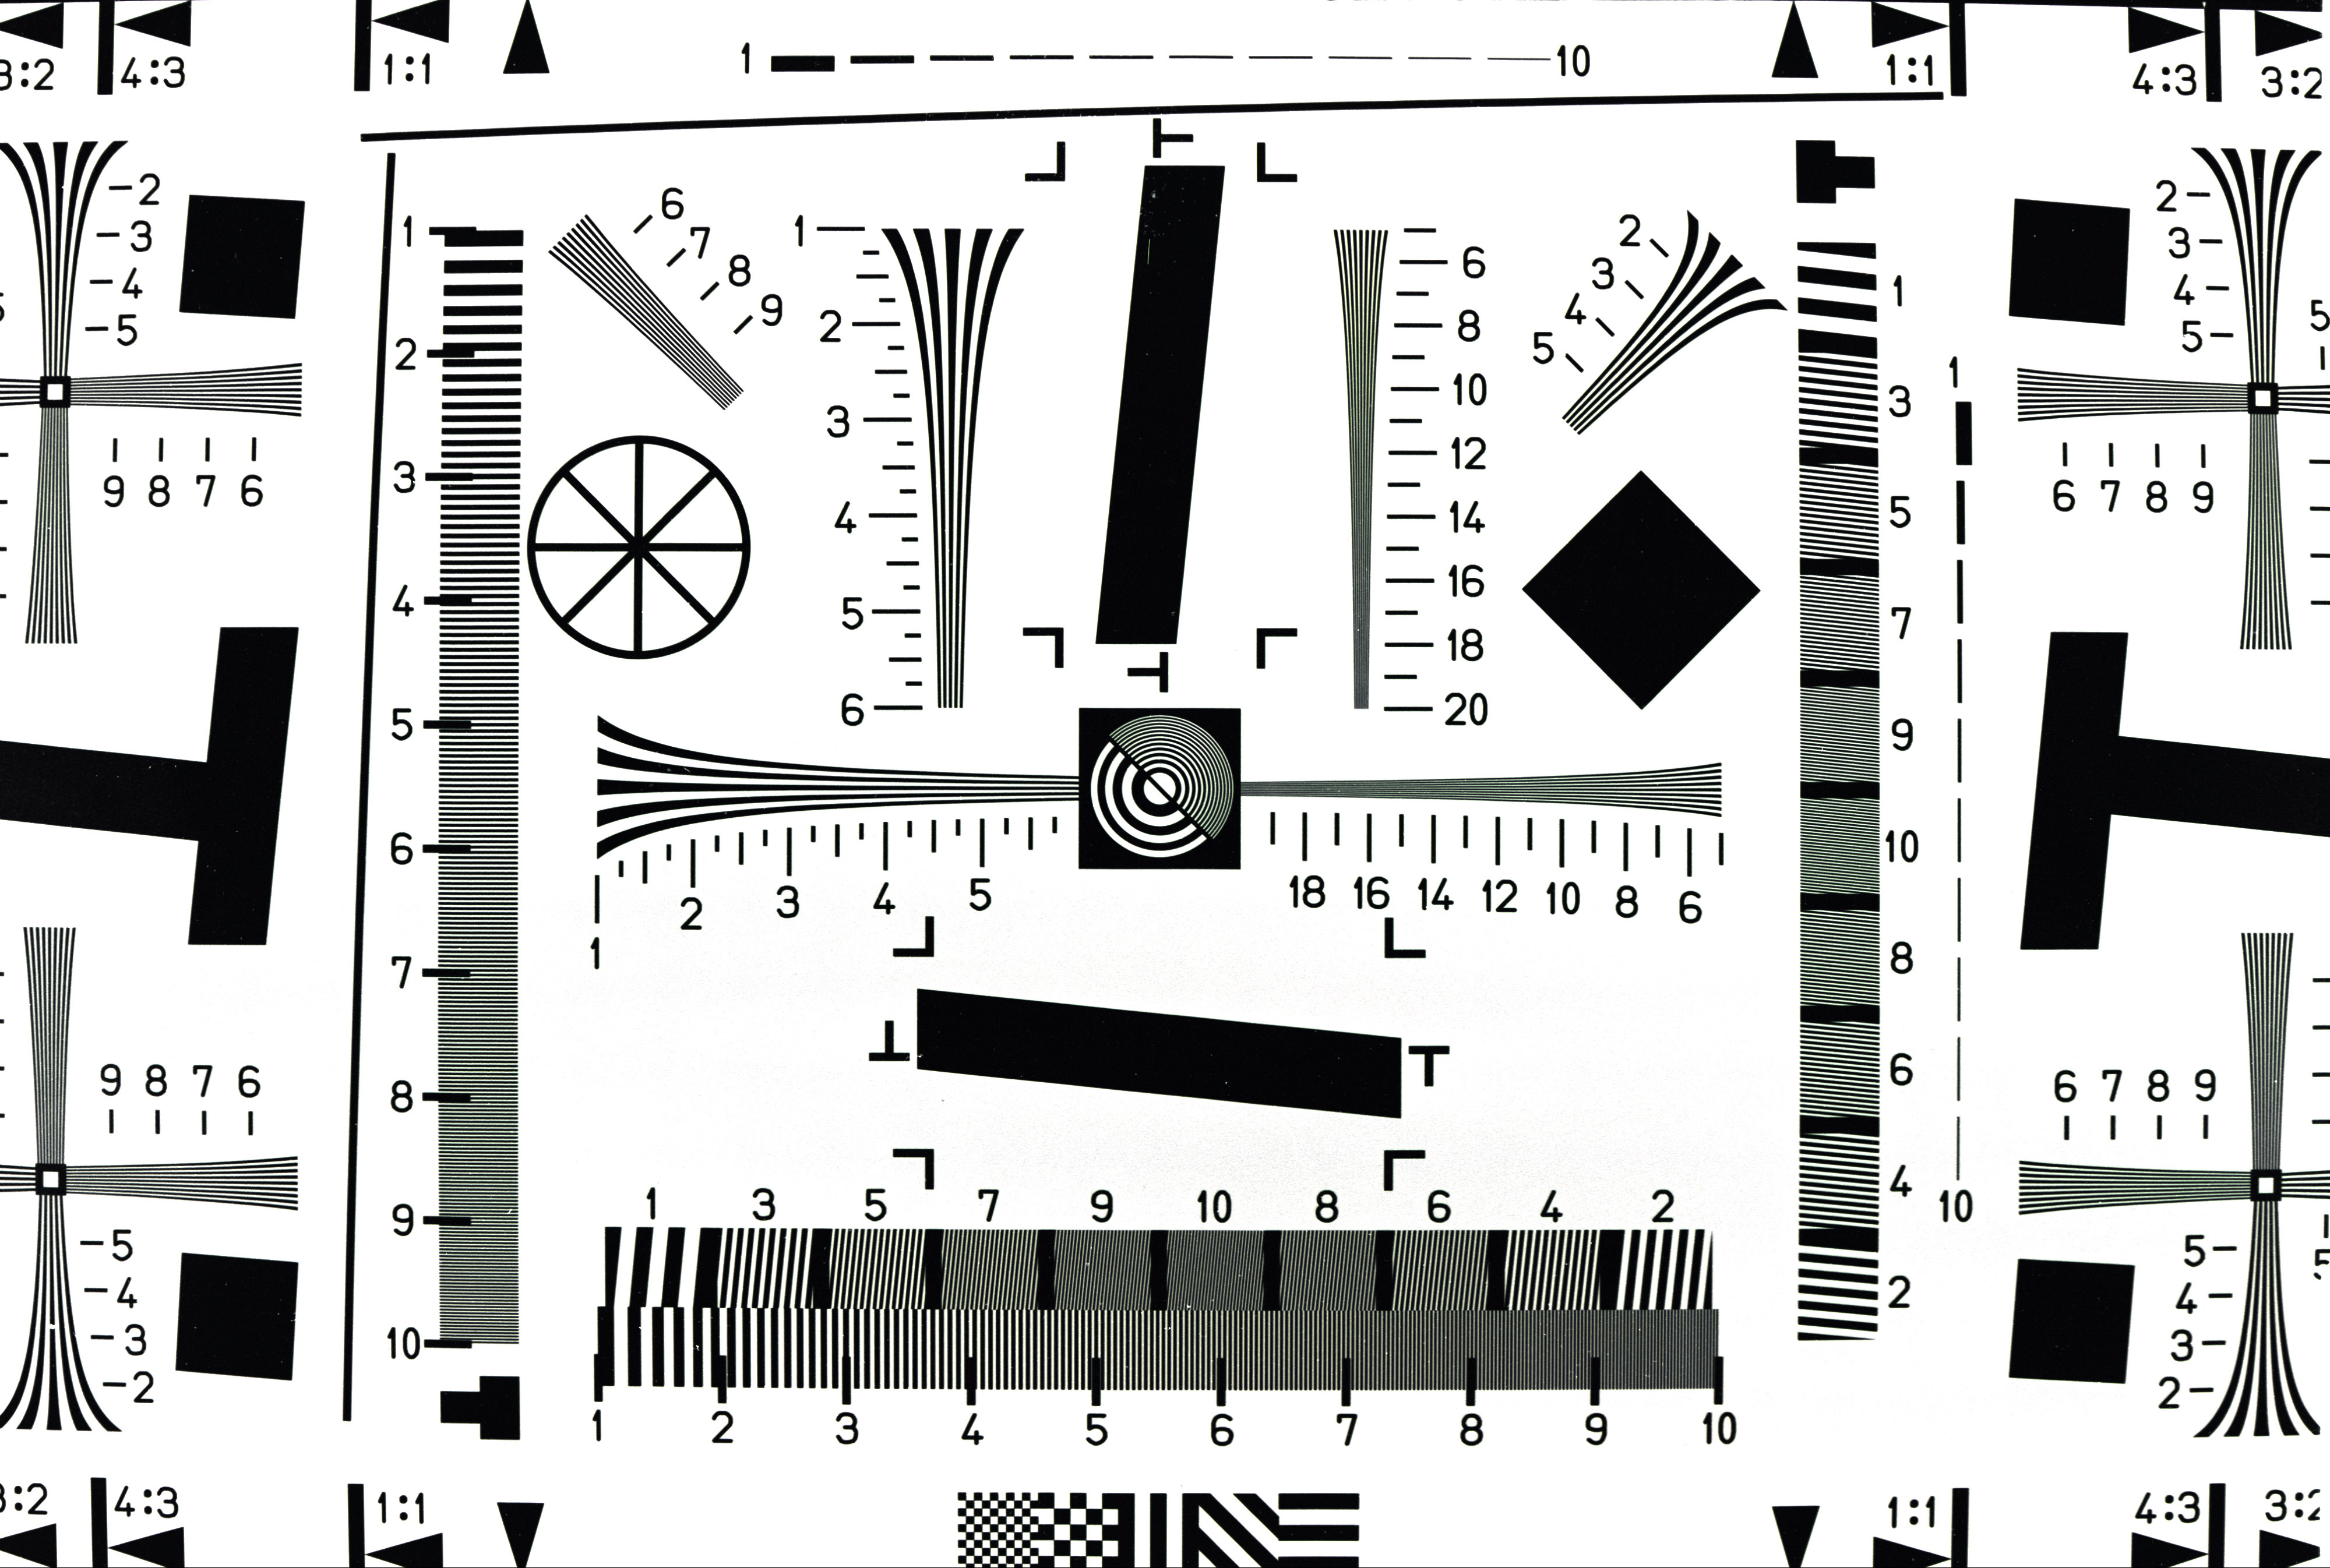
WG-18 Resolution
Target Horizontal Clip: (91k) The full WG-18 resolution target
is very large (see below), so we cropped-out these clips to show the scanner
resolution on this familiar target. These scans were made from a target
shot on Kodak Technical Pan black & white negative film. This film is
extremely fine-grained, with perhaps the highest resolution of any commercially-available
35mm emulsion. The target was shot with a Nikon 50mm, f1.4 lens (a notably
sharp lens), at an aperture of f8. Thus, while not a "laboratory"
grade target, this represents about as much detail as you'll ever see in
a conventional film image. The downside of this target is that the Tech
Pan emulsion is a little "thin," lacking density. It is thus difficult
to set scanners properly to produce adequate contrast to separate the finest
details without losing critical information. The Coolscan IV ED did very
well with this target, producing a very crisp, sharply-focused scan. The
resolution is excellent, with detail clearly discernable to 1600 lines per
picture height before the lines start to smoosh (a technical term ;-) into
each other. By comparison, the Super Coolscan 4000 ED goes to 1800 lines
and beyond. Conclusion? For any but full-on professional work meant to be
printed at poster size, the Coolscan IV ED has plenty of resolution, and
a nice sharp lens. |
||
|
|
WG-18 Resolution
Target Vertical Clip: (84k) Here's the corresponding vertically-oriented
clip of the WG-18/Kodak Tech Pan target.Essentially identical to the horizontal
clip above. |
||
|
NOTE! -> |
Full-Size ISO-12233 ("WG-18")
Resolution Target: (3,324k!) For the real masochists, here's the full-size
ISO-12233 target, scanned at the maximum resolution of 2700 dpi. A side
note: We didn't explicitly set up a test for frame coverage by scanners,
but our ISO-12233 shot goes right to the edges of the 35mm frame, and we
found that the Coolscan IV ED covers all that and then some. For this particular
scan, we were using the separate strip-film holder in the slide scanning
head, so there's some slight cropping evident at the edges.
WARNING: This
JPEG expands into a 31 megabyte file, which will almost certainly
crash your broswer if viewed directly! To view it, you must first download
it directly to your hard drive (right-click in Windows, click & hold
in Mac Netscape), then open it in an image-editing application. here
is the link to the RAW JPEG IMAGE. (No surrounding HTML file.) |
||
|
|
USAF 1951
Resolution Target: (252k) (Elderly technoids only ;-) Old-line lens
and film testers will be well-familiar with the "USAF 1951" resolution
test target. (1951 is the year it was created, giving you an idea of what
we mean when we say "old-line".) This was scanned at the maximum
2900 dpi from a laboratory-grade target (chrome on glass slide) before being
cropped down, and would normally give an excellent view of the scanner's
ultimate capabilities. The last distinguishable feature being group 5, element
6, both horizontally and vertically, at 57 line cycles/mm (1448 line pairs/inch).
The short extent of the USAF pattern targets doesn't permit the sort of
visual interpolation our eyes do naturally on the more extended ISO-12233
pattern. As a result, the USAF target should yield much more conservative
resolution numbers.
BUT... We note that there's a lot of aliasing going on in target elements larger than 5/6 (note 5/1 vertically and 5/2 horizontally). It's thus possible that the 5/6 element just happened to line up right with the scanner pixels to avoid aliasing. We thus don't take the 5/6 element rendition as being definitive here, but it's clear that the Coolscan IV ED has great resolution for a 2900 dpi scanner. This target did give us fits trying to get it properly focused. Since the pattern is on one side of a fairly thick glass slide, it's likely outside the normal focusing range of the scanner. Add to that the refractive tendencies of the glass itself, and you can end up with serious focusing hassles. Fortunately, simply turning the target over in the slide adapter let the scanner autofocus just fine, so we didn't have to resort to manual focusing as we did with the Super Coolscan 4000 ED. (Thank goodness, manual focusing is a pain!) |
Back to Coolscan IV ED Scanner Review