|
|

Review Date: June 1999
 |
|
Affordable "personal" film scanner |
|
|
2400 dpi resolution (24 meg file from 35mm neg!) | |
|
|
Slides, negatives, or prints up to 5x7 in one unit | |
|
|
High-speed USB interface (no card needed!) | |
|
|
Full 36-bit scanning, exceptional color accuracy! | |
EZ Print Link
Readers have requested free-formatted versions of our reviews (without
the graphical accouterments of our page design), to make printing easier. We
are accommodating this request with special copies of each review, formatted
to allow the text flow to be dictated by the browser window. Click here
for a print-optimized page.
Overview
Hewlett Packard (HP for short) is a company that literally needs no introduction in the world of computers and electronics. (But we're going to introduce them here anyway ;-) They've long been associated with imaging of one sort or another, through their broad line of printers and scanners. Recently, they've entered the digital photography market, although with a slightly different focus than many manufacturers: Rather than view digital cameras, scanners, and printers as isolated accessories to home or office computers, they've taken an approach more oriented to users interested in photography for the sake of the pictures themselves. HP's PhotoSmart System is just that, a system intended to bring truly high-quality digital photography to the consumer. In this review, we'll cover the latest model of thier PhotoSmart Scanner, the S20. Other reviews on this site address the PhotoSmart C20 megapixel digital camera, and the PhotoSmart System taken as a whole, including the PhotoSmart printer.
The PhotoSmart S20 scanner is the second in its line, basically representing an update to an earlier unit that was called just the PhotoSmart Scanner. (A review of the earlier unit also appears on this site.) The new model is much more than just an evolutionary upgrade though: While its basic functioning is the same, the new model uses the fast, easy-to-use USB port for much simpler connection to your computer. (The earlier model used an even faster, but much more difficult-to-connect SCSI port, and required adding an ISA-bus card to your computer in order to use it.) Besides the difference in the computer connection though, almost every aspect of the scanner has been upgraded relative to its predecessor. The new model digitizes 12 bits of data for each of the red, green, and blue color channels, up from the previous model's 10 bits. (This increased "bit depth" contributes to better color accuracy and shadow detail.) We also found the software of the new unit to be more functional, and the color fidelity and general image quality much improved over its predecessor.
At the risk of losing the editorial objectivity we strive for here at The Imaging Resource, we have to say at the outset just how much we liked this scanner: As you'll see in our analysis on the pictures page, we were consistently surprised (amazed?) by how good the default scans were, and how little tweaking we needed to do to produce exceptional results. In its price range, this is clearly one of the most capable units currently on the market. The only possible catch is that you'll need USB ports on your computer to use it, which means you'll need a fairly recent motherboard (1997 at the fearliest, preferably 1998), and a machine that shipped with at least the "OSR2" release of Windows 95. (Windows 98 is preferable.)
The PhotoSmart S20 Scanner
The PhotoSmart S20 Scanner (the "S20" for short) represents half of
the input capability of HP's PhotoSmart digital photography system, the other
half being the C30 digital camera. (The prior version of this camera was known
as the C20.) Unless you need to scan photo prints larger than the 5x7 inch capacity
of the S20, you won't need any other input device to bring all your conventionally-photographed
(35mm, anyway) pictures into your computer: The PhotoSmart Scanner handles essentially
any form of 35mm photographic media, scanning images from prints, slides, and
black and white or color negatives. As you'll see in the main body of this review,
it performs these functions admirably, with a very simple-to-operate user interface,
producing really excellent image quality at an exceptional price.
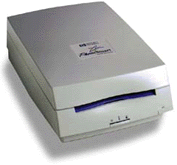
The Basics
The HP PhotoSmart Scanner is a desktop device about the size of a couple of average books stacked atop each other. It measures 3.9 inches tall, 8 inches wide, and 11.6 inches deep (about 10 x 20 x 30 cm), and weighs in at 6 pounds (2.7 kg). Interfacing is via a high-speed USB port, but the scanner is designed to support the Windows operating system (Windows '95 and '98) only: Mac users regrettably must look elsewhere for their scanning solutions. (This is a real shame, particularly since current Macs do support USB.) If you are a Windows user though, you'll find the PhotoSmart Scanner an affordable, highly capable scanning option. Without the benefit of any external adapters or film carriers, the basic S20 unit can scan prints up to 5x7 inches at resolutions of up to 300 dpi, and 35mm slides or negatives at resolutions up to 2400 dpi. (At its maximum 2400 dpi resolution, a 35mm negative ends up as a ~2468 x 3402 pixel, 22.3 megabyte(!) file.) - That's a lot of resolution! (We don't list resolution numbers for APS format here, because the PhotoSmart Scanner does not support APS film.)
While on the topic of resolution, we should clear up some misconceptions about the resolution needed to scan prints. Many flatbed scanners these days have a maximum resolution of 600 or 1200 dpi. Users are often drawn to these devices, thinking that a 1200 dpi scanner will enable them to enlarge their photo prints better than a 600 dpi one will. While high resolution is important for achieving sharp edges when scanning "line art" (text or drawings), anything beyond about 300 dpi is really wasted on photos. This is because, according to most experts, the typical photographic print doesn't have more than about 200 dpi of resolution in it! (Technically, to completely capture all the detail in a 200 dpi print, you'd need a 400 dpi scanner, but in practice, you'd be hard pressed to notice the difference between 300 dpi or 600 dpi scans of most photo prints.) In any event, although we didn't test it explicitly, we found the resolving power of the PhotoSmart Scanner in "print" mode more than adequate for most purposes.
As we've mentioned in other scanner reviews, as high as the resolution of the S20 is, it's even higher than that of a typical digital camera producing a similar file size. This is because the CCD array in the scanner takes separate red, green, and blue measurements for every pixel in the final image. By contrast, the sensors in most digital cameras are "striped" with color filters, so that only one out of every three sensor pixels is assigned to a given color. Thus, while the maximum-size output file from the S20 contains 7.7 million pixels, you'd have to have a digital camera with over 20 million pixels to achieve the same resolution. In fact, it's safe to say that the maximum resolution of the PhotoSmart Scanner is greater than the majority of film/lens combinations you're likely to encounter in conventional photography!
Another important scanner parameter is "bit depth," a measure of both the color accuracy and maximum density range the scanner can recognize. (8 bits is good, and common, 10 bits is better, and high-end units digitize to 12 bits per red, green, and blue channel.) This new version of the PhotoSmart scanner digitizes a full 12 bits per channel, which gives it a good ability to hold detail in shadows on slides.
Film (and Print!) Handling
As we mentioned earlier, the PhotoSmart Scanner handles film, slides, or prints with no additional holders, jigs, or accessories. All the film-handling mechanics are built into the unit itself, and you simply select among the three media types with a front-panel push-button. Pressing a button in the center of the scanner's front panel cycles an LED indicator between icons showing a slide, a strip of film, and a print respectively. When you select a particular media type, the motor whirs, and the front throat of the scanner reconfigures itself to accept the chosen media: For prints, a wide slot is created, which narrows for slides. When you choose "film" mode, a thin aperture is raised into place to guide the film strip into the machine.
For film and slides, there's not much chance of misaligning the media with the scanner: There's pretty much only one way you can get them in, and not a lot of play on either side to allow rotation. This is great for strips of negatives, but film sometimes gets mis-mounted in slide holders. Fortunately, the S20 software lets you rotate the scanned image in small increments (we'd guess the minimum increments are about 1 degree of rotation) across a fairly wide range of adjustment. This worked well for us, and should be more than enough to compensate for most mis-mounted slides. Actually, while a one-degree rotation doesn't sound like much, it's fairly noticeable: We'd have preferred a somewhat smaller increment for making finer adjustments. We'll take what we can get though, and the rotation adjustment via software is a feature we'd like to see in more scanners.
Prints, especially smaller ones, are much more likely to feed slightly crooked, since there's not the same support on their sides as for film or slides. We were always able to correct for any sloppiness in print-feeding with the software rotation control though.![]()
Very small prints (smaller than about 3x5 or so) can be tough to line up, and may not even catch properly in the feed rollers. Likewise, old prints with frayed edges, or images on thin paper (those clipped from magazines, for instance) may have trouble feeding. To handle subjects of this sort, HP includes a carrier jacket with a clear Mylar overlay. This holder provides the needed rigidity for proper feeding, without interfering with the light path to any significant extent.
We found the media handling of the PhotoSmart Scanner to be quite reliable and problem-free. We did encounter an initial problem with our "USAF" resolution target, which is a glass slide. The media-recognition circuitry couldn't detect the edge of the slide (it depends on detecting a change in light transmission), but a call to HP revealed a useful but undocumented calibration feature: If you press the "eject" button with no media inserted, the media-handling system will re-initialize, which includes recalibrating for the proper light level with no media in the track. Once we'd done this, the scanner successfully detected the slide every time. To its great credit, we had very few problems feeding either prints or film strips (or most slides other than our strange glass one), despite some slightly curled negatives that have been problematic when using "clamshell" type film carriers. The only feeding problem we had was with some very thick, glass-windowed slide mounts, which the feed rollers had a hard time gripping. We found though, that applying slight pressure as the scanner was trying to grab these slides got them started: Once they were in the scanner, there were no problems whatever.
System Interface and Included Software
The USB interface of the new PhotoSmart S20 Scanner model makes it tremendously easier to interface than the previous, SCSI-based unit. While it actually wasn't terribly difficult in most cases to add the SCSI card to a computer system, many people are understandably leery of venturing inside their computer's case. Also, there are enough situations where you'll find device conflicts when adding boards to a computer (even in the "Plug and Play" Windows world) that this presented an obstacle to many users.
While USB isn't quite as fast as a SCSI connection, it's still faster than most parallel-port connections (the other option for "easy" connectivity to Windows machines), and its underlying architecture makes installation of new devices a breeze. (This last deserves special comment: We've yet to have an installation problem with a USB device on our Windows '98 machine, a claim that's pretty rare for Windows hardware installations!) One note though: USB wasn't fully supported in Windows until the "B" version of Windows '95. (Also referred to as Service Release 2.) If you have an older Windows '95 machine, you're probably out of luck, even if the motherboard has USB ports, as they really weren't supported properly until the "B" version. Worse, some older motherboards had non-standard implementations of USB that won't work properly, regardless of the version of Windows you're running. Still, if your machine was manufactured any time from mid-1997 on, chances are very good that it includes USB ports on the motherboard, and that the version of Windows that shipped with it will support them.
Once connected, the PhotoSmart Scanner is controlled by an excellent scanning program that we'll describe below. This program can also function as a TWAIN driver for other software packages supporting the TWAIN standard for image import. When operating in TWAIN mode, you have all the normal functions of the scanning software at your disposal, the only difference being that the finished image magically appears back in the originating application, rather than being sent to a disk file, or output on a printer.
In addition to the HP Photo Scanning Software, the S20 package includes Microsoft PictureIt! for manipulating images, and the S20xi software package includes Broderbund PrintShop Organizer. We were disappointed to discover that the new S20 didn't ship with HP's excellent "Photofinishing" software for handling image output. According to a reader, this package is available for download on HP's PhotoSmart website. Follow this link to find the package. The current version on the HP site apparently is intended only for the C20/30 camera, and complains when the camera isn't attached, but our source indicates that it will work with images from the PhotoSmart Scanner as well. (We won't review this package here, since it isn't included with the S20, but we refer readers back to our review of the previous model of the PhotoSmart Scanner, for a fairly in-depth discussion of the Photofinishing application. Note that we also haven't tested this latest version with our eval unit of the S20 Scanner either.)
Scanner Operation and User Interface
Calibration
Actually, before we get into the scanning process itself, it would probably be a good idea to mention calibration. The PhotoSmart Scanner calibrates itself automatically when scanning slides and negatives, but requires a separate calibration procedure for print scanning. The scanner needs to be calibrated when it is first set up, whenever it is moved between computers, or whenever the software indicates calibration is needed, via a message displayed on-screen. To calibrate it, bring up the scanner properties dialog box as described in the scanner documentation, and insert the special calibration print from the back of the user's guide book. The scanner will swallow the calibration print and spit it back out, and the calibration is complete - it's that easy.
On the earlier PhotoSmart scanner, we observed a minor problem with the calibration process, which showed up in very dark areas on some of our standard images. It turned out that light reflections inside the scanner caused the feed rollers to cast shadows on portions of the print under them. In calibration mode, these shadows were interpreted as areas in which black is "blacker" than other regions. The result was that the calibration routine adjusted the shadow brightness up a tad wherever there's a feed roller. On the new S20 model, we didn't observe this effect at all, in any of our tests. We mention it though, because we've had at least one email from a reader who experienced this problem with the new unit as well. Even when it occurs though, the effect is fairly subtle. Overall, this is a fairly minor problem, but we wanted to relate our earlier experience, in case some PhotoSmart Scanner owner with a lot of very dark photos was tearing his/her hair trying to figure out where the streaks were coming from.
Overview
All scanning operations on the S20 begin by selecting a media type (using the front-panel button mentioned earlier), and inserting the film, slide, or print into the front of the scanner. The earlier SCSI-based scanner would automatically start the software whenever a slide or photo was inserted: In the current version, it's up to you to launch the program when needed.
Once the scanning software is launched, you'll see a control panel like that shown below. A small thumbnail (or thumbnails, plural, in the case of a strip of film) shows the image(s) that have been preview-scanned. From the thumbnail screen, you can rotate the image in 90-degree increments, to orient it properly, set the media type from a menu of 6 different options, or double-click on it to open a larger preview image, and adjust the scanning parameters for that particular photo. (As we'll discuss later, the S20 supports a much broader range of film types than the previous model.) After setting scanning controls for a photo, you'll return to this screen to initiate the actual scan itself. You can assign file names to individual photos by clicking on the file-name caption under each thumbnail, and entering a new name. This screen is also where you set the basic scanning resolution to use for the images. (As we'll see later, you can scale images up or down from the base resolution, but this is where you set the initial DPI or dots per inch.)
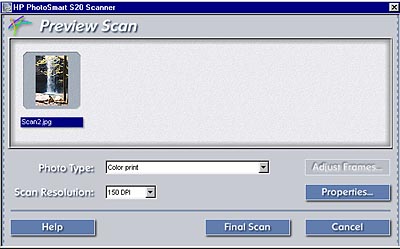 The PhotoSmart "Preview" screen: Set print/film type, basic scan resolution, and rotate your photos to orient them. |
Focusing (not)
Given the exceptional resolution of slide/film scanners, focus is generally an important issue. Some scanners focus their optics automatically, while others require the user to do so, generally with the help of some feedback from the scanning software. Not so the PhotoSmart! We were quite surprised at how sharp the images from the scanner were, given that its optics are "focus free." That is, there's no focus adjustment at all: The lens system is designed to have enough depth of field to properly focus regardless of the exact location of the film. That said, the designers did make some assumptions about where the film would be, based on the construction of the transport mechanism, and typical slide-mount dimensions. As it turns out, our glass resolution target may be a bit outside the normal range of the scanner's sharp-focus area, since the image is on an outer surface, rather than being located roughly in the middle of the thickness of a typical slide mount. We noticed we got better results when the pattern on the test target was facing down, rather than up, but the resolution was quite good in either position, and the new S20 appeared to fare better in this respect than the earlier version. Bottom line, for normal film or slides, we can't imagine anyone having focus-related problems.
The Image Adjustments Screen
The earlier PhotoSmart software was organized pretty much step-by-step, in that it tended to lead you through the scanning process in a series of fixed steps: You could elect to vary the order yourself, but the software was plainly set up to support a specific work flow. The new PhotoSmart software encourages a more "random access" approach to the scanning process, as shown in the screen shot of the Image Adjustments window, shown below. Changes made with the various controls appear automatically in the preview image shown in this screen.
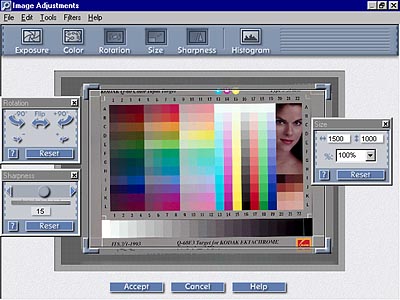 The image adjustments screen is where you'll do most of your image-tweaking in the PhotoSmart scanning software. |
The screen shot shows several optional control/adjustment windows open: These are activated by clicking on the appropriate icon across the top of the screen. From left to right, these icons provide the opportunity to adjust Exposure, Color, Rotation, Size, Sharpness, or view a Histogram of the photo's brightness values. In general, you'll do best to make Exposure adjustments first (that is, before those for Color), and the Histogram window is a significant help in doing so. Other than this minor sequencing though, you can really make adjustments and corrections in any order you like. You can also save combinations of adjustments as "Filters", which we'll discuss below.
Exposure
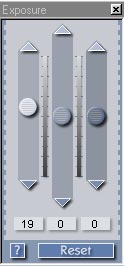 As mentioned above, the Exposure control (shown at right) is the first tool you should use in adjusting a problematic image. The reason for this is that adjustments in the exposure, (tonal range), of an image can significantly affect the color balance, by changing the "saturation" or intensity of colors. In addition to the ubiquitous "reset to defaults" and "help" buttons, the three slider controls here adjust "midtones" (actually, overall exposure), highlights, and shadows separately. The manual advises to make adjustments with the "midtones" slider first, as it affects highlights and shadows as well. We found this to be good advice indeed, as the effect of the midtone slider was pretty profound, dramatically affecting the overall exposure. The highlight and shadow sliders on the other hand, are fairly limited in the range of tonal values they affect. That is, the highlight slider only affects very light portions the image, and the shadow slider only affects very dark areas. In practice, we found that making extreme adjustments with the highlight/shadow sliders could result in noticeable "tone breaks," where the effect of the slider abruptly cut off as the tonal values in the original image passed beyond the range of the control.
Overall, we were very surprised by how good a job the default exposure settings did at maximizing the tonal range of scanned images, and thereby the overall image quality. For most normally-exposed slides and negatives, we had to make no exposure adjustments at all! (This is extremely rare, based on our experience in testing a wide range of different scanners.)
Histogram
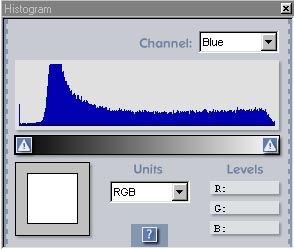 In some of our other reviews, we've made a big point of the usefulness of histogram displays for adjusting tonal values in scans and other digital images. The concept of a histogram (see the screen shot at right) is quite simple, but may take a little getting used to upon first contact. Histograms are just graphical representations of the distribution of brightness values in an image: There are 255 graph "bins", running from 0 at the left to 255 at the right. To build the graph, the computer counts the number of image pixels having each individual brightness value, and plots the totals. Thus, peaks in the histogram correspond to large areas of similar tone or color, while areas where the graph is close to zero mean that little of the image contains corresponding brightness values. (This happens most often in either the extreme highlights, at the right-hand side of the graph, or in the extreme shadows, at the left-hand edge of it.) So what's the use of this? Well, first of all, it can very quickly tell you if your exposure is high or low overall: The screen shot at right is from an image that was a bit bright overall, with no really dark shadows. Thus, the "dark" end of the histogram has almost no data present in it. This is a clue to bring down either the midtone or shadow sliders. Since the curve is fairly even overall, the indicated action in this case would be to pull down the "shadow" slider.
In general, to get good-looking photos, you want each shot to take full advantage of the available range of digital brightness values, ranging from 0 to 255. This often means stretching the tonal values so that they cover the full brightness range. Referring to the histogram curve again, you want the curve to extend over the full horizontal range, and not just be clumped up in the middle, with nothing at the ends. The trick is to know when to stop stretching, so you don't lose detail at either end of the range. How do you know when (and where) you're losing detail though? – HP has thoughtfully considered this, and provided an answer in the form of the display shown in the screen shot below.
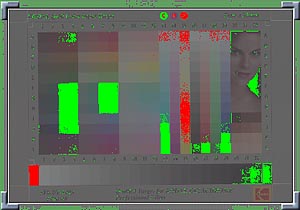 In the previous shot of the histogram window, you may have noticed the exclamation points at the two ends of the curve. These are buttons that activate the display shown in the screen shot above. Pressing the left-hand button highlights in green portions of the image that have been pushed all the way to "black" (0). Likewise, the right-hand exclamation-point button highlights in red all the parts of the image that have been pushed all the way to "white" (255). Used in conjunction with the exposure controls, these indicators are tremendously useful! Ideally, you'd want a sprinkling of both red and green indicators in your image, meaning that the lightest portions are just barely going all the way to "white", and the darkest portions just barely going all the way to "black." (The amount of red and green showing in the image above suggests it is perhaps pushed a bit too far at both ends of the scale.)
In practice, we found the automatic exposure settings in the PhotoSmart software to be remarkably good at setting the tonal range, but the addition of the Histogram window and white/black indicators was a very welcome enhancement over earlier versions of the program. (Also one that we'd asked for in our previous review.) One additional fine point: You can view the histograms for different color channels separately, although you must work back and forth between the Exposure and Color control panels to make adjustments in the individual channels.
This touches on one of the few areas in which we'd like to see further enhancements in the HP software: You can frequently make very good overall color-balance adjustments in an image simply by stretching the red, green, and blue histograms separately to fill the available tonal range. This is a function we frequently use in Photoshop's (TM) "levels" control panel. It would be nice to have similar control here, either via "white point/black point" settings, or through the ability to manipulate the histogram display more directly. Still, we found the S20's software controls both powerful and very easy to use: They're a good compromise between providing the control needed to do useful work, but not burdening the user with unnecessary complexity.
Color
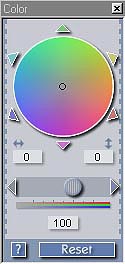 Once the exposure range is set, it's time to consider the color balance of your image. Overall color is manipulated by the control panel shown at right. Here, the cursor in the color wheel (shown in the neutral, centered position) is used to shift the overall color balance of the image in the direction of whatever color it's dragged toward. For example, dragging it toward green shifts the balance toward green and away from magenta. This is a very intuitive way to adjust color balance, but we felt that the control produced rather large variations for relatively small movements: We'd like to see a "sensitivity" adjustment somewhere to affect how strongly this control affects the image.
Below the color wheel is a slider with a grayscale-to-rainbow scale beneath it. This is the "saturation" slider, which adjusts the intensity of colors in your image. Slid all the way to the left, it produces a grayscale image. All the way to the right results in neon-bright colors. In most cases, you'll probably make fairly small adjustments. Again, a fairly intuitive control, particularly when coupled with the continuously-updated preview image.
Rotation
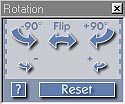 Icons in this panel (shown at right) let you rotate the whole image by 90 degrees in either direction. Pressing any of the "rotate" controls repeats the operation as many times as you wish, so you can turn an upside-down image 180 degrees by just pressing one of the "rotate 90" buttons twice. The "flip" control handles mirror-image reversals due to upside-down film, and the final two let you "nudge" the orientation of the image in roughly 1-degree increments. As we mentioned earlier, while the "nudge" controls give you pretty fine adjustments, we would have liked them to be a bit finer yet. On the other hand, if all we're talking about is a half-degree of rotation, you can probably get that much just by changing how you feed the slide, film, or print.
Size
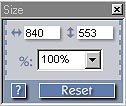 Resolution and sizing are always a source of confusion in scanning. Given that you're scanning a tiny negative at perhaps 2400 dpi, to be printed much larger at something like 200 dpi, it's easy to see how people could become confused. Some scanning software attempts to bridge this gap through (often convoluted) translations between input resolution and output resolution. HP simply lets you choose how the image is cropped, and then how many pixels it's converted to when scanned. This leaves the calculation of how many pixels are needed up to the user, but simplifies the operation of the scanning software.
Cropping is set in the main Image Adjustments screen (shown earlier), by grabbing the corners of the "frame" around the preview image and dragging them until the desired portion of the subject is showing. Once this is done, the "Size" window (shown at right) will display the pixel dimensions of the selected area, based on the basic scanning resolution chosen in the initial Preview Scan window. You can make fine adjustments in the pixel dimensions, either by changing the value in the scaling percentage window, or by adjusting the horizontal or vertical pixel numbers accordingly. (Adjusting any one of these three values will adjust the others in concert, while leaving the image cropping as set previously.)
Sharpening(!)
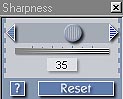 Image "sharpening" is one of the least-understood, and most-misused functions in digital imaging. People tend to either avoid it altogether, or use it to try to correct for poor focus in the original image (which it really can't do). When it is used, it's frequently overdone, resulting in heavy, blocky images. Device manufacturers also notoriously use it in attempts to correct for resolution shortcomings.
With this as a backdrop, we confess that we approached the "sharpening" function in the PhotoSmart S20's software with something less than enthusiasm. We were in for a real surprise (shock?) though, when we played with it a bit and saw the results! We found that the default setting of 15 was pretty conservative (although that's what we used in our test scans, except where noted). We felt we had the best results with a setting of about 60. The results at that level were little short of stunning! We're accustomed to using the sophisticated "unsharp masking" function in Photoshop, and are fairly proud of our prowess with it. Imagine our surprise then, when we came to the honest (if reluctant) conclusion that the PhotoSmart software's sharpening function produced better results than we could achieve in Photoshop! The sample images below show what we mean: The Photoshop and PhotoSmart versions look much the same, but there are subtle differences, all of them favoring the PhotoSmart version.
|
|
 |
|
|
 |
|
|
|
There is one caveat to record in our enthusiasm for the PhotoSmart sharpening function: It does a great job of optimizing images for screen display, but the requirements for maximum sharpness in prints are a bit different. (You generally need to apply what on-screen looks like too much sharpening in order to get the best results in print.) The lack of print-optimized sharpening is reasonable though, as there's no way for HP to account for all the variations in printer technology and characteristics, print sizes, etc, within their scanner software. What's more, if they tried to do so, the resulting software interface would be vastly complex and hopelessly confusing for users. So: Overall, the PhotoSmart's sharpening does a fantastic job, but pros will still want to use more flexible packages to optimize for printed output.
Filters (!)
One of our biggest complaints about the original PhotoSmart scanning software was that there was no way to save combinations of settings for later recall. Often, you'll try a scan, then decide that you want to tweak the settings a bit and try another. Without a way to record what your previous settings were, this can be a tedious and frustrating process. Another common situation is that a number of images will need more or less similar setups, as they were all captured under similar conditions.
We're happy to report that HP responded to this need in the new version of the PhotoSmart software, providing what they call "filters" to hold combinations of image-adjustment settings. Filters are stored under names you give them, appearing in the "Filters" menu. The screen shot at right shows the simple filter-setup screen, in which you can specify which settings a particular filter will record. We found this to be a good implementation, since you may sometimes want to record a set of tone/color adjustments, without affecting the size. Other times, you may want to scale all the images uniformly, but adjust the color separately. When you no longer need a filter, you can remove it from the Filter menu, to reduce clutter there.
"Batch" Scanning
Another thing we wished for in the previous version of the PhotoSmart software was some way to set up multiple scans on a single strip of film, and then have the software execute all of them at once. (That version of the software forced you to do scan a single frame of a film strip, then re-insert the strip & wait through the preview scan before you could scan another.) The new software lets you make Image Adjustment settings for multiple frames of a film strip, and then shift-click to select all the frames for "batch" scanning. – This is a great productivity enhancement, when you're scanning lots of images from negatives or strips of slide film.
Scanning Speed
Scanning speed is always a key issue to consider when looking at a scanner. Obviously, its importance will be a strong function of how much scanning you plan to do, but take our advice that once you get into a project involving a number of scans, you'll feel that the scanner is never fast enough. (It's just one of those things you can never have too much of, like money or good looks! :-)
We felt that the HP PhotoSmart Scanner provided quite acceptable performance in this respect, with the possible exception of preview time for film strips. Slide previews took about 15 seconds, print previews about 16 seconds (for a 4x6 inch print), and film strip previews about 38 seconds for a strip of 4 negatives (the longest strip that can be previewed - if you have longer strips, just flip them around to preview the images at the other end). These times are somewhat longer than those for the previous SCSI-connected model, but the increase to 12 bits of digitization and the ease of installation with the USB interface more than make up for it.
Final scans take variable amounts of time, depending on the resolution selected, the speed of the host CPU, the amount of RAM available, and the condition of the host's hard disk. Confused? What this boils down to is that the software needs to read in the raw data from the scanner, and then process it in order to produce the correct colors and tonal values. The scanning time is pretty purely a function of how much data needs to be read in, while the time for the subsequent processing will depend on a variety of factors. The RAM size and disk condition are important because they affect how much of the image data can be held in memory at a time. If there isn't enough RAM to hold the image data as well as any "scratch" information the software needs to create, data must be shuffled back and forth to disk in order to make room as the processing progresses. Consider the following: Scanning the Q60 test target slide at a resolution of 1200x1800 pixels took 45 seconds for the scan time, and an additional 22 seconds for processing, resulting in a 6.3 megabyte file. The equivalent numbers for a reflective print scanned at 1200 x 1800 were 16 seconds scan, plus 14 seconds processing: Print scanning appears to be a bit faster. By contrast, the times we recorded for a maximum-resolution (2400dpi) scan of the same slide were 74 seconds for the scan, and 48 seconds for processing, to produce a 26.4 megabyte file of 3600 x 2448 pixels. (Note that this was the maximum scan area, somewhat larger than the film frame itself.) Note how much longer the processing took for the larger image! This was because the computer had to swap data back and forth to the hard drive in order to get the processing done. This is an important note for users: Especially when handling large images, the best thing you can do to enhance your computer's performance is to add more memory: For manipulating large images, 64 megabytes is far from too much, and you may even see noticeable performance improvements with RAM sizes as large as 128 megabytes. (For reference, our test computer was a Pentium II/350MHz, with 128 MB of RAM.)
Supported Film Types
One of the things we've learned in playing with film scanners is just how strange color negative film is! Proper color-correction of color negatives during scanning turns out to be quite an art: Not only do you need to compensate for (substantial) variations between film types and brands, but the orange "masking" can also vary in density with the underlying image content. Overall, it's far from straightforward to sort out the necessary color transforms when scanning color negatives.
Many scanners deal with the color-negative strangeness by providing custom color profiles for different film types. Surprisingly, HP didn't find any need to do this, and the scanner produced remarkably consistent results from one type of film to another, with variations between emulsions and brands being less than we were accustomed to seeing in conventional photo prints from the different types. (Even our ultra-high-res "House" sample, captured on Kodak Royal Gold 25 film was handled very well: This film appears to have a very different color balance than most other color print films, and has given most scanners we've tested fits.) We were exceptionally impressed with how well the PhotoSmart S20 did with a wide range of subjects, using only its default settings: It's apparent that HP has built a lot more "smarts" into the scanner and its control software, as compared to the earlier unit! (And the earlier model was no slouch, either.)
Other Software for the PhotoSmart
Thanks to its low price and the large numbers of units that have been sold, there is actually third-party software available for the HP PhotoSmart Scanner! We did a very limited evaluation of Ed Hamrick's VueScan program, about which we've generally heard very favorable comments on the rec.photo.digital newsgroup. As of this writing, it's available as a freeware demo, with a 15-day time limit: After that, you'll need to purchase Ed's companion VuePrint program for $40, the registration for which includes a license for VueScan. (VuePrint is an excellent utility for printing multiple images on a page.) Ed's original VueSmart scanning application offered many extensions beyond the capabilities of the HP software, and his new version has both expanded features, and full support for the S20 version of the PhotoSmart scanner.
Some of the things that VueScan can do are: Fast batch scanning, automatic cropping, scanning of mounted color negatives (HP's software will insist that these are slides), scanning of unmounted slide film, scanning at the full 36 bits per pixel, and saving all that data to a TIFF file (HP's software only saves the "best" 24 bits of data, rather than the full 36 bits the scanner generates), scanning panoramic images, automatic orange mask removal from color negatives, and automatic removal of dust spots. (Whew, that's quite a list!) If you'd like to check out Ed's VueScan program, follow this link to his site. (Once there, check out his very popular VuePrint shareware image viewer/printer program as well.)
We didn't have time to experiment much with the upgraded VueScan in this round of testing. In our limited testing of the earlier VueSmart, we found a program with a user interface designed for more-sophisticated users, but with impressive capabilities. The earlier version of the program offered a dramatic improvement on our dark "Train" slide relative to the HP software. The new HP software and the S20's hardware go a long way to improving the native performance, but Ed's program still provides much more control (albeit with a much less "WYSIWYG" interface!) for sophisticated users.
Test Results
As always with Imaging Resource reviews, we encourage you to let your own eyes be the final judge: Look at the sample images, download them, print them out on your own printer, and decide for yourself how well the PhotoSmart S20 Scanner would meet your requirements!
When we tested the original PhotoSmart, we were impressed enough to worry that our remarks would make us sound like "perpetual cheerleaders for digital imaging." Well, with the upgraded S20, we figure there's no hope: We were exceptionally impressed with this latest version of the scanner, so much so that we can't pretend to be objective about it: This is an incredible scanner for the price, and a great one at any price!
We found the PhotoSmart S20 Scanner capable of producing beautiful, highly-detailed scans, with almost no tweaking of the scan controls. The default settings for all scan types (slides, negatives, and prints) almost always produced excellent images right off the bat. Only with unusual film types (the Royal Gold 25 House shot), or images with really pathological exposure characteristics (the Train picture) were any adjustments needed. When we did need to make adjustments, the feedback provided by the Histogram window in the new software interface proved invaluable, and made it easy to adjust images to take full advantage of the available tonal range. Colors were exceptionally accurate and bright, yet delicate pastels were well-preserved.
We found the PhotoSmart Scanner's resolution to be excellent, producing visual resolutions of 1400-1600 line pairs per picture height both vertically and horizontally on our Kodak Technical Pan version of the WG-18 resolution test target. The USAF target results showed a maximum resolution of 50.8 line pairs/mm vertically and 40.3 line pairs/mm horizontally (1290 and 1024 line pairs/inch, respectively).
See for Yourself!
Take a look at the test images from the PhotoSmart S20 Scanner, download them, print them out, see if the scanner meets your needs!
Conclusion
The Hewlett Packard PhotoSmart S20 Scanner is an absolutely excellent all-around photo scanner for personal use. It can handle all three types of 35mm photographic media (negatives, slides, and prints), and consistently produces highly detailed scans with excellent color. Most of the time, we found no need to adjust the scanning parameters from the default values chosen by the scanner. (This is very unusual in our experience!) While we found the new software package to be a substantial improvement over the previous scanner-control software, we regret the loss of the excellent HP "Photofinishing" software application. When its low cost is factored into the equation, the PhotoSmart S20 is practically a "no brainer" for photo enthusiasts wanting to bring their film-based images into their computers!
View the test images from the PhotoSmart S20 Scanner