 Minolta Dimage Scan Elite F-2900 (Review first posted 6/9/2000) |
 |
|
High-end "personal" film scanner |
|
|
2820 dpi resolution (32.5 meg file from 35mm neg!) | |
|
|
12 bits per channel, multi-sample scanning option | |
|
|
"Digital ICE" defect-removal technology(!) | |
|
|
High-speed SCSI interface | |
|
|
Software accommodates beginners AND experts | |
EZ Print Link
Readers have requested free-formatted versions of our reviews (without the graphical accouterments of our page design), to make printing easier. We are accommodating this request with special copies of each review, formatted to allow the text flow to be dictated by the browser window. Click here for a print-optimized page.
Manufacturer Overview
Minolta is a company with long experience in the world of film, and extensive digital expertise that has so far been applied primarily in the areas of office electronics and imaging (copiers & printers). They've been moving steadily into the digital world though, and in fact now (June, 2000) have one of the broadest lines of film scanners on the market.
The Minolta Dimage Scan Elite film scanner is quite a bit more capable than some of the "personal" film scanners we've reviewed in the past, positioned at the upper end of the "enthusiast" market. In many respects, its capabilities reach into the lower end of the "professional" market. We see it fitting the needs of users ranging from well-heeled photo enthusiasts, to businesses and professional photographers looking for top performance on a budget. In support of this market, we found the Dimage software did a particularly good job of providing the power demanded by pros, while remaining very approachable for the amateur. (That was our comment on the original Dimage software we reviewed nearly a year ago, and the latest version has significantly improved in several areas.) Another key advance with the Dimage Scan Elite is its use of the "Digital ICE" defect-removal technology developed by Applied Science Fiction. For anyone planning any production scanning effort, the throughput improvement offered by Digital ICE is phenomenal and could justify the cost of the scanner in labor savings (for retouching dust spots and scratches) very quickly.
High Points
- Color or black and white 35mm negatives and positives, adapter for Advanced Photo System cassettes.

- 2820 dpi input resolution.
- 12 bits per channel digitization accuracy
- Multi-sample scanning for unusually low shadow noise
- Digital ICE capability. (Automatic dust/scratch elimination)
- High speed SCSI-2 interface.
- Long-life cold cathode fluorescent light source.
The Basics
At about the size of a large book standing on edge, the Dimage Scan Elite fits nicely on a desktop and is exactly the same size as its predecessor, the Dimage Scan Speed. The entire device measures 3.6 x 6.4 x 10.7 inches (90.5 x 162 x 272 mm), and weighs about 4.4 pounds (2 kg). The Dimage Scan Elite connects to its host computer via a high speed SCSI-2 interface, so you'll want to install a SCSI port on your computer, if you don't have one already. (Older Macs typically come equipped with SCSI connections. However, on newer Macs (blue/white G3s or the new G4s) or Windows machines, you'll need to have an interface card installed. Appropriate cards range from $100 to $300 in price. The manual lists a number of Adaptec SCSI cards from the 1500 and 2900 series that are suitable. The only restriction seems to be that the 1500-series boards don't work with NEC PC98xx computers.) The Dimage Scan Elite can scan 35mm negatives or slides, in either black and white or color, and an optional APS adapter is available for scanning Advanced Photo System cartridges.
The software CD shipped with the unit supports both Mac and Windows platforms. Standalone scanning applications are provided for both platforms, as well as a Photoshop acquire plug-in for the Mac, and TWAIN drivers for the PC. (NOTE: Minolta specifies that the scanner requires either Windows 95 release 2 (OSR2), Windows 98 or NT 4.0. If you're running Windows 95, be sure to check the revision level you have installed. For Macintosh, the scanner works with OS 7.5 to 8.6. We don't know about Mac OS9 compatibility.)
Scanning resolution can be as high as 2820 dpi (a 2700-element CCD covering the width of a 35mm slide or negative). This produces maximum image sizes of 2688x4032 pixels for 35mm (32.5 megabytes), or 1920x3328 for APS (19.2 megabytes).
Another important scanning parameter is "bit depth," a measure of both color accuracy and the maximum density range the scanner can recognize. (8 bits per channel is good, 10 is better and 12 the best you'll commonly find in desktop scanners.) The Dimage Scan Elite captures a full 12 bits per pixel, and even gives you the ability of importing the full 12 bit image data into Photoshop.
Scanner Optics & Light Path
Film scanners typically provide either fixed or adjustable focus as part of their optics design. The Dimage Scan Elite employs fixed-focus optics. Given the extreme resolution of most film scanners, we're surprised that their lenses can be designed with enough depth of field to insure sharp focus in the face of minor variations in the film plane position. We're surprised, but the fixed-focus approach nonetheless seems to work quite well, as evidenced by the performance of the Dimage Scan Elite. Of course, the upside of a fixed-focus design is that focusing is no longer a concern, either in the form of twiddling a thumbwheel or by waiting while the scanner adjusts its focus for every scan. In our testing, the Dimage Scan Elite produced sharp images every time, the sole exclusion being our unusual "USAF 1951" resolution target, which is a glass slide with the pattern deposited on one side of it. With the pattern facing one way, we got sharp results, but decidedly softer ones with it facing the other. Neither orientation was as sharp as it could have been though, and there was a lot of "flare", apparently caused by the great thickness of glass in the optical path. We saw no evident focus deficiencies while scanning normal slides or negatives.
The Dimage Scan Speed uses a special fluorescent light source, producing strong spectral peaks in the red, green, and blue portions of the spectrum. We observed that this diffuse illumination source produced somewhat "softer" scans than some other scanners. The resulting scans had less of a razors-edge on fine detail, but were also a little more forgiving of minor film defects and film grain. However, while the scans produced by the Dimage Scan Elite have a somewhat "softer" appearance, they actually seem to carry an extremely high level of detail, as evidenced by the results from our WG-18 (ISO-12233) resolution target scans.
Film Handling
Like the Dimage Scan Speed, the Scan Elite uses sturdy plastic slide and filmstrip holders to load the film into the actual scanner. Operation is simple, you first place the media to be scanned into the holder, then insert the holder into the scanner. The holders have detent notches on them that provide repeatable film positioning, but also allow you to manually advance the film between frames. While scanning, the device slides the holder and film across a fixed CCD array. The filmstrip holder can accommodate strips of 35mm film up to six frames in length, and the slide holder up to four slides. Both holders are reversible, which is a necessary feature for their use. Once the holder is inserted into the scanner, you can access half of the total film frames by sliding the adapter in or out. To reach the remaining frames, you remove the adapter, flip it end for end, and reinsert it. (Frame numbers and a "Top" indicator are printed on the holder to guide you.) We found both the slide and film holders to be quite effective and easy to use. The film adapter is hinged, but only to the extent that a plate flips up to expose the recess into which the film is laid. (Unlike many clamshell designs, the slot holding the film is a fixed structure.) The back pressure plate then hinges back down and latches, clamping the film flat. This arrangement did a particularly good job of handling curled or damaged film, regardless of whether the film was curled side-to-side, or along its length. The film-holding slot is about a half-millimeter wider than the film itself, doing a good job of constraining the film position, yet still allowing minor adjustments to be made for fine alignment relative to the limits of the scanning area. We did find that the filmstrip holder crops the 35mm frame very slightly. (For some reason, this appears to be a common characteristic of filmstrip holders.)
The slide holder is also constructed of plastic, with four slots along the top edge into which the slides may be loaded. The edges of each slot set absolute limits for the horizontal position of the slide mount, but there's a bit more play (about a full millimeter side-to-side) with slides than is present in the filmstrip adapter. This small amount of play allows you to correct for film misaligned in its mount, since you can manually tweak the slides about two degrees of rotation in either direction. (Despite this looseness, we had no difficulty aligning slides square to the holder, as the edges of the "windows" in the holder provided good reference surfaces to align to, and simply "bottoming out" the slide in the slot yielded good alignment if the film was properly positioned in the slide mount.) The slide holder is also a little unusual in the way that the slides "float" between two sets of spring-loaded fingers. This seemed to do a good job of keeping the film plane well-centered about the point of optimum focus. The centering fingers gripped a particularly thick plastic-and-glass slide mount quite a bit more firmly than they did standard cardboard ones, but handled a wide range of mounts well.
Digital ICE
New on the Dimage Scan Elite is the Digital ICE (for Image Correction Enhancement) defect-removal solution, which we've found to be one of the most amazing innovations in scanner technology. For some while shrouded in secrecy, the Digital ICE technology (developed for Minolta by Applied Science Fiction) uses infrared light to separate defects from the film information itself, and then uses sophisticated processing to reconstruct the image data in areas obscured by dust or scratches. Under optimal circumstances, it can completely remove scratches, dust and fingerprints from a slide or negative, while leaving the underlying image practically untouched. We've played with this feature on other scanners and had to try it on the Scan Elite. We weren't able to locate the old, damaged negative we used in previous tests, so made a new damaged one by rubbing the emulsion of a good negative lightly against a (rather gritty) linoleum floor. This resulted in several rather deep scratches in the emulsion layer, and a fair bit of lesser damage. (In normal use, we doubt you'd ever encounter a negative as badly damaged as this one was.) Even with this extreme level of damage though, the results were pretty surprising, as seen in the before/after images below: The Digital ICE technology can't completely eliminate the damage, particularly in the case of deeply scratched emulsion, but it does an almost perfect job of removing minor damage and does an excellent job on Dust.


In these low-resolution scans, Digital ICE removes all but the deepest scratches in the emulsion
In practice, we found the ICE technology very effective, at least on the film emulsions we tested. At any given resolution level, it produces a slight softness in the image relative to an unadjusted scan, but the overall result is incredible! On a negative as deeply scratched as this one, the process can't completely eliminate all evidence of damage, particularly at higher resolutions. The images below of the eye and cheek/mouth show the effect of the technology, at maximum scanner resolution. You'll note that there are still blemishes left in the image, but their nature is such that they'd be much easier to remove either by cloning or with a "smudge" tool in a paint program than the original damage.
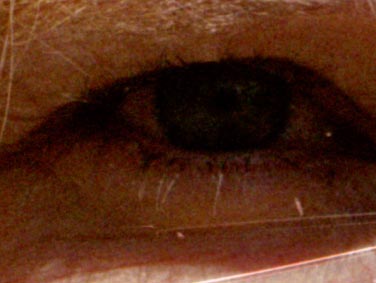
Scan without ICE is slightly sharper...
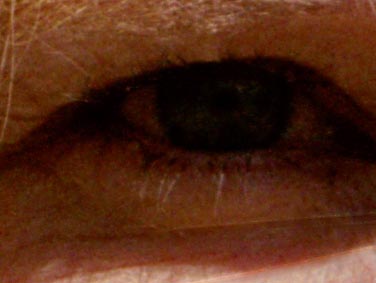
Scan with ICE is a bit softer, but the loss of sharpness is relatively minimal
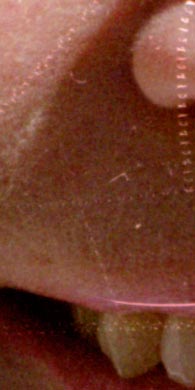

Here, the heaviest damage remains, but dust and small scratches are completely removed.
The remnants of heavy damage will require much less retouching than in the original.
In total, it's hard to overemphasize the impact the Digital ICE technology could have in a production scanning environment. The tendency is to focus on severe damage of the sort we've shown here, but in practice, you're much more likely to encounter random dust specks that require tedious "spotting" to clean up. After working with it, we're convinced that Digital ICE can completely eliminate the need for this operation, at the savings of countless hours in production shops. We have to say that this is one of the most truly useful innovations we've seen to date in scanner technology, capable of saving literally hours of retouching for each damaged or dirty image it recovers!
System Interface and Included Software
The Dimage Scan Elite uses a SCSI-2 connection to the host computer, providing the high speed data transfer necessary to handle the large amounts of data the scanner generates. No SCSI card is included with the unit, but Minolta lists several models of Adaptec cards that the unit can be used with. (Adaptec is pretty much the standard for SCSI cards: You can find cheaper ones, but the Adaptec models are more likely to be compatible with a wide range of equipment. Note in particular, that some scanners, CD-ROM drives, and other equipment ship with low-cost SCSI cards included. In many cases, these are "dedicated" cards, that will only run the particular device they're shipped with. If you're buying a card to support the Dimage Scan Elite, take our advice and get a "name brand" Adaptec unit. The hassle you'll save will be more than worth it!)
Once connected to the computer, the Dimage Scan Speed is controlled through an excellent software interface that we'll describe in greater detail below. As noted earlier, the scanner-control software takes the form of standalone applications on both the Mac and PC, as well as a Photoshop plug-in on the Mac, and a TWAIN component on the PC. A particular strength of the Dimage software is the extent to which it provides powerful controls for experienced users, while at the same time offering a simple interface for novices.
Speeds and Feeds
As scanners go, the Dimage Scan Elite is quite fast, although in common with every other scanner we've ever tested, it doesn't measure up to Minolta's published specs for speed. This is an area of constant specmanship between scanner vendors, with the result that the industry has gotten rather liberal with what counts as "scan time." (An analogous situation to the ever-increasing "print speeds" of inkjet printers.) In fairness to Minolta, we think they are accurately reporting the actual time the media is being scanned across the CCD sensor, but we feel the only really reasonable measure of scan time is how long it takes to actually get the image into your computer. In the case of the Dimage Scan Elite, we measured the following times, all on a 333 MHz PowerMac G3, with Adobe Photoshop(tm) running in a 145 megabyte RAM partition:
|
|
|
| Launch Plugin from Photoshop |
|
| Prescan to screen display, no autoexpose |
|
| Prescan with autoexpose |
|
| Minimum-resolution scan |
|
| Maximum-resolution scan |
|
These scans were for the default scanner setup, with no color management enabled, and no use of Digital ICE or multi-sample scanning. We didn't time scans using Digital ICE, but our sense was it took about twice as long to scan a slide. As you'd expect, multi-sample scanning appears to increase scan times in direct proportion to the number of scanning samples you're taking: 16x is going to take something on the order of 10-16 times as long as a raw scan: You'll only want to use this for those really dark slides that desperately need the extra dynamic range and noise reduction it affords.
Operation and User Interface
Other than the actual scans themselves, most of the story to be told about a film scanner has to do with the software that drives it, and to what extent the combination of hardware and software makes it easy to produce good-quality scans. Accordingly, we'll devote a sizable part of this review to talking about the software that drives Minolta's Dimage family of scanners, and the Dimage Scan Elite in particular.
As noted several times already, we feel that Minolta has done a particularly good job of balancing capability with ease-of-use. This is a difficult equation to optimize, as the needs of beginners and experts can vary so widely. At the same time, the goal should be to provide a smooth gradation of capability, not introducing any abrupt hurdles to overcome as the users advance in their sophistication. Minolta has accomplished this difficult design goal by providing very basic, visually oriented contrast/brightness adjustments for neophytes, while at the same time offering fairly sophisticated histogram and tone curve controls for those comfortable with more complex adjustments, and who need the control they provide. By way of showing you how the software works, we'll step through its various screens, in roughly the order you'd encounter them while doing a scan. (For a more complete walk-through of scanner operation, check out Minolta's excellent web site for their scanners: They've put together a comprehensive "on-line demo" of how the software works.)
The Command Window and Prescan Workspace
The most basic options and functions of the Dimage Scan Elite scanner are controlled via the main Command window (which is always displayed), shown below. The Command window contains two list boxes, a status display window, the preview screen, a variety of control buttons (which we describe below, moving from left to right, top to bottom in the screen shot) and a tabbed workspace. When the scanning software opens, this main screen automatically opens to the Prescan tab (Index and Image Correction are the other two work areas). (NOTE: This and all screen shots following have been scaled-down to better fit the 'web page -- The actual screens are larger and much more readable!)

- Film Format (List Box) - Options are 35mm or APS.
- Film Type (List Box) - Options are Color Negative, Slide Film, B&W Negative, B&W Positive.
- Navigation Button - Calls up the Navigation dialog box, which allows you to automate the scanning process with adjustments for a series of image corrections, cropping, preferences and other controls.
- Status Bar (Display field) - Displays descriptions of controls as your mouse rolls over them, and gives status information during the scan process. (Very handy for interpreting the sometimes-cryptic button icons, before you get used to them.)
- Index Scan Button (APS Only) - Creates thumbnail-sized index scans of an entire APS film roll.
- Prescan Button (APS or 35mm) - Generates a preview scan of the current film frame or slide.
- Scan Button (APS or 35mm) - Performs the final scan of the image and opens Photoshop to display the image.
- Rewind Button (APS Only) - Rewinds APS film back into its canister.
- Scan Settings Button - Brings up the Scan Settings window (shown at right), where you can manually adjust the input and output scan resolutions and set the units you want to work in (pixels, inches, or cm). NOTE that you can't set the resolution values when your units are set to pixels.
- Preferences Button - Brings up the Preferences window for setting up scanning preferences.
- Help Button - Calls up the software help menu.
 Navigation Window
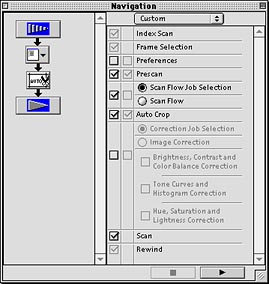
The Navigation window lets you set up an automated scanning process, helpful for batch work. The left side of the screen features the navigation process, defining the steps you'd go through to perform a scan. On the right side of the screen is a series of options, accompanied by checkboxes. You simply check the functions that you want included in your standard workflow. For example, you can select the Auto Crop function to automatically crop each image. There's also an indicator for APS, if you want to repeat those functions on the APS cartridge. While we didn't experiment with it too extensively, this looks like a very handy function. (Especially for APS applications, where the scanner can process an entire roll of film at once, in a "batch" mode.)
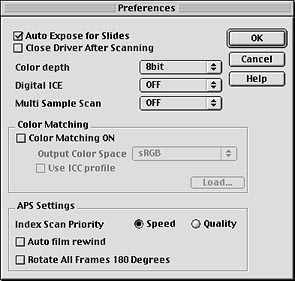 Preferences Window
The Preferences window controls a number of overall settings governing scanner operation. Most people will rarely need to visit this screen, as the default settings will suffice for many applications. About the only controls you're likely to need to change with any regularity are the ones for Digital ICE or Color Depth. Below are the Preferences functions:
- Auto Expose for Slides - This appears to be an overall exposure compensation adjustment for scanning very dense transparencies.
- Close Driver After Scanning - This will be most useful when using either a TWAIN or Photoshop acquire module for scanning. It will close the scanning window after each scan, returning you to the host application. (Or to the desktop, if you're running standalone.)
- Color Depth (Options are 8-bit, 16-bit, and 16-bit linear) - As mentioned earlier, the Dimage Scan Elite is a 12-bit per channel scanner. Since computer displays and most programs can only accept 8 bits per channel, what happens to the rest? Normally (in 8-bit mode), the scanner and scanning software translate the 12-bit data down to the 8-bit final data size, in effect "choosing the best 8 bits." For most uses, this is the easiest and most direct thing to do. For difficult subjects with particularly wide dynamic ranges though, you may want to employ some unusual tonal mapping, to preserve both shadow and highlight detail, or experiment with different approaches after the scan is complete. For these situations, Minolta provides the ability to capture all 12 bits per channel, and store them in a file. Since the TIFF file format only recognizes either 8 or 16 bits per channel, the option which preserves the full 12 bits of original data is labeled "16-bit," even though only 12 bits per channel are actually being stored. It's a little harder to understand the need for the "16-bit linear" option, but perhaps it has some use in scientific applications. What it appears to do is to turn off the analog gamma adjustment that takes place prior to the digitization of the image data. The same raw data is being captured, but the distribution of bits across the tone curve is very different. (In general, dark areas look VERY dark with the 16-bit linear option enabled.) As we said, this doesn't appear to be terribly useful for general photographic applications, but could find some use in photogrammetry.
- Digital ICE - Turns the Digital ICE function for removing dust and scratches on or off, but is unavailable for monochromatic film.
- Multi Sample Scan (Options are Off, 2 times, 4 times, 8 times and 16 times) - This function reduces the amount of random noise in the scanned image by referring the average of the result while scanning several times. (Note that the amount of random noise remaining in the image should decrease as the square root of the number of image samples. Thus, a 16x sampling of the image should produce a noise level 1/4 of that of a raw scan. We've seen this practice followed in other scanners, with varying results, but in the Dimage Scan Elite, it seems particuarly effective.)
- Color Matching Settings - The Dimage Scan Elite gives you the ability to match the scanner data to the monitor "circumstance", or color space. Colors on the original film are reproduced with a high fidelity. The output color space and the monitor ICC color profile can be specified here. This option is also probably beyond the interest of novices, but provides an extra level of tweaking for more advanced users. Options are as follows:
- Color Matching On Checkbox - enables the ICC-based color management of the Dimage software, whereby the scanner can optimally match its color handling to the color space of your monitor.
- Output Color Space List Box - Lists available standardized color spaces, including: sRGB, AppleRGB, SMPTE-C, PAL/SECAM, ColorMatch RGB, Adobe RGB, Wide Range RGB, NTSC, CIE RGB, Scanner RGB, or "not specified" (whew)
- Use ICC Profile Checkbox - If you have a custom ICC color profile created just for your specific monitor, you can use it instead of one of the standard ones. Check this box if this is the case.
- ICC Profile Text Box - Specify the ICC profile you want to use.
- ICC Profile Load Button - Gives you a standard file-open dialog box for you to select the ICC profile.
- Color Matching On Checkbox - enables the ICC-based color management of the Dimage software, whereby the scanner can optimally match its color handling to the color space of your monitor.
- APS Settings - not having had the APS attachment to play with, we didn't have an opportunity to experiment with these, and the main manual offered no description. Below are our "best guesses" as to what they do:
- Index Scan Priority (Options are Speed or Quality) - With up to 40 frames on a roll, you may sometimes prefer a "quick and dirty" pre-scan in order to view all your images quickly. At other times, you may want a higher-quality prescan, to facilitate image adjustments prior to the high-resolution scans themselves. (Note that you don't have to pre-scan the entire roll, if you know which image you're interested in, based on your APS index print: The software apparently displays blank thumbnails as soon as the roll is loaded, allowing you to choose the image you're interested in, based on frame number.)
- Auto Film Rewind - Apparently an option to rewind the film back into the cartridge after the scanning is completed.
- Rotate All Frames 180 degrees - Depending on how the APS cartridge loads into the camera, rolls from some models could come out "upside down." This checkbox avoids the need to laboriously flip every individual frame separately.
- Index Scan Priority (Options are Speed or Quality) - With up to 40 frames on a roll, you may sometimes prefer a "quick and dirty" pre-scan in order to view all your images quickly. At other times, you may want a higher-quality prescan, to facilitate image adjustments prior to the high-resolution scans themselves. (Note that you don't have to pre-scan the entire roll, if you know which image you're interested in, based on your APS index print: The software apparently displays blank thumbnails as soon as the roll is loaded, allowing you to choose the image you're interested in, based on frame number.)
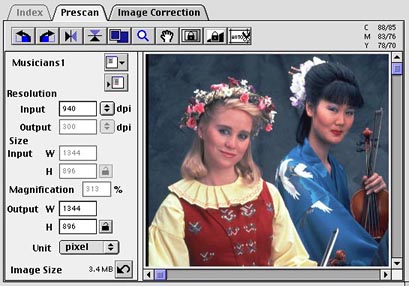 Prescan Window
This tabbed window (shown at right) is "home base" for the scanning process. As we mentioned earlier, this window automatically comes up when the software is loaded and always displays the Command window in the top portion. This window has basically two components, a row of control buttons across the top and the Scan Settings area on the left side. The top row of controls here adjust preview orientation, data readout and exposure parameters for sequential scans while the Scan Settings area sets up the resolution and size of the scanned image. See the text following the screen shot for a description of the individual buttons and controls.
Orientation and Viewing Controls
![]()
- Rotate Left Button - Rotates preview (and final scan) 90 degrees to the left (counterclockwise).
- Rotate Right Button - Rotates preview ( and final scan) 90 degrees to the right (clockwise).
- Flip Horizontal Button - Flips picture horizontally.
- Flip Vertical Button - Flips picture vertically. (The two "flip" buttons find frequent use when flipping the slide or film carrier to scan frames at both ends.)
- Full-Screen View Button - Enlarges the currently selected region of the pre-scan window to full-screen size. (Note though, that this enlargement is only a pixel replication, so it becomes rather pixellated when smaller regions are magnified.)
- Zoom Button - Zooms in on a selected area of the pre-scan window.
- Grab Button - This button turns the cursor into a "grabber", that lets you drag the pre-scan image and drag it around, to see various areas when the pre-scan image has been enlarged with the Zoom Button.
- Auto Exposure Area Lock Button - Allows you to change the auto exposure area for automatic adjustment.
- Auto Exposure Lock Button - The scanner normally performs an autoexposure adjustment prior to each scan. Sometimes, you'll want to treat all slides or negatives of a group the same (for instance if they're going to be used together to make a panorama). To accommodate this, click the Auto Exposure Lock button after pre-scanning the first image. This will lock the exposure settings to those calculated for the first image of the group. (NOTE though, that this doesn't lock or save any exposure adjustments made with the Histogram, Variations, or Tone Curves
- Auto Holder/Mount Crop Adjustment Button - Automatically crops out the slide holder or mount from the prescanned image. controls.)
![]() Readouts/Information Displays
Readouts/Information Displays
At the top right-hand corner of the Prescan window, there are two sets of readouts, one showing the RGB (or CMYK) values of the point under the cursor in the preview window and the other providing the frame number.
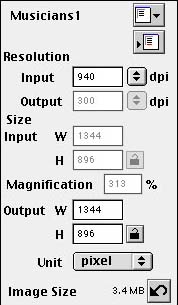 Scan Settings Area
Along the left side of the Prescan window are the Scan Settings controls, which allow you to adjust the dimensions and resolution of the image.
- Job Name List Box - Displays the name of the selected job or "Default" if no job is selected. (A job is basically a saved group of settings applied to the prescan image).
- Input and Output Resolution List Boxes - Allows you to enter a resolution size, or, when pixels are selected in the Unit List Box, allows you to choose from a list of resolution sizes.
- Input Size Text Boxes (W & H) - Displays the dimensions of the input size (you can type your own values into the boxes or change the values by resizing the prescan frame). Remember that these values will change if a different measurement unit is selected in the Unit List Box.
- Magnification Size Text Box - Displays the current magnification of the prescanned image.
- Output Size Text Boxes (W) - Displays the dimensions of the output size (you can type your own values into the boxes or change the values by resizing the prescan frame). Remember that these values will change if a different measurement unit is selected in the Unit List Box.
- Unit List Box - Allows you to select the measurement unit, i.e., pixels, inches, etc.
- Image Size Display - Provides a readout of the prescanned image's file size.
- Job Load Button - Allows you to select from a presaved list of job settings to apply to the current image.
- Job Registry Button - Allows you to save the settings of the current prescan as a job.
- Input Size Lock Button - Locks both text boxes so that the values cannot be changed.
- Output Size Lock Button - As with the Input Size Lock Button, values cannot be changed if the Output Size is locked.
- Reset Button - Resets all the Scan Settings to their defaults.
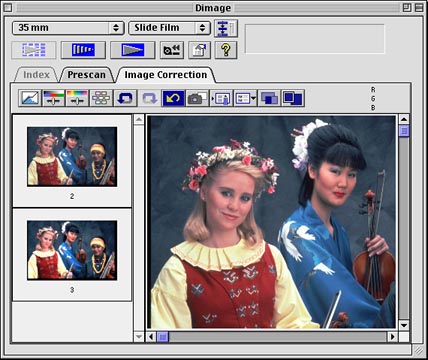 Image Correction Window
Clicking on the Image Correction tab (directly to the right of the Prescan tab) produces the Image Correction workspace which features a large preview window for the prescanned image, a smaller snapshot display area and a row of buttons across the top. We'll get into the specifics on the toolbar next, but first we wanted to mention the snapshot display area. This small area on the left side of the workspace provides temporary storage of the prescanned image as a thumbnail. The convenience of this is that you can store several different sets of image corrections as "snapshots" and compare them before deciding which settings to scan with. This is a fantastic timesaver when dealing with tricky images!
Now, on to the tool bar: First, we'll provide a basic description of each button and its function, and then go on to discuss some of the functions in a bit more detail.
Image Correction Toolbar
![]()
- Tone Curves/Histogram Correction Button - This accesses the Tone Curves/Histogram Correction window, which allows you to adjust the blacks, whites and midtones of the prescanned image.
- Brightness/Contrast/Color Balance Correction Button - As it sounds, this button brings up a small window that lets you manually adjust the brightness, contrast and color balance of the prescanned image via a set of sliding bars.
- Hue/Saturation/Lightness Correction Button - This button calls up another small window that lets you manually adjust the hue, saturation and lightness of the RGB or CMYK elements.
- Variations Button - This produces a grouping of tonal variations of the image, where you can pick from seven tonal adjustments which will automatically apply to the prescanned image. You can also choose from a range of brightness/contrast adjustments and saturation adjustments. (This is a very handy interface for novices.)
- Undo Button - This button gives you a quick remedy to most mistakes by allowing you to undo the last adjustment you made - a must-have in just about any software application.
- Redo Button - Exactly as it sounds, this button reapplies whatever was just undone.
- Correction Reset Button - If you've made several adjustments and feel like you need to start over, this button resets all the image correction tools back to their default values, so you can go back at square one.
- Snapshot Button - As we mentioned earlier, this button lets you make a thumbnail of the current prescanned images, including the image correction settings. This gives you the freedom to try multiple settings and then choose the best one overall - similar to the idea of bracketing exposures when shooting with a camera.
- Image Correction Job Save Button - Once you've settled on a series of adjustments you like, you can save those settings as a job. This is perfect for batch processing of similarly exposed images, saving you a lot of time.
- Image Correction Job Load Button - This button allows you to pull up an already saved set of image correction settings to apply to the current prescanned image.
- Pre/Post Correction Comparison Display Button - You can quickly check your image correction adjustments versus the original prescanned image by clicking this button.
- Full Screen View Button - Clicking this button pulls up a full screen view of the image, so you can get a closer look at the adjustments you've made before scanning the image, or to see what specific areas may need attention.
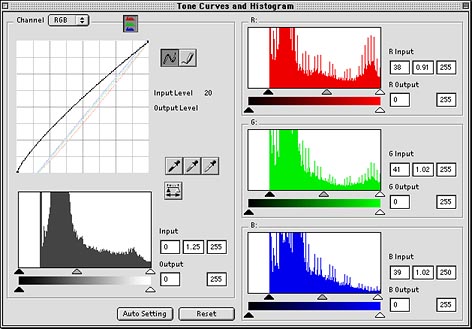 Tone Curves/Histogram Correction
As we noted earlier, Histogram adjustments are by far our preferred method for quickly correcting tone and color problems in digital images. For those not familiar with histograms though, a brief explanation would probably be in order. A histogram is simply a graph of how many pixels in an image have each possible brightness value. A large peak on a histogram graph means there's a lot of pixels (a large area) with roughly the same brightness values. Likewise, if the histogram curve is near zero, it means relatively few pixels have those brightness values. To understand how this helps image adjustment, we've included a couple of sample images, showing two images set up with different brightness and contrast settings, and the histograms associated with each.
Notice the sliders under the individual histogram curves. These are used to set the brightness values the scanner will consider to be the minimum (black), maximum (white) and a middle value (gray), for each of the color channels. If you move the "black" slider up from the leftmost position, you're telling the scanner to treat that value as "zero" for the color channel involved. Any values darker than that will also be treated as zero, and values brighter than it will be proportionately stretched downward so that the brightness values will extend smoothly down to zero. Likewise, the "white" slider on the right sets the value that will be considered as a maximum, and mapped to a digital value of 255. Anything brighter will also be set to 255, and darker values will be "stretched" smoothly. The middle slider sets the value that the scanner will put in the middle of the brightness scale (the "50%" point). Anything brighter than the level set by the slider will be made brighter than 50%, anything darker will be made darker. Thus, to lighten the image overall, you'd move this slider to the left, so that more of the brightness values would be pushed above the 50% point. (This all sounds more complicated than it is: You'll figure out what the sliders do after just a couple of minutes of playing around.)
The histogram screen includes the tone curves (which we'll discuss shortly), image histogram and a number of controls for adjusting the image. At middle left are three of the most immediately useful tools, the eyedroppers for setting white, black, and gray points. If you select the black eyedropper button, and then click on a point in the preview window, that point will be set as the "black" point, and the individual red, green, and blue black-point sliders will all adjust automatically to make it so. Likewise, selecting the white eyedropper button and clicking in the left-hand preview window will set that point as the "white" point, moving the red, green, and blue white-point sliders as needed. In practice, you'll find that the eyedropper controls offer a very quick way to color balance many problem images in a matter of seconds.
Part of the beauty of the Dimage Scan's histogram screen is the way it shows histograms for all three color channels separately, yet also allows you to operate on all the channels at the same time, if you wish. By default, you can adjust any of the slider controls independently of any other. You can access these RGB sliders by pressing the RGB/CMYK display button in the upper right of the window (RGB or CMYK is established by selecting the appropriate value in the top text box).
The other control buttons in the lower right-hand corner let you reset the settings to their defaults and put the adjustment under automatic control. A full treatment of histogram-based tonal adjustments is far beyond the scope of this review, but we encourage users to spend some time playing with the controls on this screen: They're simple to master, but quite powerful to use. Now, on to the tone curves.
The tone curves section of the window (shown below) offers a set of controls that are at once easier to understand than those of the histogram display, yet considerably less straightforward to apply effectively. Even here though, minor tweaks by Minolta contribute greatly to ease-of-use. In concept, tone curve controls are as simple as can be: They're nothing more than a graph of output brightness values against input brightness values. Essentially, they say "whenever you see brightness 'x', replace it with brightness 'y'. The input brightness values (those of your original image) are arranged along the horizontal axis of the graph, and the output values (those your image will come to assume) are arranged along the vertical axis. Again, the easiest way to understand how a tone curve works is to play with one. A little experimenting will reveal that a steeply sloping curve produces high contrast, while a flatter one produces less. Likewise, a curve bulging upward results in a brighter image overall, and one drooping downward makes for a darker one. The Dimage Scan software lets you adjust either the overall RGB curve, or each of the color channels (red, green, and blue) individually.
Tone curve controls let you adjust parts of the tonal scale, without affecting others. As such, they're more powerful than the histogram controls, but you have less feedback as to what part of the image you're affecting, and it's much easier to get lost in your adjustments with them. Experienced graphics professionals rely on tone-curve adjustments almost exclusively though, because they provide such a high degree of control over the tone and color balance of images The tone curve controls in the Dimage Scan software work like those of most any high-end image editing program: You can click any point on the curve and drag it, and the rest of the curve will bend smoothly to pass through the point you've defined. You can set multiple control points by clicking on more than one part of the curve. You also have the ability to draw your own curve, using a pencil tool, allowing you to create abrupt discontinuities if desired. Minolta added a unique twist to the tone curves though, in the form of white and black-point eyedropper controls, which work in the same way as the equivalent controls on the histogram. While a seemingly minor point, the eyedroppers can quickly make gross adjustments in the overall tone and color balance, and provide a good jumping-off point for your own finer adjustments.
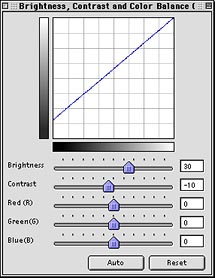 Brightness/Contrast/Color Balance Correction
This window allows you to adjust the brightness, contrast and color balance of the image via a series of easy to use sliding scales. A Post Correction LUT (Look Up Table) dominates the top of the screen, bordered on the left and underneath by pre and post correction grayscales. Operating the brightness and contrast sliders is a snap and you can see the results of your moves in the main preview window as you adjust the values. After you've set the contrast and brightness, you can then correct the overall color balance of the image, by adjusting the R, G, and B slider controls. Always wait to adjust the color until after you've made the brightness and contrast changes though, as you'll frequently find that perceived color problems diminish once the brightness and contrast are properly set. As with the histogram and tone curves screen, an Auto Setting and Reset button are at the bottom of the screen.
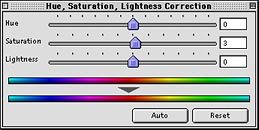 Hue/Saturation/Lightness Correction
Adjusting the hue, saturation and lightness is just as simple as the brightness and contrast, as the Hue/Saturation/Lightness Correction screen features the same sliding adjustment scales. Below the scales are a pre and post correction color sample, so you can see the effects of your adjustments (which are also reflected in the main preview screen). As with the other adjustment screens, the Auto Setting and Reset buttons live at the very bottom of the screen and the value of each slider is reported in a text box to the right.
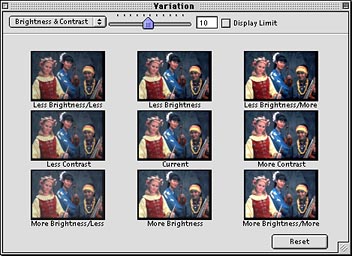 Variations Screen
It's often difficult for novices to decide what to do to an image to make it look better. Frequently, after playing with an image for a few minutes, you end up with something that looks worse than when you started! Yet, even the rankest amateur can generally tell whether picture "A" looks better than picture "B". Taking advantage of this, Minolta offers the Variations tool. Here, the current contents of your preview window are displayed in the center of a matrix of images with those around the edges of it representing the effects of more or less contrast or brightness, color balance or saturation corrections. The type of correction is controlled by a list box at the top of the screen. Because each adjustment works similarly, we'll use the brightness and contrast variation control for our example. In this adjustment, the contrast variations run vertically and the brightness variations run horizontally. If you decide you like one of the variations presented more than the current image, just click on it: It becomes the new reference sample, and the variations adjust to reflect changes relative to the new center image. By continuing to click on the image that you like best, you can quickly find the optimum brightness/contrast setting. The same process goes for adjusting the color balance (which shows the same image in a variety of hues) and the saturation settings.
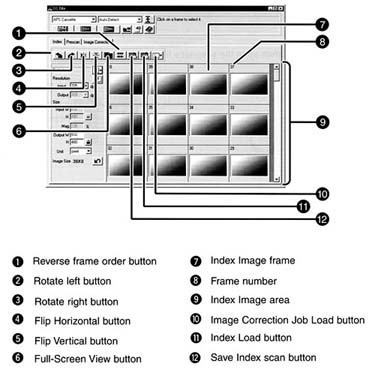 Index Window
The remaining tab on the main screen that we haven't yet discussed is the Index tab. This screen looks nearly identical to the Prescan workspace, with the exception that it displays an indexed prescan of an APS cartridge instead of one single image. The same Scan Settings adjustment area appears on the left side of the screen, allowing you to set resolution, input and output sizes, magnification, etc.
Test Results
The Dimage Scan Elite produced clear, sharp scans in all our tests, and we found both its color handling and tonal rendition to be very good as well. Minolta has updated their Dimage Scan software since we reviewed their earlier products (the Dimage Scan Dual, Speed, and Multi), and the improvements are all welcome. We liked Minolta's earlier software quite a bit, as it gave excellent control for the pro, yet a simple interface for the beginner. This latest version improves the product at both ends of the user spectrum. Overall, the Dimage Scan Elite turned in a very competent performance, easily besting the current crop of "consumer" film scanners in most areas. (As you'd expect from a scanner selling for well over $1,000, vs as little as $300 for the low-end devices.) Particularly when compared to the digital cameras that constitute the other major review focus of this site, readers are bound to be impressed with the incredible amounts of detail a scanner like the Dimage Scan Elite can extract from a slide or negative.
Color handling on the Dimage Scan Elite was quite good, although as has generally been our experience with film scanners, color negatives are subject to significant variation, depending on the particular emulsion involved. The Elite did a better job than most with the oddball Royal Gold 25 film of our house test image (this emulsion caused problems for many scanners, but is no longer manufactured), and seemed subject to the normal range of variation with other emulsions. As is often the case, we recommend that you find a color negative film that matches the scanner, if your workflow will involve large amounts of scanning. Slides fared better, with more consistent "WYSIWYG" (what you see is what you get) color processing. Color rendition seemed quite good across the spectrum for slide film, with only the slightest falloff of saturation in "royal blue" hues. The 12 bit digitization really showed it's strength in the scanner's handling of very dark slides, and the multi-sample scanning dramatically improved noise performance. (Its scan of our infamous "train" slide was one of the very best we've seen to date, although there were some non-random, in-scan artifacts.) We felt that, in almost every parameter, the Dimage Scan Elite was a significant upgrade from Minolta's previous top-of-the-line 35mm scanner, the Dimage Scan Speed.
The new Dimage scanning software is an excellent upgrade to what we already considered a very good scanning program. The changes significantly improve its usefulness for both beginning and advanced users.
Resolution on the Dimage Scan Elite was quite good, but interestingly not as good as that on the earlier Dimage Scan Speed: The Can Speed seemd to produce resolution beyond the limits that should have been possible, with clean detail extending well beyond 1000 lines per picture height in both vertical and horizontal directions. The Dimage Elite does well, but not nearly that good, since we started to see aliasing in the horizontal direction somewhere between 800 and 900 lines per picture height. Performance in the vertical direction is better, with unaliased detail to at least 1300 lines per picture height along that axis. We were puzzled that the Elite didn't do at least as well in the resolution department as the earlier Dimage Scan Speed, given it's significant gains in almost every other parameter. Again, likely due to a different optical system, the Dimage Scan Elite seemed to have a very difficult time with our unusual glass-slide USAF resolution target: We found extreme flare, regardless of how we oriented the "emulsion" side of the slide. This flare/focus problem prevented us from getting a clear scan of this target, so we really couldn't use its results in our determinations.
Overall, we felt the image quality of the Dimage Scan Elite was a significant improvement over the already good Dimage Scan Speed, particularly in its handling of difficult colors.
Conclusion
In the Dimage Scan Elite, Minolta has continued with the user-friendly capabilities and software features which already captivated us with the Scan Speed. Now, they've combined the promise of good image quality with the advanced technology of Digital ICE. Additionally, the Dimage Scan Elite's improved image correction tools provide a full range of capabilities, satisfying both the novice and more experienced users.
View the Test Images from the
Dimage Scan Elite
Up to Imaging Resource Scanners Page
Or, Return to the Imaging Resource home
page.![]()