The Imaging Resource
Quick Review
Nikon Coolpix 4800 Digital Camera
|
|||||||||||||||||||||

Introduction
|
|||||||||
The Nikon Coolpix 4800 is one of the latest in a long line of Coolpix digital cameras whose popularity stretches back to the original Coolpix 900, Nikon's original "breakthrough" digicam. While Nikon is best known for exceptional high-end cameras and optics, in recent years, they've turned increasing attention to the needs of ordinary people, rather than exclusively those of the enthusiast crowd. The Coolpix 4800 extends the consumer-oriented portion of Nikon's line into the long-zoom arena, with a combination of a four-megapixel CCD and a high quality 8.3x optical zoom lens. At the same time, it carries forward the user-interface innovations we've seen in other recent Coolpix models, including an expansive set of scene modes and unique "framing assist" modes.
From a feature standpoint, the Coolpix 4800 is hybrid of the Coolpix 4200 and 5200 announced earlier in 2004 and the 3200 announced in 2003, with all automatic controls and a surprisingly compact form factor for a long-zoom camera. Apart from the 4800's slightly larger and more elongated profile, the biggest outward change from the 4200 to the 4800 is the new model's lens, an 8.3x zoom with an equivalent focal length range from 36 to 300mm. Internally, the feature set has been trimmed slightly from that of the 4200/5200, with fewer creative controls and focusing/metering modes. The 4800 does boast the same rich set of "scene" modes offered in the 4200/5200 though. Nikon was an early leader in the popularization of scene modes, preprogrammed camera setups that make it easier for average consumers to bring back great-looking photos from what would otherwise be challenging situations. Starting with the Coolpix 3200, they also added "framing assist" modes, that overlay framing guides in the shape of people, mountains or an alignment grid on the LCD monitor, making it easy to frame your subjects to best align with the camera's exposure and focusing systems. The net result is that consumers have a nearly foolproof system for capturing great pictures in just about any situation--so long as they take the time to learn about these modes.
Based on our tests, the new Coolpix 4800 looks to be a very worthy addition to Nikon's consumer lineup, with bright, vibrant color and a better-than-average lens. If you're looking for a long-zoom digicam that's easy to use, read on for all the details!
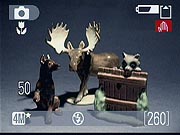
The Coolpix 4800 features both an electronic viewfinder ("EVF") and a 1.8-inch color LCD monitor. Both viewfinder screens provide nearly 100% framing accuracy, but the lack of a purely optical viewfinder means that the switching to the eyelevel viewfinder will save little if any battery power. The camera's 8.3x, 6-50mm zoom lens (equivalent to a 36-300mm lens on a 35mm camera, a moderate wide angle to fairly long telephoto) offers maximum apertures from f/2.7 to f/4.4, depending on the zoom setting, and is made up of eleven elements in nine groups. The camera uses contrast-detection autofocus in normal mode, which ranges from 16 inches (40 centimeters) to infinity. Multi-point AF automatically chooses among five autofocus points to find the nearest object, with the chosen focusing point highlighted on the viewfinder screen. Users can also choose select the AF point manually, choosing from among the five available AF points clustered near the center of the frame. In Macro mode, the camera focuses as close as 0.4 inches (1 centimeter), and automatically switches to continuous AF mode, focusing constantly when the Shutter button is not half-pressed. (Note that closest focusing is possible only when the lens is set to a fairly narrow range of focal lengths towards the wide-angle end of its range. The zoom indicator that appears at the top of the LCD when zooming and the "tulip" macro icon both turn green when the zoom is set within the optimal range in Macro mode.) Turning on the camera triggers the shutter-like lens cover to open, and the lens to extend forward anywhere from 3/8 to 1 inch, depending on the zoom position. In addition to its 8.3x optical zoom, the Coolpix 5200 offers a maximum 4x digital zoom, which lets you "zoom" in even closer (equivalent to a 1200mm lens on 35mm camera). As always though, keep in mind that the digital zoom simply enlarges the center pixels of the CCD, resulting in lower image quality. The 4.0-megapixel CCD produces high-resolution images, good enough for printing to 11x14 inches with good detail, as well as lower-resolution images for sending via email or printing as 4x6-inch snapshots.
 In keeping with the tradition
of the entry-level Coolpix line, the Coolpix 5200's exposure control is very
straightforward. Operating mainly under automatic control, the Coolpix 4800's
user interface is easy to learn. Most of the exposure options are controlled
through the multi-page LCD menu system, although a handful of external controls
access basic features. A Mode dial atop the camera's rear panel controls the
operating mode, with four preset modes (Portrait, Landscape, Sports, and Night
Portrait), and a Scene mode for selecting from among a range of 11 other specific
shooting situations, Auto setting, and Movie and Setup modes. The Framing Assist
modes are optional in Portrait, Landscape, Sports, and Night Portrait modes,
each offering a range of framing scenarios. For example, under Portrait mode,
you can set up the framing for a centered single subject, a single subject off
to the right or left, a close-up portrait, two subjects positioned side-by-side,
and a figure shot with the camera held in portrait (tall) rather than landscape
(wide) orientation. Once a specific setup is chosen, faint yellow subject outlines
(these used to be quite bold on earlier models) appear in the LCD monitor to
help you line up the shot for the best focus and exposure. (See the animated
screenshot above right, showing the framing options for portrait mode.) Sports
mode offers enhanced options for capturing fast-paced action, such as a rapid
fire mode that captures 16 tiny images in two seconds that form a single 4 x
4 image mosaic. The Scene position of the Mode dial provides access to 11 preset
"scenes," which optimize the camera for what would normally be more
difficult shooting situations. Available Scenes are Party/Indoor, Beach/Snow,
Sunset, Dusk/Dawn, Night Landscape, Close-Up, Museum, Fireworks Show, Copy,
and Back Light. Beginning with the 3200, Nikon added a Panorama Assist mode
which has carried over to the 4800. This includes a "ghosted" translucent
overlay of the last image on the LCD screen, so you can more easily line them
subsequent shots for better off-camera stitching. Each scene mode sets multiple
camera options to configure it for the specific type of subject and shooting
condition chosen. These tools make the Coolpix 4800 extremely flexible in a
variety of conditions, providing almost worry-free operation.
In keeping with the tradition
of the entry-level Coolpix line, the Coolpix 5200's exposure control is very
straightforward. Operating mainly under automatic control, the Coolpix 4800's
user interface is easy to learn. Most of the exposure options are controlled
through the multi-page LCD menu system, although a handful of external controls
access basic features. A Mode dial atop the camera's rear panel controls the
operating mode, with four preset modes (Portrait, Landscape, Sports, and Night
Portrait), and a Scene mode for selecting from among a range of 11 other specific
shooting situations, Auto setting, and Movie and Setup modes. The Framing Assist
modes are optional in Portrait, Landscape, Sports, and Night Portrait modes,
each offering a range of framing scenarios. For example, under Portrait mode,
you can set up the framing for a centered single subject, a single subject off
to the right or left, a close-up portrait, two subjects positioned side-by-side,
and a figure shot with the camera held in portrait (tall) rather than landscape
(wide) orientation. Once a specific setup is chosen, faint yellow subject outlines
(these used to be quite bold on earlier models) appear in the LCD monitor to
help you line up the shot for the best focus and exposure. (See the animated
screenshot above right, showing the framing options for portrait mode.) Sports
mode offers enhanced options for capturing fast-paced action, such as a rapid
fire mode that captures 16 tiny images in two seconds that form a single 4 x
4 image mosaic. The Scene position of the Mode dial provides access to 11 preset
"scenes," which optimize the camera for what would normally be more
difficult shooting situations. Available Scenes are Party/Indoor, Beach/Snow,
Sunset, Dusk/Dawn, Night Landscape, Close-Up, Museum, Fireworks Show, Copy,
and Back Light. Beginning with the 3200, Nikon added a Panorama Assist mode
which has carried over to the 4800. This includes a "ghosted" translucent
overlay of the last image on the LCD screen, so you can more easily line them
subsequent shots for better off-camera stitching. Each scene mode sets multiple
camera options to configure it for the specific type of subject and shooting
condition chosen. These tools make the Coolpix 4800 extremely flexible in a
variety of conditions, providing almost worry-free operation.
Depending on the exposure mode, the Coolpix 4800 offers a wide range of exposure options. Though no mode allows the user to control the aperture or shutter speed directly, the exposure compensation adjustment can be set in any mode to deal with high contrast, dark or light subjects. (This is a nice touch. Exposure compensation is a pretty essential control, but it's disabled in the Scene modes of many digicams.) The Exposure Compensation adjustment optionally increases or decreases overall exposure from -2 to +2 exposure equivalents (EV) in one-third-step increments. They aren't reported on the LCD display, but the Coolpix 4800's shutter speeds range from 1/2,000 to four seconds. A White Balance adjustment offers five preset modes, an Auto setting, and a Custom setting for manually determining the color balance. The Coolpix 4800 uses a 256-Segment Matrix metering system to determine exposure, evaluating the contrast and brightness across the frame to determine the best exposure. In any of the Framing Assist modes, the emphasis of the exposure reading is placed on the AF area indicated by the framing guidelines. ISO light sensitivity is rated at 64 during normal shooting, but the Coolpix 4800 automatically raises it as high as 400 when conditions require it, or the user can manually select the ISO from the four available options of 50, 100, 200, and 400. (Note though, that the camera doesn't report its automatically chosen ISO value to the user while shooting.) You can also access Nikon's Best Shot Selector mode, which automatically chooses the least blurry image from a rapid series shot while the shutter remains pressed. (The Best Shot Selector feature is one of my all-time favorite digicam features, as it makes it possible to hand hold even very long exposures by playing the odds that during one of those moments you're going to be still enough to get a sharp image.) The Coolpix 4800's built-in flash is rated as effective to approximately 16 inches to 14.1 feet (0.4 - 4.3 meters) with the lens at its wide angle setting, or 3.3 - 8.6 feet (1.0 - 2.6 meters) with the lens zoomed all the way to telephoto. In my own testing, I found that there was indeed relatively little decrease in image brightness all the way out to the 14 foot limit of my test. The 4800's flash operates in Auto, Red-Eye Reduction, Anytime (Fill) Flash, Flash Cancel, and Slow Sync (night) modes. Slow Sync flash mode combines the flash with slower shutter speeds, letting more of the ambient light into the exposure, making for brighter, more natural-looking night shots. In some Assist and Scene modes, the flash mode is automatically set for you, but otherwise, flash mode is up to the user. Portrait Assist, for example, defaults to Red-Eye Reduction mode but can be overridden, while in Night Portrait Assist the default Red-Eye Reduction can not be overridden. Night Portrait Assist and the Scene modes Night Landscape and Dusk/Dawn also enable an automatic Noise Reduction feature to eliminate excess image noise resulting from the higher ISO sensitivity and longer exposure. Flash is also not available in Sports or Landscape modes. While this panoply of default flash modes and constrained options may sound complicated, the net result is that the camera's scene modes let average users bring back good-looking photos from tricky shooting conditions, while enjoying point & shoot simplicity.
Other camera features include a Self-Timer mode, which provides a 10-second delay between the time the Shutter button is pressed and when the image is actually captured. A Continuous Shooting mode captures a rapid series of images while the Shutter button is held down, with the actual number of images dependent on the size and quality settings, as well as the amount of memory card space. (The sequence length varies from about four images at the 4800's highest resolution and image quality setting, to over 70 images at the smallest image size and lowest quality.) The special 3-Shot buffer mode is designed to help you capture the action, even if the action is happening a little faster than your reflexes can catch up with. Just hold down the shutter as the action approaches, and release just after the action has occurred; the camera then saves the last three images in the buffer, recorded at just over one frame per second. There's also a Multi-Shot 16 mode, which captures 16 thumbnail images (400x300 pixels each) in sequence at a rate of about 2.1 frames/second, and arranges them in rows of four within a 1600x1200 image. The Coolpix 4800's Movie mode offers three options: TV Movie 640, (640 x 480, 15fps, 440 seconds max on 256MB card) Small size (320x240 pixels, 15fps, 880 seconds max on 256MB card), and Smaller size (160 x 120, 15fps, 3520 seconds max on 256MB card). Provided you're using a fast enough memory card, the actual length of recording time depends only on the amount of available SD card space (there is no arbitrary limit set by buffer capacity), and appears in the LCD monitor.
The Coolpix 4800 stores images on SD memory cards, but the standard retail package in the US includes no memory card. There is enough onboard memory, however, to hold up to six pictures at the maximum image size and quality setting. Files saved to internal memory can be easily copied to an SD card, and vice versa. Given the camera's beefy 2,288 x 1,712-pixel maximum image size, I'd recommend picking up at least a 128 - 256MB memory card so you don't miss any important shots. Images are saved in JPEG format, with three compression levels available for. A CD-ROM loaded with Picture Project software accompanies the camera, compatible with both Windows and Macintosh platforms (including Windows XP and Mac OS X). Nikon Picture Project provides organization and image editing tools for enhancing images. There's also an excellent tutorial video that walks users through all the information needed to get started with the 4800, very nice for beginning users. The camera comes with an EN-EL1 lithium-ion battery and a charger. While the Coolpix 4800 has excellent battery life, I as always recommend picking up a spare battery and keeping it freshly charged at all times, to avoid the dreaded dead battery syndrome. (Murphy's law applies in spades to digicam batteries - They invariably go dead when you can least afford it.) The optional AC adapter plugs into a connector on the camera's left side. This could be useful for offloading pictures after a long day of shooting, but really isn't necessary for the vast majority of users. Also included with the Coolpix 4800 is a video cable for connecting to a television set for slide shows, and a USB cable for downloading images to a computer.
Basic Features
- 4.0-megapixel (effective) CCD delivering image resolutions as high as 2,288 x 1,712 pixels.
- 1.8-inch color LCD display.
- Real-image optical viewfinder.
- 8.3x, 6-50mm zoom lens (equivalent to a 36-300mm lens on a 35mm camera).
- Maximum aperture f/2.7-f/4.4, depending on lens zoom position.
- Shutter speeds from 1/2,000 to four seconds.
- 4x Digital zoom.
- Automatic exposure control.
- Built-in flash with five modes.
- Built-in mic and speaker for including sound in videos and playback from the camera.
- SD memory card storage.
- Power supplied by lithium ion rechargeable battery, or optional AC adapter.
- Nikon Picture Project software for both Mac and Windows.
- Tutorial video.
Special Features
- ED Glass lens.
- 5 Multi-point AF, or user selectable AF point.
- QuickTime movies (with sound).
- Continuous Shooting, Multi-Shot, and Multi-Shot 16 mode.
- Eleven preset Scene modes, plus four Scene Assist modes.
- Internal memory stores 4 - 8 full-res images.
- Self-timer for delayed shutter release.
- Best Shot Selector mode.
- Camera shake warning.
- Macro (close-up) lens adjustment.
- White balance (color) adjustment with seven modes, including a manual setting.
- 256-Segment Matrix metering.
- ISO equivalent sensitivity range of 50 to 400.
- PictBridge compatibility.
- USB cable for quick connection to a computer.
- Video cable for connection to a television set.
Recommendation
As one of the smaller long-zoom digicams on the market, the Coolpix 4800 combines a fine Nikkor 8.3x ED glass optical zoom lens, a 4.0-megapixel CCD, and a range of automatic, preset shooting modes in a very consumer-friendly digicam. Automatic exposure control lets the camera take charge of all the picky details, although a handful of exposure options provides creative tools when you need them. With its diminutive dimensions, the Coolpix 4800 is great for travel, and the range of preset shooting and framing modes anticipates most common shooting conditions. The 2,288 x 1,712-pixel maximum resolution is high enough for making good-looking 11x14-inch photographic prints (or sharp 8x10 prints with some cropping), while the 640x480-pixel resolution setting is perfect for sending email attachments over the Internet. The uncomplicated user interface means you won't spend much time learning the camera. Perfect for novice users or anyone looking for a compact long-zoom point-and-shoot camera with a slick look, a few extra features, great ease of use, and sharp, colorful photos, the Coolpix 4800 could also serve as a great take-anywhere snapshot camera for more advanced shooters.
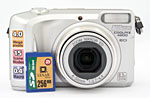 While larger than most other members of Nikon's consumer-oriented Coolpix lineup, the Coolpix 4800 will be an easy fit for most coat or pants pockets. Though the camera body has a few protrusions, they're for the most part small enough to avoid catching on pockets, especially when combined with the smooth contours that define the camera. The design of the Coolpix 4800 is also such that it should fit a range of hand sizes fairly well: I had no trouble holding it with my rather large hands, but at the same time, even a person with fairly small hands should be able to grasp it easily. The Coolpix 4800's duotone silvery metal body is modern and chic. High quality Nikkor optics and a 4.0-megapixel CCD give the Coolpix 4800 great image quality, and a broad selection of Scene Assist modes makes operation a breeze, even for novice users. The Coolpix 4800 measures 4.17 x 2.60 x 2.13 inches (106 x 66 x 54 millimeters), and weighs 10.6 ounces (300 grams) without battery and memory card. The photo inset above right shows the 4800 posed with an SD memory card, to give you a sense of the camera's overall size.
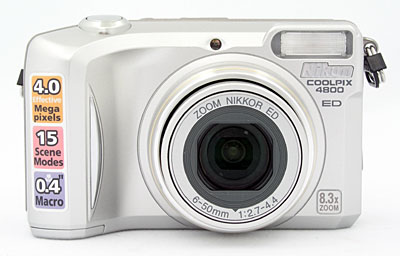
The camera's front panel contains the 8.3x zoom lens, built-in flash, optical viewfinder window, and the self-timer lamp. The self-timer lamp also serves as a relatively bright AF (autofocus) assist illuminator. A shutter-like lens cover protects the lens when not in use, and automatically slides out of the way when the camera is powered on (eliminating the hassle of keeping track of a lens cap). When powered on, the lens telescopes out anywhere from 3/8 to 1 inch to its operating position, depending on the zoom setting. A curved, sculpted ridge beneath the Shutter button acts as a finger grip, and comfortably aligns your fingers as they wrap around the camera.
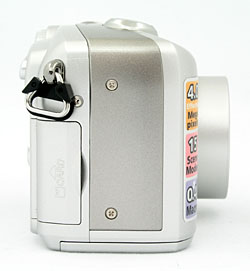
On the right side of the camera is the Secure Digital (SD) memory card compartment and an eyelet for attaching the neck strap. The SD card compartment door flips open toward the back of the camera to reveal the SD card, leaving plenty of room to grasp the card. The card releases with an inward press.

On the opposite side of the camera is the connector compartment, protected by a rubbery cover that remains attached to the camera. Inside is the Video Out / USB jack and a socket for the optional external AC power adapter.

The Shutter button, power button, speaker and microphone grilles, and power LED are on the top panel. The edge of the rear-mounted Mode dial is visible at the back of the top panel.
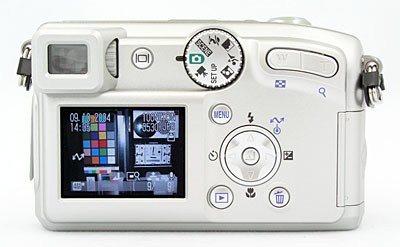
The remaining external controls are all located on the camera's rear panel, along with the 1.8-inch, TFT color LCD monitor and electronic viewfinder eyepiece. A small button just to the right of the eyepiece lets you select between the two displays, and a small ridged knob on the eyepiece housing itself controls a dioptric adjustment for eyeglass wearers. (The viewfinder on the Coolpix 4800 also has a fairly high eyepoint, making it easy for eyeglass wearers to see the entire frame, without having to press their lenses up against the camera body.) At the top of the rear panel is a rotating Mode dial, used to select the camera's primary operating mode. A two-way zoom rocker button in the top right corner controls optical and digital zoom, as well as some Playback viewing options. In the middle right of the back panel is a five-way nav disk, which accesses Flash, Macro, and Self-Timer, and exposure compensation options, in addition to navigating menu screens. The nav disk has a separate button in the middle for accepting selections, a solution that is easier than trying to press in the entire disk as we've seen in other cameras. This button can also be pressed to initiate picture transfer when the camera is connected to a computer that has the Nikon software loaded onto it. Arrayed around the five-way nav control are the Delete, Menu, and Playback buttons.

The Coolpix 4800 has a flat bottom panel, with slightly rounded edges that curve up toward the rest of the camera. The battery compartment door and plastic tripod mount line up side-by-side, making quick battery changes while mounted to a tripod impossible. This won't likely be a problem for most Coolpix 4800 users, though, given the point-and-shoot orientation of the camera. A hinged, plastic door covers the battery compartment, releasing with a slide to the side. Be careful opening the battery compartment though, as there's no retention latch to hold the battery in, once the compartment door is opened. (If you aren't careful, it'd be easy for the battery to fall out when you open the compartment.)
Despite the Coolpix 4800's limited exposure control, the camera offers a nice selection of external control buttons, making for an easy-to-navigate user interface. Flash mode, Self-Timer mode, Macro mode, zoom, record mode, and an Erase function are all accessible via external controls. The Mode dial atop the rear panel selects the main operating mode, and a multi-directional Arrow pad on the back panel navigates through on-screen menus, in addition to accessing camera features directly. The LCD menu system is fairly short, with user-friendly icons in the Scene Assist modes. Operating this camera is so straightforward I doubt you'll need the manual for much more than reference. It shouldn't take more than a few minutes to be able to shoot basic photos with it, but there are a lot of options to familiarize yourself with.
 Record
Mode LCD Display: In Record mode, the Coolpix 4800's LCD reports limited
status information, including camera modes, the resolution/quality setting,
number of available images, etc. Half-pressing the Shutter button displays a
green circle when focus is achieved, as well as red brackets indicating which
focus point has been selected in autofocus auto-area mode (if focus is not achieved,
both the dot shows red, and the brackets don't appear). In Manual AF Area Mode,
you can use the five-way navigator to select which of the five possible AF areas
you want the camera to use. The camera doesn't show aperture or shutter speed
information as some do. It does tell you when it thinks the image might become
blurred by camera shake when it's forced to use a slow shutter speed, by showing
a red "shaking hand" icon on the LCD display. The 3200 had a blur
warning when the camera detected a lack of sharpness in a captured image, but
that was omitted on the 5200, and is not included on the 4800 as well. The display
mode can be changed from the Setup Menu, letting you choose between a viewfinder
display of the subject by itself, with overlaid status information, or with
an overlaid grid as an aid to orienting the camera to your subject.
Record
Mode LCD Display: In Record mode, the Coolpix 4800's LCD reports limited
status information, including camera modes, the resolution/quality setting,
number of available images, etc. Half-pressing the Shutter button displays a
green circle when focus is achieved, as well as red brackets indicating which
focus point has been selected in autofocus auto-area mode (if focus is not achieved,
both the dot shows red, and the brackets don't appear). In Manual AF Area Mode,
you can use the five-way navigator to select which of the five possible AF areas
you want the camera to use. The camera doesn't show aperture or shutter speed
information as some do. It does tell you when it thinks the image might become
blurred by camera shake when it's forced to use a slow shutter speed, by showing
a red "shaking hand" icon on the LCD display. The 3200 had a blur
warning when the camera detected a lack of sharpness in a captured image, but
that was omitted on the 5200, and is not included on the 4800 as well. The display
mode can be changed from the Setup Menu, letting you choose between a viewfinder
display of the subject by itself, with overlaid status information, or with
an overlaid grid as an aid to orienting the camera to your subject.
 Playback
Mode LCD Display: In Playback mode, the LCD reports the image series
number, resolution/quality setting, file name and folder it's stored in on the
memory card, and the date and time of image capture. It also displays an icon
if the image is one that's been selected for quick download with Nikon's host
software, as well as an icon indicating that you can record an audio note to
accompany the image. Pressing the "Display" button (that switches
between the LCD and EVF in record mode) toggles the information overlay on and
off. Pressing the center button of the multi-directional controller on the camera's
back toggles between normal playback-mode display and a 3x-zoomed view, and
the zoom lever can be used to zoom in or out from there. Pressing the zoom lever
toward the wide-angle end zooms out to a 4-image thumbnail view of photos stored
on the card. Pressing it in the wide-angle direction a second time shows a 9-image
thumbnail display. Pressing the zoom control in the telephoto direction zooms
in as much as 10x on the subject, handy for checking image details and focus.
An interesting feature is that, any time you're zoomed in on an image in playback
mode, pressing the shutter button gives you the option of saving the zoomed
view as a separate image file on the memory card or internal memory. The animated
image above right shows the various playback-mode displays.
Playback
Mode LCD Display: In Playback mode, the LCD reports the image series
number, resolution/quality setting, file name and folder it's stored in on the
memory card, and the date and time of image capture. It also displays an icon
if the image is one that's been selected for quick download with Nikon's host
software, as well as an icon indicating that you can record an audio note to
accompany the image. Pressing the "Display" button (that switches
between the LCD and EVF in record mode) toggles the information overlay on and
off. Pressing the center button of the multi-directional controller on the camera's
back toggles between normal playback-mode display and a 3x-zoomed view, and
the zoom lever can be used to zoom in or out from there. Pressing the zoom lever
toward the wide-angle end zooms out to a 4-image thumbnail view of photos stored
on the card. Pressing it in the wide-angle direction a second time shows a 9-image
thumbnail display. Pressing the zoom control in the telephoto direction zooms
in as much as 10x on the subject, handy for checking image details and focus.
An interesting feature is that, any time you're zoomed in on an image in playback
mode, pressing the shutter button gives you the option of saving the zoomed
view as a separate image file on the memory card or internal memory. The animated
image above right shows the various playback-mode displays.
External Controls

Shutter Button: Just to the right of the power switch, the Shutter button angles forward slightly, in excellent position for your finger to come over the right panel and rest just perfectly. This button sets the camera's exposure when halfway pressed, and releases the shutter when fully pressed.
![]()
Power Switch: Nestled in a small recess to the right of the power LED, the power switch turns the camera on and off with a push.

Mode Dial: Readily activated with a thumb at the top of the rear panel (although more easily operated with their left hand, for people with small hands), this ribbed dial selects the camera's main operating mode. Choices are Setup, Movie, Auto, Scene, Portrait, Landscape, Sports, and Night Portrait.
Zoom (W and T) Rocker Button: Located in the top right corner of the
camera's back panel, this two-way rocker button controls the optical and digital
zoom (when enabled) in any record mode. In Playback mode, the "W"
button activates the index image display mode, while the "T" button
controls digital enlargement of the captured image.
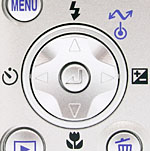
Multi-Directional 5-way navigator (Flash, Self-Timer, Exposure Compensation, and Macro Buttons): Just to the right of the LCD, this button features four arrows, one pointing in each direction. In any Settings menu, the arrow keys navigate through menu selections, and the center button selects.
In Playback mode, the right and left arrows scroll through captured images, while the central button toggles between the normal size and a 3x zoomed view.
In Record mode, the arrow keys control specific exposure features. The up arrow controls the camera's flash mode, producing a popup menu of options (Auto, Red-Eye Reduction, Anytime (fill) Flash, Slow Sync, and Flash Cancel). The left arrow activates the camera's Self-Timer mode, and the right arrow activates exposure compensation control, while the bottom arrow activates the Macro focus mode. All of these settings are confirmed by pressing the central button once the selection has been made.
When connected to a computer with Nikon's software loaded, pressing the center button triggers a "one touch" upload of selected images to the computer.

Playback Button: Just off the bottom right corner of the LCD, this button accesses the camera's Playback mode.

Menu Button: Adjacent to the LCD's upper right corner, this button displays the settings menu in any camera mode. It also dismisses the menu display.

Erase Button: Below and to the right of the 5-way controller, this button pulls up the Erase menu while in either Playback or Record mode.
Camera Modes and Menus
Auto Record Mode: Activated by turning the Mode dial to the Auto position (green camera icon), this mode places the camera in control of both aperture and shutter speed, as well as most other exposure features. Pressing the Menu button displays a limited Shooting menu.
 Image
Size and Quality: Sets the image resolution and compression level.
Choices are 4M High (2,288 x 1,712), 4M Normal (2,288 x 1,712), 2M Normal
(1,600 x 1,200 pixels), PC screen (1,024 x 768 pixels), and TV screen (640
x 480 pixels). (Secondary Screens)
Image
Size and Quality: Sets the image resolution and compression level.
Choices are 4M High (2,288 x 1,712), 4M Normal (2,288 x 1,712), 2M Normal
(1,600 x 1,200 pixels), PC screen (1,024 x 768 pixels), and TV screen (640
x 480 pixels). (Secondary Screens)
- White Balance: Chooses from Auto White Balance, PRE for custom presetting of white balance, Daylight, Incandescent, Fluorescent, Cloudy, Speedlight.
- Continuous: Chooses from Single, Continuous, Multi-Shot 16, and 3-shot Buffer (when button is held down, saves last three shots in buffer to better catch action) capture modes.
- BSS: In Best Shot Selector mode, the camera shoots 5 shots and picks the one with the least blurring due to camera shake. Flash is automatically turned off in this mode, since it is intended for capture of natural light photos in low light. Options are on, off, or Exposure BSS. Exposure BSS brackets the exposure, and three options let you decide how you want the camera to automatically determine the best exposure. Highlight BSS causes the camera to select the exposure with the least overexposure in the highlights, Shadow BSS selects the image with the least underexposure, and Histogram BSS balances under- and overexposure to select the image with the best exposure overall.
- Sensitivity: Selects Auto ISO or sets the camera to 50, 100, 200, or 400 ISO equivalents.
- Image Adjustment: Sets contrast to Auto, Normal, More, or Less values.
- Image Sharpening: Sets the in-camera sharpening to Auto, High, Normal, Low, or Off.
- AF Area Mode: Sets Auto (5-point AF), Manual (user selects one of the five focus points), or Off (defaults to center AF point).
- Color Options: Selects Standard, Vivid, Black-and-white, Sepia (brown-tinted monochrome), or Cyanotype (blue-tinted monochrome) color.
 Movie
Mode: This mode is denoted by a movie camera icon on the Mode dial. Movie
mode captures moving images at 15 frames per second for as long as the memory
card has available space. Pressing the Menu button calls up a menu with sub-menus
for resolution and autofocus operation. Resolution options include TV movie
(640 x 480 pixels), Small size (320 x 240 pixels), and Smaller size (160 x 120).
Autofocus options include continuous or single autofocus.
Movie
Mode: This mode is denoted by a movie camera icon on the Mode dial. Movie
mode captures moving images at 15 frames per second for as long as the memory
card has available space. Pressing the Menu button calls up a menu with sub-menus
for resolution and autofocus operation. Resolution options include TV movie
(640 x 480 pixels), Small size (320 x 240 pixels), and Smaller size (160 x 120).
Autofocus options include continuous or single autofocus.
Scene Exposure Mode: The word "Scene" indicates this mode on the Mode dial. Eleven preset scene modes are available, by pressing the Menu button:
 Party/Indoor:
Use to capture background details in situations that require flash. Also good
for preserving the look of candlelight or other indoor lighting.
Party/Indoor:
Use to capture background details in situations that require flash. Also good
for preserving the look of candlelight or other indoor lighting.
- Beach/Snow: Boosts the exposure to compensate for subjects that are very bright overall.
- Sunset: Preserves the deep colors of sunsets and sunrises. (Likely sets white balance to "daylight" rather than auto, and dials in some negative exposure compensation to get a good exposure on the sky.)
- Dusk/Dawn: Preserves the colors seen in weak natural light seen before dawn or after sunset. The flash is disabled, noise reduction is automatically enabled at slow shutter speeds, and the autofocus-assist illuminator is disabled, even in dim lighting.
- Night Landscape: Combines longer exposures with the "Landscape" mode. Focus is fixed at infinity, and the flash is disabled in this mode. Noise reduction is enabled for long exposures, and the autofocus-assist illuminator is disabled, even in dim lighting.
- Close Up: Adjusts the lens for close-focusing on small objects, apparently also increases color saturation slightly. Autofocus operates continuously until you half-press the shutter button, helpful in focusing on very close subjects. AF-area mode is set to "manual", so you can select what part of the frame you want to focus on by pressing the center button of the multi-controller and moving the focus cursor around the image with the arrow keys. Press the center button again to save the new AF area selection.
- Museum: Enables longer exposure times and higher sensitivity, for indoor situations where you can't use flash. Automatically turns on the Best Shot Selector to help get a sharp image. The autofocus-assist illuminator is disabled, even in dim lighting.
- Fireworks Show: Sets a long exposure and small aperture so you can catch the colored trails of fireworks. Exposure compensation is disabled, and the autofocus-assist illuminator is disabled, even in dim lighting.
- Copy: Sets the color mode to black and white, boosts contrast, and adjusts exposure to produce sharp images of black text (or line drawings) on white backgrounds.
- Backlight: For difficult lighting conditions, when the main light is behind your subject, casting their features into shadow. The flash is set to fire even in bright conditions, to throw light onto the shadowed subject.
- Panorama Assist: Lets you capture a series of images to be stitched together later on a computer as one panoramic image. Flash, macro, and zoom setting are all fixed at their values for the first shot in the series. Likewise, exposure and white balance values are determined by the first shot in the series, to help avoid visible boundaries between the component images in the final panorama, after they've been stitched together.
- Image Mode: Lets you select the image size and quality to shoot at.
 Portrait
Assist Mode: Labeled on the Mode dial with a woman in a hat, this mode is
best for portraits, and is the first of the camera's Framing Assist modes. In
Portrait mode, the camera uses a larger aperture setting to decrease the depth
of field, producing a sharply focused subject in front of a slightly blurred
background. Pressing the Menu button calls up the Scene Assistance menu, which
lets you choose from a range of portrait setups, including basic Portrait, Portrait
Left, Portrait Right, Portrait Close-up, Portrait Couple, and Portrait Figure.
In each of these modes (except basic Portrait), an outline appears on the LCD
display to help you align the subject.
Portrait
Assist Mode: Labeled on the Mode dial with a woman in a hat, this mode is
best for portraits, and is the first of the camera's Framing Assist modes. In
Portrait mode, the camera uses a larger aperture setting to decrease the depth
of field, producing a sharply focused subject in front of a slightly blurred
background. Pressing the Menu button calls up the Scene Assistance menu, which
lets you choose from a range of portrait setups, including basic Portrait, Portrait
Left, Portrait Right, Portrait Close-up, Portrait Couple, and Portrait Figure.
In each of these modes (except basic Portrait), an outline appears on the LCD
display to help you align the subject.
 Landscape
Assist Mode: A mountain scene distinguishes Landscape mode on the Mode
dial. Here, the camera employs a smaller aperture setting to produce sharp detail
in both foreground and background objects. As with Portrait mode, the Scene
Assistance menu offers a handful of options (accessed as in Portrait mode).
Framing options are Landscape (no guidelines), Scenic View (mountain outline),
Architecture (grid), Group Right (outlines of people with lines for buildings
in the background), and Group Left (also outlines of people with building and
horizon lines).
Landscape
Assist Mode: A mountain scene distinguishes Landscape mode on the Mode
dial. Here, the camera employs a smaller aperture setting to produce sharp detail
in both foreground and background objects. As with Portrait mode, the Scene
Assistance menu offers a handful of options (accessed as in Portrait mode).
Framing options are Landscape (no guidelines), Scenic View (mountain outline),
Architecture (grid), Group Right (outlines of people with lines for buildings
in the background), and Group Left (also outlines of people with building and
horizon lines).
 Sports
Assist Mode: A figure in action is the icon for Sports mode, which
uses faster shutter speeds to freeze action. The Menu button accesses the Scene
Assistance menu, with options for Sports, Sport Spectator, and Sport Composite
modes. Sport Spectator enables the user to instantly press down on the Shutter
button without pausing halfway to focus, and works best with unpredictable subjects
within a range of 9.8 feet (3.0 meters). Sport Composite mode takes 16 images
in two seconds, each time the Shutter button is pressed, and arranges them in
a four-by-four array, much like Multi-Shot 16 mode.
Sports
Assist Mode: A figure in action is the icon for Sports mode, which
uses faster shutter speeds to freeze action. The Menu button accesses the Scene
Assistance menu, with options for Sports, Sport Spectator, and Sport Composite
modes. Sport Spectator enables the user to instantly press down on the Shutter
button without pausing halfway to focus, and works best with unpredictable subjects
within a range of 9.8 feet (3.0 meters). Sport Composite mode takes 16 images
in two seconds, each time the Shutter button is pressed, and arranges them in
a four-by-four array, much like Multi-Shot 16 mode.
 Night
Portrait Assist Mode: Indicated by an icon of a person in front of a star,
this mode is for twilight and dusk portraits. The flash is automatically set
to Auto Red-Eye Reduction mode, and syncs to the slower shutter speed, which
allows more ambient light in to balance color and shadows. The camera's ISO
setting automatically adjusts as high as ISO 200, depending on the light level
(not reported on the LCD screen). And Noise Reduction is turned on. The Scene
Assistance menu offers the same framing outlines as in Portrait mode
Night
Portrait Assist Mode: Indicated by an icon of a person in front of a star,
this mode is for twilight and dusk portraits. The flash is automatically set
to Auto Red-Eye Reduction mode, and syncs to the slower shutter speed, which
allows more ambient light in to balance color and shadows. The camera's ISO
setting automatically adjusts as high as ISO 200, depending on the light level
(not reported on the LCD screen). And Noise Reduction is turned on. The Scene
Assistance menu offers the same framing outlines as in Portrait mode
Playback Mode: Pressing the Playback button on the camera's back panel instantly enters Playback mode. Here, you can review captured images and movies, erase, enlarge, copy, and protect images, and also set them up for printing. Pressing the Menu button offers the following options:
 Print
Set: Sets the DPOF settings for captured images. The "Print Selected"
option pulls up an index display, letting you mark individual images for printing.
Once images are marked, you can establish whether any text is overlaid on
the image (such as image information or the date and time). You can also cancel
print settings here with the "Delete Print Set" button.
Print
Set: Sets the DPOF settings for captured images. The "Print Selected"
option pulls up an index display, letting you mark individual images for printing.
Once images are marked, you can establish whether any text is overlaid on
the image (such as image information or the date and time). You can also cancel
print settings here with the "Delete Print Set" button.
- Slide Show: Automates a slide show of all still images on the memory card with three seconds between shots. You can also enable a looped playback that will play for 30 minutes before the camera goes into standby mode.
- Delete: Erases selected images from the memory card, or all images (except for write-protected ones).
- Protect: Write-protects individual images from accidental erasure or manipulation. An special display of the images on the card appears, with a three image filmstrip across the top and a larger image preview on the bottom, which you scroll through and select images to be "locked." Protected images are only deleted through card formatting.
- Auto Transfer: Marks all images or allows user to select specific images for auto transfer instantly when connected to a computer.
- Small Picture: Create a lower resolution version of an image with this tool, choosing from 640 x 480, 320 x 240, or 160 x 120. Great for pictures you know you'll want to email.
- Copy: Quickly copy images from internal to external memory or vise versa. Great for images you want to bring along or keep in memory for the startup screen.
- Sort by date: Sorts images on the memory card (or internal memory) into folders according to the date they were taken. A new folder is created for each day on which a photo was captured, and all photos shot that day are moved into that folder.
- Instant Index: Creates "Index Print" images, with up to 16 images arranged in a single 4M image file. You can either select specific images to be assembled into an index, or have the camera make index prints for all photos currently in memory.
Setup Mode: The following Setup menu automatically appears whenever the Mode dial is turned to the "Setup" position:
 Welcome
Screen: Chooses the welcome screen that appears at startup, either
none, static, or animated, or lets you designate a previously-shot image as
the welcome screen.
Welcome
Screen: Chooses the welcome screen that appears at startup, either
none, static, or animated, or lets you designate a previously-shot image as
the welcome screen.
- Date: Sets the camera's internal clock and calendar.
- Date imprint: Includes the date, or date and time as part of the image.
- Monitor Settings: Sets the monitor to Show info, Auto Info (displays info for 5 seconds), Hide info, Framing grid, or Off.
- Sound settings: Can turn on or off the button sound, shutter sound, and startup sound, as well as control the volume.
- Auto Off: Enables the Auto Off feature, which automatically shuts down the camera after a period of inactivity, to save battery life. Times are 30 seconds, or 1, 5, or 30 minutes. Sleep mode will put the camera in standby mode after 30 seconds regardless of auto off setting if no change in scene brightness occurs; a press on the power button returns to full readiness.
- Format card: Formats the SD card, erasing all files (even protected ones).
- Language: Changes the menu language to German, English, Spanish, French, Italian, Dutch, Swedish, Japanese, Chinese, or Korean.
- USB: Sets the USB protocol to Mass Storage or PTP. The PTP option is best for Windows XP and Mac OS X systems (unless you want to mount the camera on the desktop), while Mass Storage is best for older operating systems. Mass storage essentially makes the camera appear as a hard drive to the operating system when plugged in via the USB cable. PTP mode is also used when communicating with PictBridge-compatible printers.
- Video Mode: Sets the video output to NTSC or PAL timing.
- Reset All: Resets all camera settings to their defaults.
- Firmware version: Reports version number of firmware (the operating software) running on device.
See camera specifications here.
Cycle times, shutter lag, battery life, etc. can be found here.
In the Box
The Coolpix 4800 ships with the following items in the box:
- Coolpix 4800 digital camera.
- Wrist strap.
- Video cable.
- USB cable.
- Li-ion rechargeable battery EN-EL1.
- Battery charger MH-53.
- CD-ROM loaded with Nikon Picture Project software and drivers.
- Quick start video CD
- Instruction manual and registration kit.
- Larger capacity Secure Digital (SD) card (at least 128MB; 256MB preferred).
- AC Adapter.
- Small camera case for outdoor and in-bag protection.
Recommended Software: Rescue your Photos!
Just as important as an extra memory card is a tool to rescue your images when
one of your cards fails at some point in the future. I get a lot of email from
readers who've lost photos due to a corrupted memory card. Memory card corruption
can happen with any card type and any camera manufacturer, nobody's immune.
A surprising number of "lost" images can be recovered with an inexpensive,
easy to use piece of software though. Given the amount of email I've gotten
on the topic, I now include this paragraph in all my digicam reviews. The program
you need is called PhotoRescue, by DataRescue SA. Read our review
of it if you'd like, but download the program now, so you'll have it.
It doesn't cost a penny until you need it, and even then it's only $29, with
a money back guarantee. So download PhotoRescue
for Windows or PhotoRescue
for Mac while you're thinking of it. (While you're at it, download the
PDF manual and quickstart guide as well.) Stash the file in a safe place and
it'll be there when you need it. Trust me, needing this is not a matter of if,
but when... PhotoRescue is about the best and easiest tool for recovering
digital photos I've seen. (Disclosure: IR gets a small commission from sales
of the product, but I'd highly recommend the program even if we didn't.)
OK, now back to our regularly scheduled review...
See the full set of my sample pictures and
detailed analysis here.
The thumbnails below show a subset of my test images. Click on a thumbnail to
see the full-size photo.
 |
 |
 |
| |
|
|
|
|
|
|
| |
|
|
|
|
|
|
| |
|
|


Test Results
In keeping with my standard test policy, the comments given here summarize only my key findings. For a full commentary on each of the test images, see the Coolpix 4800's "pictures" page.
As with all Imaging Resource product tests, I encourage you to let your own eyes be the judge of how well the camera performed. Explore the images on the pictures page, to see how Coolpix 4800's images compare to other cameras you may be considering.
Not sure which camera to buy? Let your eyes be the ultimate judge! Visit our Comparometer(tm) to compare images from the Coolpix 4800 with those from other cameras you may be considering. The proof is in the pictures, so let your own eyes decide which you like best!
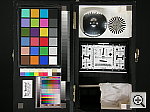
- Color: Very good to excellent color, moderate oversaturation. The Coolpix 4800 produced good color in the majority of my tests, although it has the typical consumer camera's bias toward moderate oversaturation. The Auto white balance setting tended toward a warmer cast in the studio, leading me to choose the Manual white balance setting more often than not. Outdoors, color balance was more neutral, and the camera also did better than average with the very warm-hued incandescent lighting of my Indoor Portrait test. Skin tones were generally ver tood, and the always-difficult blue flowers in the bouquet came out very well also. Color accuracy was good on the Davebox target, with moderate oversaturation in the additive primary (red, blue, and green) color blocks, but quite accurate color elsewhere.
- Exposure: Accurate exposure, but high default contrast. The contrast adjustment helps some. The Coolpix 4800 generally showed good exposure accuracy, requiring roughly average amounts of exposure compensation in my standardized test shots. Its default contrast was rather high though, causing it to lose details in strong highlights and deep shadows. Its contrast adjustment option helped with this somewhat, generally pulling in the highlight values a bit more than the shadows. Even with the contrast adjustment though, the camera had a little trouble with the deliberately awful lighting of my "Sunlit" Portrait test. Overall, I'd like to see the cameras default contrast a notch or so lower.
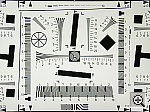
- Resolution/Sharpness: High resolution, 1,150-1,200 lines of "strong detail." The Coolpix 4800 performed well on the "laboratory" resolution test chart. It started showing artifacts in the test patterns at resolutions as low as 800 lines per picture height, in both horizontal and vertical directions. I found "strong detail" out to at least 1,200 lines horizontally, 1,150 vertically. "Extinction" of the target patterns didn't occur until about 1,400 lines. The "MTF 50" results from Imatest show average resolution of 1227 LW/PH uncorrected, or 1219 LW/PH with standard sharpening of radius 1 applied.
- Image Noise: Slightly higher than average image noise, but more restrained anti-noise processing. As we've moved to higher pixel counts on small CCD chips, image noise has increased. Many current cameras have cranked up their anti-noise processing to manage the increased noise coming from the sensor, but in the process throw away important subject detail in areas of subtle contrast. The Coolpix 4800 manages to walk a good middle ground on this issue, showing slightly higher than average image noise at low ISO settings, but giving up little if any subtle detail to achieve it. The noise takes a sudden jump at ISO 400 though, making that ISO setting useless, IMHO.
- Closeups: Typically excellent "Nikon macro" performance. Flash is blocked by the lens, however. Exceptional macro performance has almost become a Nikon trademark, so it's no surprise that the Coolpix 4800 performed well in the macro category, capturing a minimum area of only 1.01 x 0.76 inches (26 x 19 millimeters). Resolution was very high, and detail was excellent in the dollar bill. Details were fairly sharp, though softened quite a bit toward the corners of the frame. (Softness in the corners of the images is unfortunately an almost universal weakness of digicam macro modes.) The position of the Coolpix 4800's flash makes it difficult to light the subject evenly at the shortest shooting distances, so plan on using external illumination for your closest shots.
- Night Shots: About average low-light performance, with bright enough exposures for average city street lighting at night. Autofocus works to a light level about half as bright as city street lighting. The Coolpix 4800 produced bright, usable images only down to the 1/4 foot-candle (2.7 lux) light level, and those only at the 400 ISO setting. At ISO 200, images were bright as low as 1/2 foot-candle (5.5 lux), and at ISOs 50 and 100, images were bright only to one foot-candle (11 lux). (Average city street lighting at night is about equivalent to one foot-candle, so the 4800 should handle most city night scenes at ISO 100 and above just fine.) With the camera's Night Landscape mode, images were bright as low as 1/4 foot-candle, as the camera boosts the ISO to 300 and allows exposure times as long as 2 seconds in this mode. Color was pretty good, though a hint warm with the Auto white balance setting. Image noise was moderately low to moderate at the lower ISO settings, but increased to a higher level at ISO 400. The Coolpix 4800's autofocus system worked down to light levels a bit below 1/2 foot candle, so the camera is capable of capturing photos at light levels slightly darker than those that it can focus effectively in.
- Viewfinder Accuracy: Excellent accuracy from the electronic viewfinder. The Coolpix 4800's electronic "optical" viewfinder (EVF) is very accurate, showing 99+ percent frame accuracy at both wide angle and telephoto zoom settings. The LCD monitor is also very accurate, since it shows the same view, just on a larger screen. Given that I like LCD monitors to be as close to 100 percent accuracy as possible, the Coolpix 4800's LCD monitor is essentially perfect in this regard.
- Optical Distortion: Better than average lens quality: Average barrel distortion, higher than average pincushion though. Low chromatic aberration. Optical distortion on the Coolpix 4800 was about average at the wide-angle end, where I measured approximately 0.8 percent barrel distortion. The telephoto end fared only slightly better, as I measured approximately 0.6 percent pincushion distortion there. (Most digicams seem to have about 0.8 percent barrel distortion at wide angle. The 0.6 percent pincushion at telephoto is higher than average, but not unusual for cameras with long-ratio zoom lenses.) Chromatic aberration was very low, showing only about two or three pixels of very faint coloration on either side of the target lines. (This distortion is visible as a very slight colored fringe around the objects at the edges of the field of view on the resolution target.) Apart from the somewhat high pincushion distortion at telephoto, the Coolpix 4800's lens appears to be of very high quality.
- Shutter Lag and Cycle Time: Average shutter lag, leisurely cycle times. Shutter lag and particularly cycle time are two of the Coolpix 4800's weaker areas. With a range from 0.91 - 1.04 seconds, full-autofocus cycle time is in the average range, which actually isn't bad for a camera with a long-ratio zoom lens. (Long zooms tend to focus more slowly.) Prefocus lag is very slow though, at 0.34 seconds, and cycle times are on the slow side as well, at about 2.3 seconds per shot for up to four large/fine images before the camera has to wait for the memory card to catch up. Continuous mode performance is a little faster, at about 1.5 frames per second, although (like many digicams), the interval between the first and second shots is longer, about 0.83 second, vs 0.67 for subsequent ones). Overall, probably not a first choice for sports or other action shooting, despite its long-ratio lens.
- Battery Life: Excellent battery life. Because it uses a custom power connector, I couldn't conduct my usual detailed power consumption measurements on the Coolpix 4800. A simple run-down test with the camera in its worst-case power drain mode (capture mode, with the LCD turned on) gave run times of just under three hours though, excellent by any standards. I still recommend purchasing a second battery along with the Coolpix 4800, but honestly, its battery life is good enough that many users won't need the extra capacity.
Nikon's Coolpix line of consumer digicams has always been well-received, appreciated for their image quality and ease of use. Lately, they've been finding success in bringing their technology into the consumer market, most notably with the very successful Coolpix 4300 and Coolpix 3200 models in 2003. The Coolpix 4800 continues that trend, bringing forward many of the user-interface innovations of the 3200 model, but upgrading the design with a 4-megapixel CCD very sharp 8.3x optical zoom lens. In my testing, the Coolpix 4800 delivered good color and sharp images, and overall was an enjoyable camera to work with.Free Photo Lessons 
Simple pro lighting and use tips let you snap stunning photos. Check out our free Photo School area!Bottom line, the Coolpix 4800 is a nice, compact point & shoot digicam with a nice long zoom lens, a good choice for anyone who wants an easy to use camera that delivers good-looking pictures with pleasing color and plenty of resolution. For those willing to delve just slightly deeper than "just push the button" its extensive scene modes and unique framing-assist options greatly extend its capabilities, making it easy to bring back good-looking shots of what might otherwise be difficult subjects. All in all, a good choice for the point & shoot user looking for an easy to use long-zoom digicam with a surprising range of capabilities. In my testing, the Coolpix 4800's images showed accurate exposure and better than average color, but were a bit more contrasty than I personally prefer. Under average lighting, the high contrast makes the sort of bright, snappy-looking images that appeal to many consumers. Under harsh outdoor lighting though, the high contrast resulted in lost highlight detail and a harsher look to the images, making it worthwhile to acquaint yourself with the contrast-adjustment option on its record menu. Overall though, the Coolpix 4800 looks like an excellent long-zoom digicam, easily winning status as a "Dave's Pick" for its combination of color, sharpness, and capabilities.
Other Reviews
Steve's Digicams: Nikon Coolpix 4800 Review
Digital Photography Review: Nikon Coolpix 4800 Review - Resolution/Sharpness: High resolution, 1,150-1,200 lines of "strong detail." The Coolpix 4800 performed well on the "laboratory" resolution test chart. It started showing artifacts in the test patterns at resolutions as low as 800 lines per picture height, in both horizontal and vertical directions. I found "strong detail" out to at least 1,200 lines horizontally, 1,150 vertically. "Extinction" of the target patterns didn't occur until about 1,400 lines. The "MTF 50" results from Imatest show average resolution of 1227 LW/PH uncorrected, or 1219 LW/PH with standard sharpening of radius 1 applied.

Follow Imaging Resource: