The Great Battery Shootout!
by Dave Etchells
(This article no longer maintained)
For about three years, I conducted extensive tests of battery capacity of rechargeable AA NiMH batteries. This was always more of a hobby than anything, as it never helped pay the rent, and I had to steal time away from camera review writing and editing to do it. Over time, as much as I enjoyed the battery testing, it was harder and harder to justify the time it took, and as time went on, more and more cameras used proprietary LiIon batteries, so interest in battery performance waned. Bottom line, I stopped testing batteries and maintaining this page back in 2005. :-(
While the battery test results are dated, the notes about my test setup and controlling test variables are as valid as when I first wrote them, and should be of use to anyone wanting to conduct battery testing of their own. Enjoy, and good luck on your own battery-testing endeavours!
The Short of It
This is one of the more technical articles on the site, and almost all readers will be interested in "which batteries are best". For those readers, here's the bottom line, the results of over two years of off-and-on battery testing:
- After testing a number of the newer 2300 mAh-labeled cells, the Energizer 2300s are the current leaders for total power, although the Powerex 2300s run a close second, with only 2% lower capacity. Now that I've revived my battery testing program, I have a number of other cells in-house and currently undergoing test, and hope to post another update in a month or so, with results from cells with labeled capacities as high as 2500 mAh. (I have to admit that I'm more than a little skeptical about some of these, we'll see how they hold up through multiple charge/discharge cycles.)
- I still haven't gotten around to the extensive charger test I've been wanting to do for so long, the time pressure from more mainline projects has just been too great. (I'm getting a little tired of saying this every time I do an update to the battery shootout page, but the battery/charger testing is unfortunately little more than an unfunded hobby that I have to squeeze in around my primary work of camera/scanner testing.) I did manage to look fairly closely at the new Maha C-204W, with the result that it has become my favorite charger, displacing my longtime favorite the Maha C-204. The big advantage of the C-204W is that it uses a modified charging profile (Maha tells me that it's based on my own findings about the need to "top off" cells after a rapid charge cycle), that does the best job of any charger I've seen to date at cramming the last bit of charge into batteries left in it overnight. Overall, it still seems that chargers can charge fast, completely, and gently (low battery temperatures), but you can only pick two of the three characteristics. The C-204W gets around this limitation with a "topping off" cycle after the fast charge cycle has been completed, and has the added advantage of needing no "wall wart" power adapter. Another excellent charger seems to be the Lightning
Pack 4000N from RipVan100, which is more in the fast/gentle camp (although its overnight trickle charge does do a fairly good job of topping-off batteries).
- On the subject of chargers, I've put Rayovac's 15-minute charging technology to the test, with mixed results. The Rayovac 2000 mAh cells appear to be of very good quality, testing higher than many 2100 mAh units when put through the standard Imaging Resource charging protocol. And the 15-minute Rayovac charger does indeed complete its charging cycle in 15 minutes, without detonating the batteries. The only catch is that after a 15 minute charge cycle, the cells have only reached about 85% of their maximum capacity. (They do continue to drift up if left in the charger overnight, but the Rayovac charger never "tops them off" as completely as my DC trickle-charging protocol does. Bottom line, the Rayovac battery/charger combination seems like a good solution if you're in a real hurry, but if you can wait a little bit, a Maha C-204W and Energizer (or Powerex) 2300 mAh cells will give you a whole lot more bang for your buck, and much longer run times in your digicam.
There - I just saved you reading the rest of a long, boring article! ;-) The hard-core techies can read on for all the fascinating details though.
Latest Updates & Test Findings (1/10/2005):
- Apologies for the absurd delay again in this update. As always, I've been so swamped with camera (and scanner and printer) review work that I haven't had much time to spare for battery testing. - I've continued to do testing in the background of all my other work, but have only now finally found time to sit down to do all the data reduction and write these brief notes. The good news is that there's new or updated data on four more brands/capacity combinations, including several of the latest round of 2300 mAh cells.
- The test setup continues to do very well, with the soldered connections
and added clamps for the battery holders. I've also recently switched to a
metal-and-fiber battery holder design that is much more rugged than the previous
spring-steel-and-plastic unit. Accuracy doesn't seem to be impacted, but the
new holder is much more rugged, eliminating the hassle of replacing the test
socket every month or so. Run to run consistency continues to be better than
1% on virtually all runs.
- Nexcell does indeed appear to have fixed the cathode problem in their 1800
mAh cells, as my retest of these units showed none of the early failure syndrome
I observed previously. I saw some evidence of cathode limitations in their
2000 mAh cells, but not nearly as severe as with the previous 1800s.
- I've had to drop all attempts at a charger test protocol, at least for the
present, as I've barely had time to keep up the basic battery testing in the
face of ongoing digicam review overload. (The problem is that charger behavior
seems to vary a fair bit with the cells being charged. Completeness of charge
seems to be fairly consistent across multiple battery models, but temperature
profiles are all over the map. A charger that seems to overheat one brand/model
of battery does just fine on others. On the other hand, an otherwise well-behaved
charger will overheat one particular brand/model of cell. Some chargers do
seem to be "hotter" or "cooler" than others, but it's
tough to develop the level of objective quantification I like to see in my
reviews.)
- As alluded to earlier, one important, albeit somewhat informal finding at
this point: The Rayovac 1-hour charger does indeed seem to get the batteries
too hot. - I observed with several different sets of batteries from
various manufacturers that repeated charge cycles in the Rayovac resulted
in a noticeable and continuing decrease in maximum capacity. (Two sets of
cells even vented, a very unusual occurrence in my experience.) It's darn
fast, and charges the batteries pretty completely, but definitely seems to
have a negative impact on battery life.
- Reader Mark Roberts (owner of Harbortronics.com,
maker of *really neat* time-lapse/remote release gadgets for Nikon Digicams)
came up with a brilliantly simple idea for testing the batteries under true
constant-power loading conditions. In a fit of generosity, he bought and donated
a pair of DC-DC converter to the cause so I can try some tests under conditions
more precisely similar to typical digicam operation. (Given the need to test
a number of battery types under a range of loads, this extension of the testing
is going to be a longer-term project.) I got a circuit based on these about
90% wired some while ago, before life and camera reviews caught up with me,
and the project got shelved. No progress on this front since the last update,
I've just been too swamped trying to keep up with the rest of the site. (That
tells you about the complete absence of "leisure time" in my life
for the last year or so, as this sort of thing is what I like do for relaxation.
;-)
- I've started doing a little battery life-cycle testing in "deep background"
mode. (It takes a *lot* of cycles, and hence a looong time.) I've got a bank
of five Maha C204 chargers dedicated to this, basically just hitting the discharge
button whenever a set of batteries reaches full charge. Given the slow discharge
rate of these chargers, I can only eke out about 2 cycles every 24 hours.
The batteries under test will likely be obsolete before I get meaningful results,
but I do think I'm seeing some trends already. I'll try to post an update
here with some preliminary results by the end of this year. (If anyone out there would like to donate 20-30 channels of laboratory-grade battery analyzer, I'll be happy to write up my results with the product and give you a big PR plug. - Something like 30-40,000 rabid battery fanatics read this page every month.)
- A number of folks have asked for power data on Lithium AA cells. I have
a couple of sets of lithiums here, but (still) need to make a minor mod to
the test jig to test them. I'll stop saying I'm going to get to this "soon",
but at least haven't forgotten it entirely...
- A long sidebar on iPowerUS batteries: I don't want to be seen as aritrarily beating up on iPowerUS, but feel that I need to leave this paragraph in here, as I've gotten a lot of email in the past about their cells, and know that I will again if I take this out. - Also, my red-flagging of their cells in the test results below requires some explanation, so people will understand what it's about, and what the test conditions were that lead to my findings. Based on my test results, it's my opinion that the iPowerUS cells are poorly suited to digicam usage. They do initially deliver very high power capacity (when I first tested them, they showed the highest power capacity of any cells to date at that time, as much as 9.6 watt-hours), but a tradeoff seems to have been made in their construction that results in these cells being very delicate. - That is, while they deliver high capacity at the outset, they can very easily be "killed" by any of a number of means, including too-high current drain on an intermittent basis, relatively modest current drain on a continuous basis, or too-long trickle charging. My standard test setup subjects batteries to a continuous load of roughly 5 ohms, corresponding to the current drain of a rather high-drain digicam. This is the condition I test all cells under, and other NiMH cells tolerate it quite well, but it resulted in the iPowerUS 2100s losing capacity with every charge/discharge cycle. Through Thomas Distributing (the source of the cells I tested), I was told that iPowerUS had designed these cells"specifically for digicams," which apparently meant that they were designed to be used in an intermittent fashion. iPowerUS claims that these cells can tolerate high drain currents only in intermittent usage, but that they should have no problems with continuous drain under more intermittent usage. In practice, I found that the highest current drain that the iPowerUS cells could tolerate without damage was something on the order of 500 mAh or less. (A discharge rate of about 0.24C.) This is a good bit below the current demanded by many digicams operating in capture mode with their LCD turned on. While it may be customary for many digicam owners to use their cameras in an intermittent fashion, I don't think it makes sense to use batteries that can be damaged by occasional continuous usage. The iPowerUS 2100s could be a good choice for shooters having less power-hungry cameras, but these aren't the users who'll be most desirous really high-capacity batteries. I also observed that long-term trickle charging (25-50 mAh) was damaging to the iPowerUS cells. I dislike this, as it's my common practice to just leave a few sets of cells in low-rate trickle chargers all the time, as a way of keeping them "topped off." While this isn't a mandatory usage, not being able to keep a few sets of cells topped-off all the time makes battery management more of a chore to deal with. The problems with high current drain were so bad with these cells that I resorted to testing them at half load, really an unfair comparison to the rest of the batteries on the chart. Because these batteries showed such variable performance through their relatively short lives, I chose to put them fairly low on the chart, located at the point they'd reached at the end of my testing. (One final note - The best use of the iPowerUS 2100s might be to simply view them as "semi-disposable" batteries, simply accepting the fact that they're going to need to be replaced after a dozen or charge/discharge cycles, along with the fact that you can't trickle charge them for more than a day or so at a time. In that usage, they'd be a good bit more expensive than other NiMH cells, but still vastly cheaper than alkaline batteries. - And you'd get very high power capacity throughout their rather short lives.) (Final note - As a counter to my own observations, I have heard from several readers who report good results with the iPowerUS cells, so it's possible that they would indeed work fine in a camera, provided you're not operating it in a high power-drain mode for too long at a time.)
Introduction
Apart from the camera itself (and a big enough memory card), batteries are probably the most critical element in your entire digicam equipment kit. Choose the wrong batteries, and you can be left with a camera that's no more than an expensive paperweight, when that once-in-a-lifetime shot appears.
Some cameras come with custom-designed rechargeable LiIon battery packs in the box - If you own one of these, there's no issue of which brand and type of batteries to buy, just be sure to get an extra battery pack and keep it charged as a spare. A lot of digicams use conventional AA-size batteries though, which opens a whole Pandora's box of potential battery issues. (Let me go on the record right away though, that I generally like AA-equipped cameras, as it makes packing spare batteries a much more affordable proposition. - And you always want to pack along at least one extra set of batteries, even if your camera uses the whizziest high-tech LiIon packs.)
For the AA-equipped cameras, it's well established that standard alkaline batteries are almost completely worthless in most cases. (Although some recent models have admittedly gotten much more efficient in their battery usage.) Hopefully all my readers have been thoroughly indoctrinated in the need for high capacity NiMH rechargeable AA cells and a good charger. As we'll see though, there's quite a range of performance between brands and models of NiMH batteries. (And even more variation between chargers, but that's a subject for another review altogether.)
Given the importance of NiMH batteries to digicam operation, I resolved to test as many as I could get my hands on, to sort out battery performance once and for all. In typical Dave-fashion, I couldn't be content with anything simple or straightforward, and so built my own test system, with a microcontroller and A/D converter to collect all the relevant data. It turned out to be a good thing that I went to such extremes, as I discovered that less-involved test protocols would have yielded inaccurate results.
The result is what's surely the most comprehensive study of NiMH battery performance that's been published anywhere accessible to the general public. As new battery models appear on the market from time to time, I'll add to this article to incorporate their data as well.
The Results!
Even techies sometimes want to cut to the chase, so I'll give the ultimate results of my testing here at the outset. The table below shows the results for all the batteries I've tested thus far. The column to pay the most attention to is that showing Watt-Hours, a measure of the total energy delivered by the batteries. (See the discussion immediately below for an explanation of this.) The mAh column shows the actual milliamp-hours each battery model delivered under the particular test conditions I employed. Finally, the "Min" column shows the average runtime in minutes in my constant-load test setup. (As discussed below, it's interesting to note that neither mAh nor runtime at constant load correlate very precisely with total energy in Watt-hours)
So, without further ado, here's the result of my battery testing to date. (This
table now reflects the most up to date results for all batteries, based on the
improved test jig, which is delivering cycle to cycle consistency of 1% or better
in most cases.):
| Battery brand & rated capacity |
(4 cells) |
|
|
|
 |
Energizer 2300 |
10.49
|
2162
|
140.9
|
| Powerex 2300 |
10.24
|
2105
|
136.7
|
|
| Uniross 2300 |
10.01
|
2119
|
141.8
|
|
 |
Powerex 2200 |
9.79
|
2019
|
131.5
|
 |
Sanyo 2100 |
9.66
|
2013
|
131.8
|
| Rayovac 2000 (Standard IR charging protocol) |
9.57
|
1955
|
126.3
|
|
 |
Rayovac 2000 (15-30 minutes in Rayovac charger) |
8.12
(85% of max capacity) |
1650
|
104.6
|
 |
Uniross 2100 |
9.41
|
1867
|
124.0
|
 |
Powerex 2000 |
9.04
|
1856
|
120.5
|
 |
Nexcell 2100 |
9.00
|
1886
|
126.9
|
 |
Nexcell 2000 |
8.91
|
1861
|
122.8
|
 |
Sanyo 1850 |
8.89
|
1841
|
123.2
|
 |
Energizer 1850 |
8.88
|
1827
|
121.7
|
 |
GP 2000 |
8.86
|
1845
|
121.5
|
 |
Kodak 1850 |
8.84
|
1813
|
120.5
|
 |
Jetcell 1850 |
8.81
|
1815
|
121.0
|
|
GE/Sanyo 1850* |
8.79
|
1823
|
119.4
|
 |
Panasonic 1950 |
8.65
|
1822
|
121.3
|
 |
Quest 1800 |
8.56
|
1760
|
117.2
|
 |
Powerex 1800 |
8.46
|
1726
|
112.0
|
 |
Nexcell 1800 |
8.32
|
1737
|
114.5
|
 |
Lenmar 2000 |
8.28
|
1754
|
117.4
|
 |
Ansmann 1800 |
8.27
|
1714
|
115.0
|
 |
Duracell 1800 |
8.21
|
1707
|
112.0
|
 |
GP 1800 |
8.21
|
1690
|
112.6
|
 |
Sony 1750 |
8.17
|
1683
|
112.1
|
 |
LenMar 1800 |
8.14
|
1669
|
110.8
|
 |
Energizer 1700 |
8.01
|
1646
|
109.4
|
 |
Kodak 1700 |
8.01
|
1667
|
112.3
|
 |
Sanyo 1700 |
7.91
|
1643
|
109.8
|
| Olympus 1700 |
7.84
|
1631
|
107.3
|
|
| Powerex 1700 |
7.79
|
1618
|
109.0
|
|
 |
iPowerUS 2100** |
9.6-7.7
|
1970-1705
|
n/a
|
|
Sanyo 1600 |
7.67
|
1564
|
103.1
|
 |
Powerizer 1800 |
7.66
|
1555
|
102.1
|
 |
Kodak 1600 |
7.56
|
1569
|
105.4
|
 |
Digipower 1600 |
7.52
|
1540
|
101.9
|
 |
Radio Shack 1600 |
7.49
|
1537
|
102.0
|
 |
Powerex 1600 |
7.44
|
1527
|
101.3
|
| Rayovac 1600 |
7.31
|
1479
|
100.0
|
|
| Yuasa 1600 |
7.12
|
1465
|
97.6
|
|
 |
Panasonic 1600 |
7.10
|
1457
|
96.9
|
 |
GP 1600 |
6.83
|
1428
|
96.5
|
 |
Sunpak 1600 |
6.53
|
1330
|
87.4
|
| Panasonic (Alkaline cells) |
3.66
|
774
|
56.0
|
|
| Duracell Ultra (Alkaline cells) |
3.66
|
781
|
57.0
|
|
| Energizer (Alkaline cells) |
3.55
|
756
|
55.0
|
|
|
Footnotes:
* - These cells' numbers are based on testing of only a single set of 4. ** - See my comments earlier in the article about the iPowerUS 2100 cells. New batteries awaiting test: Delkin 2300s, CTA 2400s, AccuPower 2400s, Ansmann 2400s, Ansmann 2500s (!), Energizer 2500s (!), iPowerUS 2500s(!). (I'm a little skeptical about the 2500s, we'll see how they do. - I'm going to try to hold off reporting data on them until I have at least 10 charge/discharge cycles on each set, to see if they hold up to the high discharge currents reasonably well.) |
||||
Watt-hours vs mAh and Simple Run Times
(Warning, technical jargon ahead!)
Most of us are accustomed to seeing batteries rated in milliampere-hours (mAh), a measure of how much current they can provide over time. A rating of 1600 mAh means that the battery should theoretically be able to supply 1600 milliamps (mA) for one hour, or 160 milliamps for ten hours, etc. The best NiMH AA cells today carry ratings of 1700 to 1800 mAh.
It turns out though, that mAh is really only part of the story. What we really care about is how much total energy a battery can deliver. Energy is measured in Watt-hours, the product of voltage and current over time, or volts times amperes, measured over hours. (A milliamp is 1/1000 of an ampere.) To measure total energy, we need to measure the voltage and current moment by moment throughout the battery's discharge, multiply the two values together, and total up all the individual readings. This sounds like a lot of hassle, and it would be, were it not for automated data collection, and always-handy spreadsheet software.
Still, I'd hoped I would be able to avoid the tedium of explicitly calculating energy capacity for every test run. I expected that overall run times in my simple test setup (see below) would be a pretty good measure of total energy, saving me from the hassle of running all the data through a spreadsheet. I was quite surprised to discover that total run time was actually only an approximate indicator of energy capacity: When I ran the numbers, I discovered that some batteries that ran shorter periods of time actually delivered more energy than ones with shorter run times. Even more surprising, I found that even the measured mAh capacities of the batteries didn't correlate perfectly with total energy capacity.
This is pretty significant because it means that the usual battery-testing practice of just hooking a resistor across a battery pack and timing how long it takes the pack to run down won't give a very accurate representation of how well the batteries will do powering a digital camera.
Fortunately, because my little test system measured voltage (and thereby current) continuously throughout the discharge process, I could accurately compute total watt-hours with just a little spreadsheet work.
The point of all this is that run times with a resistive load and even actual mAh measurements don't tell the full story: Watt-Hours are the real McCoy.
Further Fallacies of mAh
There's a lot of gamesmanship with mAh ratings, but even the standard way of measuring mAh gives wildly optimistic values when compared to what the batteries actually deliver in typical digicam usage. The problem is that digicams gobble power in big gulps, while battery-testing standards measure power delivered in small sips. Batteries are much less efficient when driving heavy loads than light ones. Thus, even if a manufacturer tests and reports their batteries' capacities truthfully according to the accepted standard, the resulting numbers may have little to do with how well the batteries perform in real-world digicam usage.
Because of this load-dependent behavior, I set up my battery test system to run the batteries under loads closer to those seen in typical digicams. As a result, the mAh capacities I measured are generally quite a bit lower than the manufacturer's claims, but do give a much better idea of how the batteries will do when plugged into an average digicam.
 Test
Methodology (Nerdly Details)
Test
Methodology (Nerdly Details)

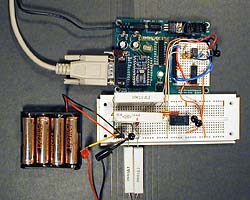
Obviously, I couldn't stand around for an hour or more at a time, watching each set of batteries run down, let alone make constant voltage/power measurements on them as they discharged. (Well, I could, but updates to anything else on the IR site would come to a standstill.) My solution was to cobble together a little MSD (Mad Scientist's Device) battery discharge tester, using a Basic Stamp microcontroller, a Linear Tech A/D chip, a relay to connect or disconnect the batteries from the load, a couple of big power resistors (to serve as the load itself), and a few other components. The whole mess is as appears at right.
Not beautiful (I'm a master of understatement), but it worked just fine for what I wanted.
Note, added 3/1/2002: Well, not quite "just fine" - Months into my testing, I discovered that one or more of the contacts on the breadboard socket had fatigued over time, with the result that the load resistance increased by a few tenths of an ohm. Worse, the resistance varied whenever I jiggled the load resistors. Argh! I soldered all the high-current connections, with the exception of those between the batteries and battery holder, and those I clamped to reduce resistance and improve consistency. The result was much less variation between runs, but also the need to retest all the batteries I'd previously run through the apparatus. Yeesh, what a pain. (A word to the wise for anyone else contemplating such testing: DON'T trust the contacts in these little breadboard sockets over time for anything requiring more than milliamps of current!)
I tested batteries in sets of four, as they're most commonly used in digicams. I used a total load resistance of about 5 ohms, providing peak discharge currents of a bit under an amp (1000 milliamps), equivalent to a fairly power-hungry digicam running with its LCD turned on in capture mode. This isn't an absolute worst-case test, but should be pretty representative of what batteries will encounter with real-world digicams (as opposed to the sort of gentle discharge curves used by manufacturers when setting the mAh ratings). For the techies out there, this is a discharge rate of about 0.6C for 1600 mAh cells, as compared to the 0.1C discharge rate used to determine the normal mAh rating of batteries.
The system starts up with the relay open, and no current flowing. I plug the batteries into the holder and press the reset button for the Basic Stamp, which starts the test program running. The program closes the relay, connecting the load resistor across the battery pack, and measures the battery voltage. When the voltage has been measured (to 12-bit accuracy, with a full-scale range of about 5.5 volts) the Basic Stamp goes to "sleep", waking up one minute later for the next reading. This cycle continues until the voltage from the battery pack drops below 4.0 volts, at which point the Stamp stops the test by opening the relay contacts again, disconnecting the load. (Update note, added 7/11/2002: The original test setup used the "sleep" function of the Basic Stamp to generate the delay between samples. This proved to be very temperature dependent, to the extent that minor changes in room temperature could affect the test accuracy. I subsequently added a little crystal oscillator and divider chain to the test setup, giving very accurate timing. All of the results shown here were collected using crystal-controlled timing, with the Stamp sampling the voltage every 30 seconds (instead of every minute) to further improve accuracy.)
The Stamp then goes into a wait loop, watching for keyboard input. I set the terminal program on my laptop (the "host" computer for the Stamp) to capture data to a disk file, and then type "go" on the keyboard, to tell the Stamp to play back all the data values it's collected.
After I've collected a batch of test results, I run them through an Excel spreadsheet that calculates the total energy delivered, actual mAh, etc. (This is one of the most tedious parts of the testing, as I haven't bothered to write a Visual Basic program to automate the data reduction.)
In the end, a lot of very interesting data spills out the other end of the process, with some lesser-rated batteries performing better than higher-rated ones, mAh not correlating well with total energy, and charging parameters making a huge difference in attainable battery capacity.
Controlling the Variables (or not)
I found out right away that it was easy for results to vary as much as 50% between runs, depending on the charger used, the charge time, and probably the phase of the moon. I settled on a protocol that involved charging the batteries for a minimum of 5 hours in the Maha C204 chargers (which brings them pretty nearly to full capacity), and then popping them in very low-rate trickle chargers for at least 10 hours more. (To be sure the batteries are fully "topped off," I now always let them sit in the trickle charger overnight or longer.)
This protocol seemed to reduce cycle-to-cycle performance variations to a minimum, although there were still individual runs that'd be as much as 7-10% off the best performance a pack could muster. I attributed the underperforming runs to incomplete charging, and so only accepted the runs that fell within a 3-5% window as being truly indicative of ultimate energy capacity. (The point of this testing was to determine the actual energy capacity of the batteries, not the effectiveness of a particular charging protocol.)
I'm pretty sure I could have come up with absolutely consistent results if I'd nailed down *all* the variables, but frankly I have too much else to do to justify spending the time doing that. The problem is that there's a huge range of possible variables. (time from discharge to subsequent recharge, charging duration, current profile during recharge cycle, temperature profile during recharge cycle, time between rapid charge termination (when the batteries were switched to the trickle-charge topping-off/maintenance current) and subsequent discharge testing, temperature during discharge, etc.) Trying to control for all of these parameters would be enormously time-consuming, and quite likely yield little more in the way of information, other than reducing the variations between test cycles. - I'm pretty confident that my approach of averaging the results of the best test runs for each set of batteries, and then averaging results for at least two different sets of each model of batteries gives a pretty good indication of ultimate performance. (Note: Run to run consistency improved quite a bit once I soldered the high-current connections, and clamped the batteries in their holder to reduce contact resistance I now routinely get repeatability of 1-2% from run to run with the same cells.)
The Importance of the Charger (!)
One of the most interesting things I found was that the right (or wrong) charger can make a difference of nearly 2x in the results! The worst chargers (in terms of completeness-of-charge) produced "charged" batteries with only half the stored energy of ones charged with the best chargers. Interestingly though, the best overall results were obtained by combining the worst fast-charger with an inexpensive trickle-charger for topping-of and charge maintenance. - This combination was also the gentlest on the batteries. (Stay tuned for a detailed overview of battery chargers as I can get to it. For now, you can just take as given that the Maha C204 charger was among the most consistent I tested, and charged the batteries to close to their maximum capacity every time. To insure that the batteries were *totally* topped-off, I always gave each set at least an overnight trickle charge as well though..) The Lightning 4000 charger sold by RipVan100 was also very good - It was more gentle during the charge cycle, but took longer to charge the cells than the C-204, and didn't charge them quite as fully as the 204, even if left overnight. The difference in charged capacity was rather slight though.)
Grains of Salt
For all the effort I've invested in testing batteries, my results still need to be taken with several grains of salt.
First, my purely resistive test load is a bit easier for batteries to handle than the constant-power loads that most digicams present. As batteries discharge in a digicam (and their terminal voltage drops), the camera draws proportionately more current from them. This is a bit harder on batteries than the sort of load I used in my testing. Thus, Your Mileage May Vary when comparing my results here with actual digicam usage. (Not by much though, I don't think.)
A second factor is that, as just noted above, battery performance is very dependent on the charger used. - Having the best batteries in the world won't do you a whit of good if you've got a lousy charger. To avoid seeing charger-dependent variation, I standardized on the most reliable high-performing combination I found, a Maha C204 followed by a long, low-rate trickle charge in a Maha 2A4, or a homebuilt trickle charger with similar characteristics. You may see very different performance than I measured here if you're using a charger that doesn't charge the batteries as completely as the C204/2A4 combination. (The C204 does a pretty good job by itself, without a subsequent trickle charge, about as good as any fast charger I've seen that doesn't burn the batteries up in the process.)
Finally, even with a consistent charging protocol, I still found a 3-5% variation between runs. (Note, this variation dropped to less than 1% after I soldered all the high-current connections and applied a clamp to the battery holder to reduce contact resistance.) Since the top-performing batteries are separated by less than one percent in their total-energy numbers, closely-ranked batteries should really be considered as equivalent to each other).
Conclusions - Battery Best Buys & Cautions
OK, so what's the bottom line? Well, the table near the top of this article shows all the pertinent data so I'll just comment briefly on the results here.
Energizer has edged the competition in this round, with their 2300 mAh cells, although longtime champion Powerex isn't too far behind with their own 2300 mAh offering. Now that I've cranked up the tester again though, I've got a number of even higher-rated cells currently under test. Stay tuned, I hope to have another update fairly soon. (At least, quicker than the year-plus this latest update took me to get around to!)
It continues to be the case that taking one step down in capacity may yield great economy: Depending on where you buy your batteries, you can often get more bang for the buck from lower-rated cells, which may sell for significantly lower prices. (Note too though, that there are some cheap brands of cells that just aren't worth it regardless. (IMHO) - Taking an example from the earlier days of this test, the Powerizer 1800s tested worse than Sanyo industrial 1600 cells from RipVan100.) Bottom line, battery cost isn't terribly relevant for digicam usage: Spending another $4-5 for a set of batteries for your $800 digital camera (or even your $200 one) makes sense if it'll net you an extra 5-7% in run time, charge after charge. - One missed picture would easily erase any benefit the cheaper batteries might have.
The final discovery came as no surprise at all: In digicam usage, even so-called "high capacity" disposable alkaline cells are pretty worthless. (Although a number of recent digital camera models do sip power pretty sparingly, at least compared to most older models.) You could easily spend the equivalent of a set of high-capacity NiMH rechargeables and good-quality charger in just a few weeks of use with disposable alkaline batteries.
Special Thanks: Thomas Distributing
In conclusion, a special note of thanks needs to go to Thomas Distributing, who generously provided most of the (literally hundreds of) batteries and chargers used in my testing. Thomas Distributing has about the widest range of power solutions for digital cameras I've seen anywhere on the web, and at some of the most competitive prices. If you have a digicam and need batteries (who doesn't?), you really owe it to yourself to pay them a visit, at http://www.thomasdistributing.com/!
For those interested, here's a link to the Powerex website, for more information on their NiMH batteries.